Normally, when using Photos on your Mac, you have a single Photos library that holds all of your photos. As your library grows over time, it can become hard to manage, and Photos can get slower due to the large number of photos in the library. PowerPhotos lets you instead divide your photo collection among multiple Photos libraries. This allows for more fine grained organization, as well as improving the performance of Photos when browsing and editing. If you sync your photos with iCloud Photos, creating separate libraries lets you keep a smaller selection synced with iCloud, while still keeping the bulk of your photos on your Mac. You can also easily browse and search your photos and find duplicate photos in your libraries.
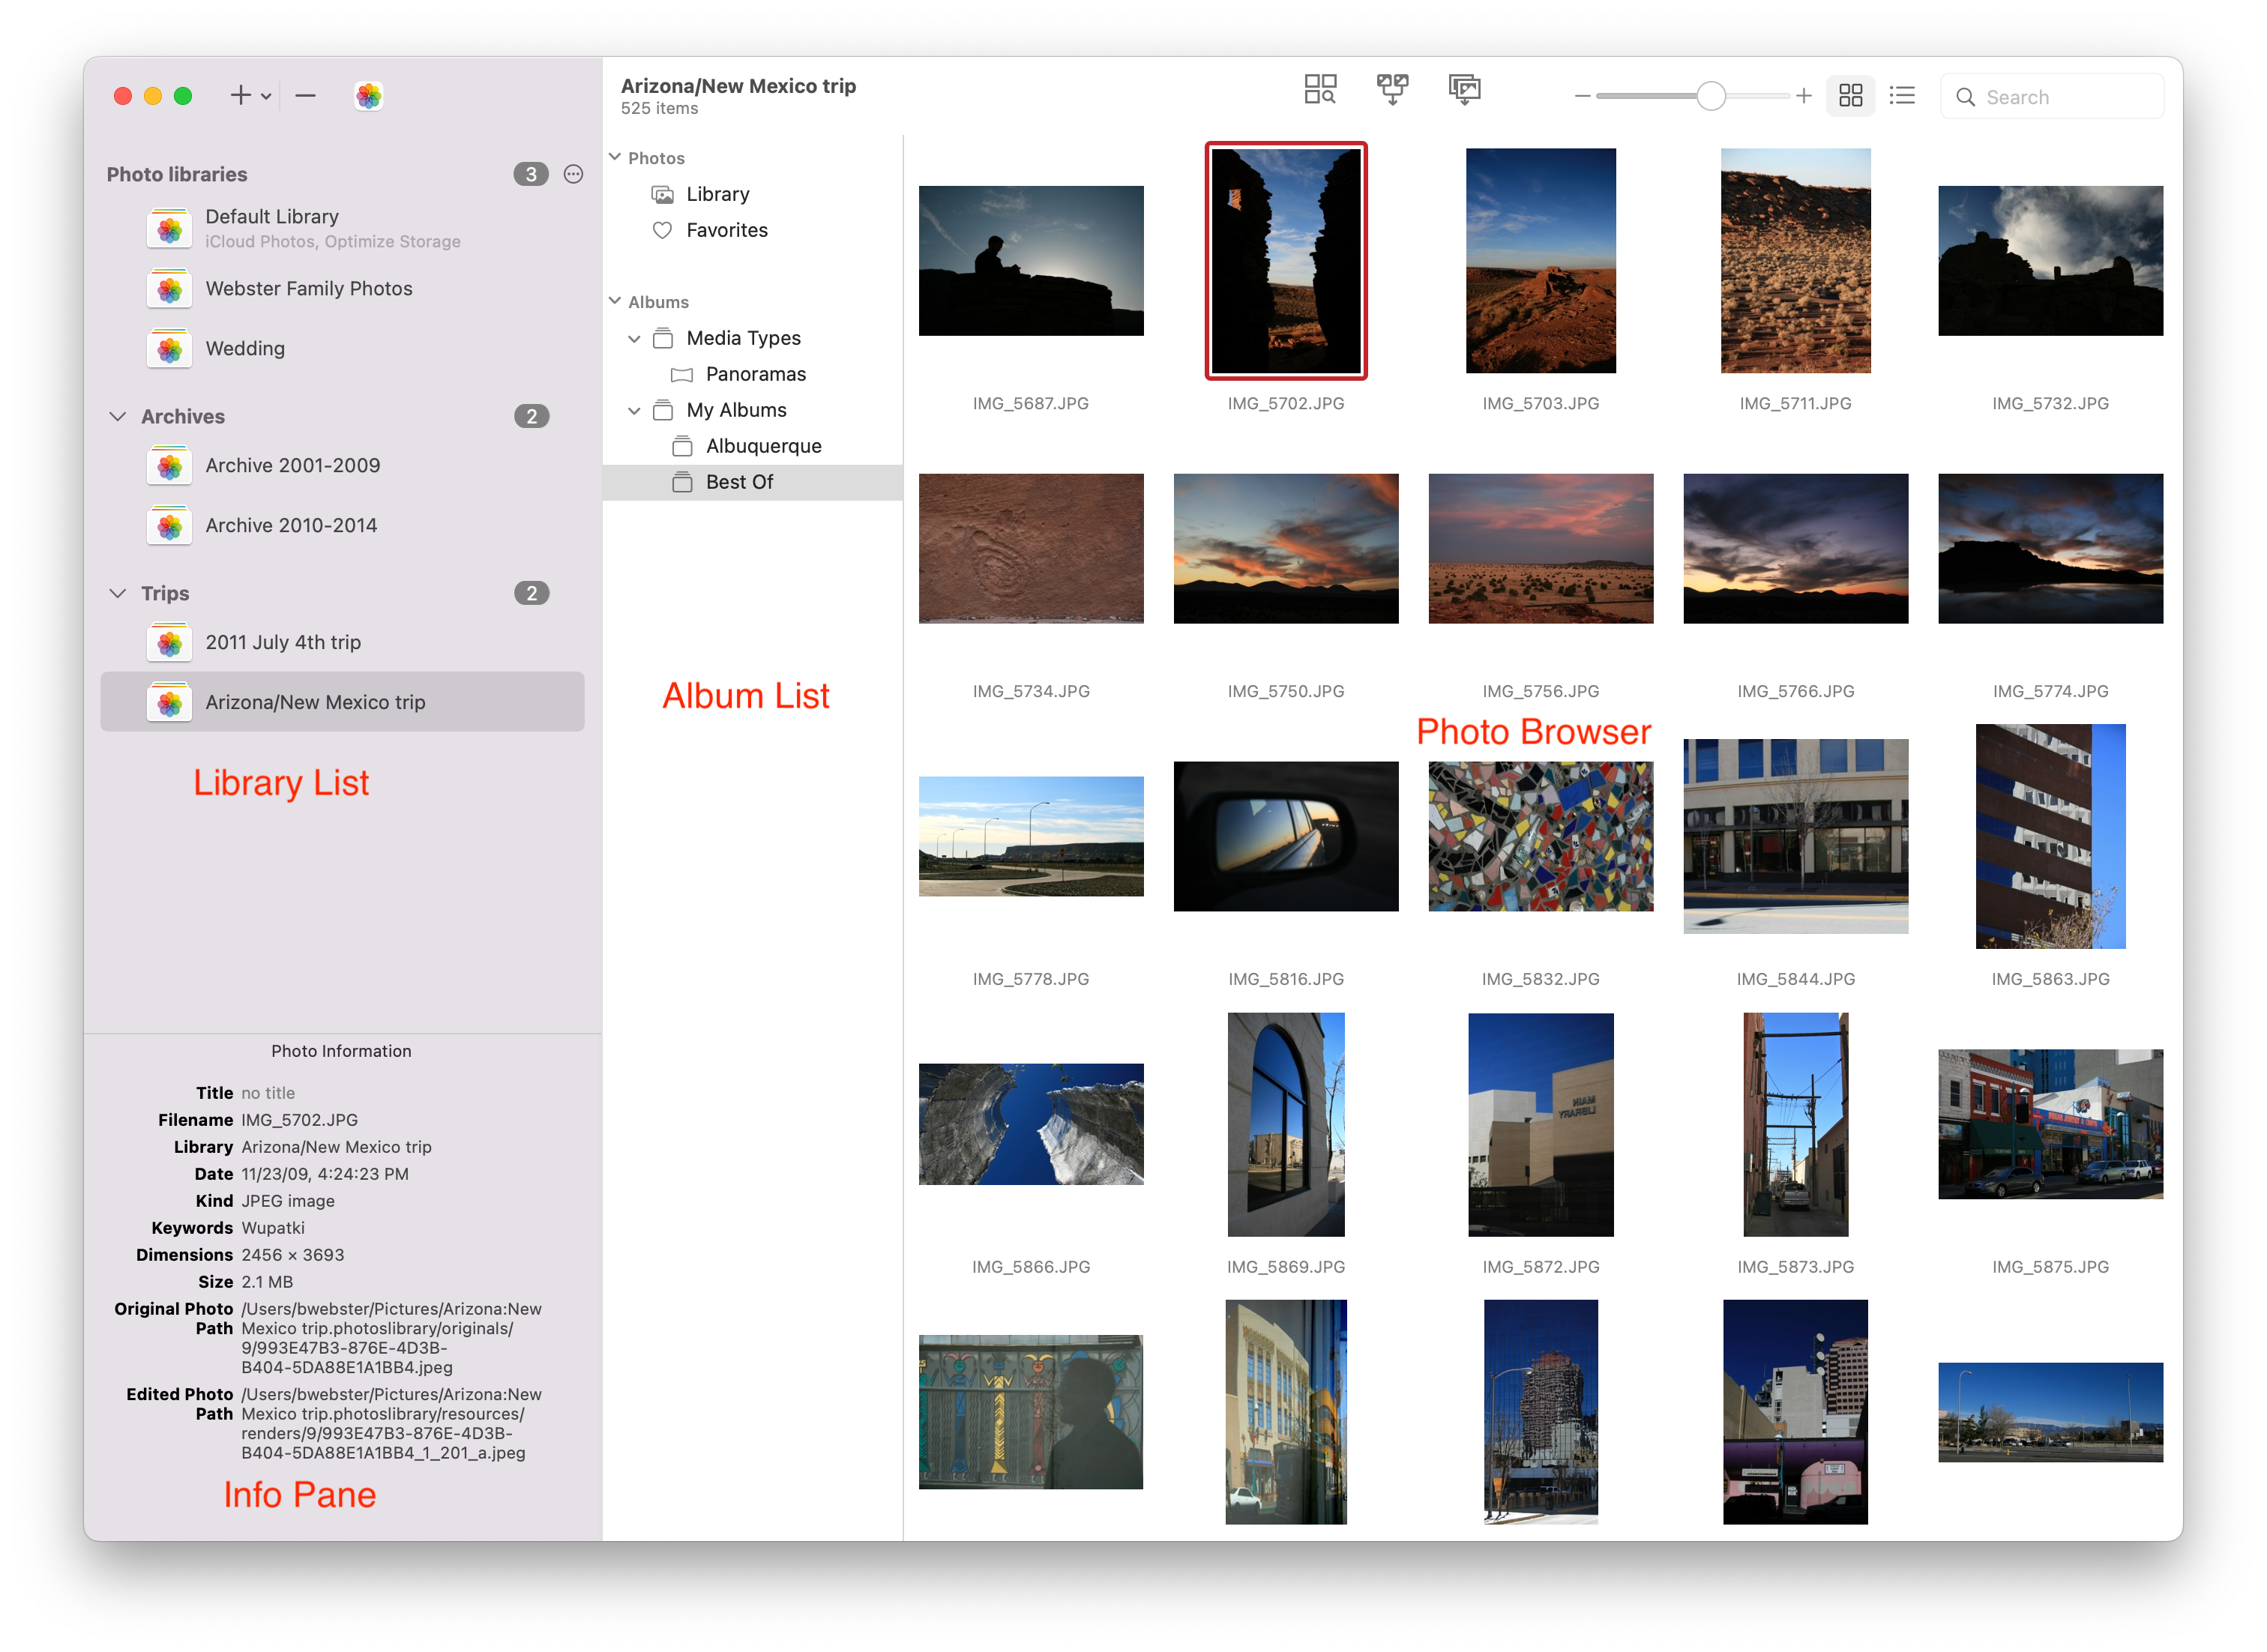
There are four main parts to the PowerPhotos window:
Library list: This is a list of the photo libraries that PowerPhotos knows about. The “+” button lets you create a new, empty library, or add existing Photos libraries to PowerPhotos. You can rename the items in the list by selecting the library, then clicking the name and typing in a new name. The “-” button lets you remove a library from your library list (though the library will remain where it is on your hard drive).
Album list: This displays the list of albums in the selected library. You can select an album to view the photos it contains in the photo browser on the right.
Photo browser: The photo browser takes up the majority of the window, and allows you to browse through the actual photos stored in whatever library you have selected. There is both a grid view, which lets you browse photos much like in Photos, and a list view, which provides an easy way to view your photos’ attributes, such as dates, ratings, keywords, etc. The View menu contains options for sorting and viewing different photo attributes.
Info pane: The pane in the lower left corner of the window will show more detailed information about whatever item you currently have selected in the window. This can display information for a photo, album, or library, depending on what you have selected most recently.
PowerPhotos can be run from anywhere on your hard drive, though usually you’ll want to store it in the Applications folder, along with the rest of the applications on your Mac. Once you’ve downloaded the PowerPhotos.zip file to your Mac, Safari should automatically unzip it in your Downloads folder. You can drag PowerPhotos from there into your Applications folder to install it. To uninstall, drag PowerPhotos from your hard drive to the trash. If you are upgrading a previous version of PowerPhotos, you can simply replace the old version with the new one, and your list of libraries and all your settings will be retained automatically. You can also use the “Check For Updates” menu item from within PowerPhotos to automatically check for, download, and install new updates.
PowerPhotos {{ site.pwph_version }} requires macOS 12.0 or later, and runs on both Intel and Apple Silicon Macs. If your Mac is running an older version of macOS, older versions of PowerPhotos are available for download from our website. PowerPhotos does not run on any other Apple platforms such as iPhone or iPad.
Many of the features of PowerPhotos work without a license key, but if you find PowerPhotos useful and/or wish to use some of the advanced features only available to licensed users, a license can be purchased for $29.95 by clicking the “Purchase PowerPhotos” button in the upper right corner of the main window, or online at https://www.fatcatsoftware.com/store. The differences between a licensed and an unlicensed copy of the program are outlined below
| Unlicensed | Licensed | |
|---|---|---|
| Create new libraries | Yes | Yes |
| Use existing libraries | Yes | Yes |
| Library groups | Up to 3 | Unlimited |
| Search libraries | Yes | Yes |
| Find duplicate photos | Find duplicates only | Delete duplicates |
| Copy photos and albums | 20 photos at a time | Unlimited photo copying |
| Merge libraries | Preview only | Full merge |
| Delete photos | 20 photos at a time | Unlimited photo deletion |
| Export photos | 20 photos at a time | Unlimited exports |
| Convert iPhoto/Aperture libraries | Yes | Yes |
Unlicensed copies of PowerPhotos can be used on as many computers as you’d like. A license for PowerPhotos is for a single user, but allows for use on two machines (e.g. a desktop and a laptop). If you intend have more than one user using the license-only features of the program, you should purchase a license key for each person who will be using the program. If you buy a key for multiple users, the number of users the license covers will be shown in the license window.
Once you’ve made your purchase, you’ll receive an email your license info, consisting of the name you used to purchase, and a unique license key. If you already have the PowerPhotos app installed on your Mac, the email will have a “Activate License” link which will automatically open up PowerPhotos and enter your license info for you.
If that doesn’t work for any reason, you can also enter your license manually by opening PowerPhotos and selecting “License…” from the PowerPhotos menu in the upper left, next to the Apple menu. This will bring up the license window where you can enter the name and license key from your email. Both the name and license key need to be exactly the same as in your order, so make sure to copy and paste them from your email rather than try to type them in yourself.
{% include full_width_image.html image_path=”screenshots/registration.png” %}
Note: past versions of PowerPhotos have used the terms “registration code” or “serial number” but was later changed “license key”. There is no functional change between the two, just a terminology change.
PowerPhotos 2.0 was released in 2022 and has a number of major new features and improvements over PowerPhotos 1.0. If you have an existing license for PowerPhotos 1.0 or any version of iPhoto Library Manager, you can receive a 50% discount when upgrading to PowerPhotos 2.0 by entering your old license key when placing your order at https://www.fatcatsoftware.com/store.
If you’re running PowerPhotos 2.0 on a Mac that already has a PowerPhotos 1.0 or iPLM license, the “Upgrade PowerPhotos” button will automatically send your existing license key for you when placing an in-app order.
If you need to retrieve your license info, visit our lost license page.
Here is a summary of the major additions to PowerPhotos 2.0.
Full iCloud Photos support: If you use iCloud Photos, PowerPhotos 1.x was only able to see photos in your library that had already been downloaded to your local hard drive. For users with the “Optimize Mac Storage” option enabled, this could mean a significant portion of your iCloud library would not be visible to PowerPhotos. In PowerPhotos 2.0, it can now see and work with any photos in your iCloud photo library, and will automatically download any photos from iCloud as needed.
Advanced exporting: Photos has an export command, but it is fairly limited in what it can provide. PowerPhotos 2.0 has a new, more fully featured export function with options such as:
Global menu bar item: Get fast access to your libraries via a global item in your menu bar even when PowerPhotos itself isn’t running.
Library groups: For those with lots of libraries, you can now organize your libraries into groups in the PowerPhotos sidebar.
Multiple windows: You can now open each library in a separate window in PowerPhotos, allowing for easier comparison between libraries, and dragging and dropping photos/albums between libraries.
New duplicate search engine: PowerPhotos 2.0 uses a new duplicate comparison algorithm that can find more duplicate photos which are not quite 100% identical, such as scaled down copies of photos, photos that have been resaved in a different format or with different compression, and even photos with minor edits applied to them.
Faster library loading: The new internal structure in PowerPhotos 2.0 will allow it to load your libraries much faster than PowerPhotos 1.0, especially for users with the “Optimize Mac Storage” option enabled in iCloud Photos.
Merge/duplicate search reports: PowerPhotos 2.2 introduced a new detailed report when performing a merge, photo/album copy, or duplicate search that allows the user to see which photos were copied, which photos were skipped as duplicates, and which photos couldn’t be copied because of a problem. This helps troubleshoot problems that might occur during a merge or duplicate search.
Conversion of old iPhoto/Aperture libraries: Since Apple dropped support for migrating libraries from iPhoto/Aperture to Photos, PowerPhotos 2.3 and later now have the ability to convert a library from iPhoto or Aperture to Photos.
Photos stores all of the photos and information about your photo collection in a Photos library. When viewing a Photos library in the Finder, it appears as a single icon, known as a package, but in reality, that package contains a whole hierarchy of folders and files inside of it. When you import photos into Photos, they are copied by Photos into the library package, and Photos takes care of organizing them within that library and keeping track of where they are. Photos also creates a handful of its own data files in the library along with the photos themselves. These files contain information such as how you have your photos organized into albums, the title, favorites, keywords, and other information you assign to your photos, and much more.
A Photos library is a self-contained unit, so all the photos and related data are all stored within that one library package. This means that you can backup, move, or copy the library by simply copying or moving the library package using the Finder, just like you would copy any other file or folder.
Typically, while working with Photos, it keeps all the details of the library package hidden from you. You can just use Photos’ interface to manage your photos, and you never even need to look inside the Photos library package itself. However, in some cases, especially if you encounter problems with your Photos library, in can be useful to know a little bit more about what goes on inside the library. If you wish to delve into the library package’s contents, you can do so by control-clicking on it in the Finder and selecting “Show Package Contents” from the contextual menu. If you choose to do so though, do not move, rename, or delete any items within the library package. Altering the library contents in this manner can cause Photos to become very confused, and thus is not recommended.
If you have been using iPhoto Library Manager to keep track of your iPhoto libraries, PowerPhotos can help you with your move to using the new Photos app.
Converting your iPhoto libraries
In order to see your libraries in PowerPhotos, you will first need to convert your libraries from iPhoto to Photos. PowerPhotos can assist with this process if you select “Convert iPhoto/Aperture Libraries” from the File menu. This will let you add any iPhoto or Aperture libraries you have to PowerPhotos so that you can convert or merge them into your existing Photos libraries. You can read in more detail about how this works at Converting iPhoto and Aperture libraries.
If you have already converted some or all of your libraries before downloading PowerPhotos, you can also select “Add Existing Library” from the File menu to add any of your existing Photos libraries to the PowerPhotos library list.
Merging, rebuilding, or copying photos between your libraries
Just as iPhoto Library Manager can copy and merge photos between iPhoto libraries, PowerPhotos can be used to copy/merge with Photos libraries. Due to limitations in the new Photos app, there are some pieces of data that iPLM could copy that PowerPhotos cannot. You can read more about that in Copying limitations. If you want to combine your older content with your existing Photos libraries, you can either convert the iPhoto/Aperture library to Photos by itself, or you can merge those libraries directly into one of your existing Photos libraries.
Licensing/Upgrading
If you have an existing license for iPhoto Library Manager, you can upgrade to PowerPhotos 2.0 for a discounted price. Read more about upgrading.
To create a new library, either click the “+” button in the PowerPhotos window and select “Create New Library”, or select “New Library” from the File menu. You will be prompted to choose a name and location for the new library. When the library is first created, it will initially be empty, with no photos. To open your newly created library, double click on it, and PowerPhotos will open the library in Photos for you.
If you have a Photos library already on your disk, you can add it to your list by clicking the “+” button and selecting “Add Library”, or by selecting “Add Library” from the File menu. PowerPhotos will automatically search your computer using Spotlight for any libraries that are not already in your library list. You can select one or more libraries from the list it displays and then click “Add” to add those libraries to your library list.
Spotlight is not able to search some drives, such as network drives or other drives excluded from Spotlight indexing. If a library you want to add does not appear in the search results, click the “Choose Manually…” button, and that will let you select a specific library to add to the list.
Alternately, you can drag a library from the Finder and drop it into the library list in the PowerPhotos window to add it to the list.
To remove a library from your list, select it then either click the “-“ button or select “Remove Library” from the File menu. Note that this will only remove the entry for the library in the list and will not delete any of your files from the disk. If you really do want to move the library to the trash, you can hold down the option and shift keys, and the “Remove Library” command will change to “Delete Library” instead. This will both remove the library from the library list and move the library to the trash for you. Note that you’ll still need to empty the trash via the Finder or Dock in order to delete the library permanently.
By default, PowerPhotos will warn you when you are about to remove a library from your list. If desired, you can turn this warning off in the settings.
If you want to make an exact copy of one of your libraries, either as a backup or as part of moving a library to another disk, you can do so one of two ways.
Referenced Photos If you have unchecked the “Copy items to the Photos library” checkbox in the Photos settings window, then when you import photos into your library, those photos don’t get copied into the library package, but are instead referenced in whatever folder they were originally stored in.
Any such referenced photos will not be copied when duplicating the library. The duplicate copy of the library will simply reference the same photos in the same external locations. If you’re duplicating the library with the intention of transferring it to another machine, the duplicate library will not be able to find any of the external photos if they are not available from that machine.
If you’re not sure whether your library has any referenced photos, you can find out by doing the following:
If the album is empty, that means your library does not have any referenced photos, and can be duplicates without any problem. If you do have references photos and want to bring them all into the library so they’re no longer references, select all the photos in that smart album, then use the File > Consolidate menu item in Photos to copy your referenced photos into the library package. When you then duplicate the library, all the photos will be included in the duplicate copy.
iCloud Photos If you have a library that has iCloud Photos enabled, then it is possible that the library will not have downloaded all the full size versions of each photo from iCloud at the time you duplicate the library. This is almost always true when the “Optimize Mac Storage” option is enabled in Photos’ preference, but can also be the case for a small number of photos even if “Download Originals” is checked instead.
If you duplicate such a library, then the new copy of the library will appear to have all of its photos intact, but trying to view or edit some of the photos may result in error messages being displayed by Photos. So, when copying a library that’s syncing with iCloud, it’s highly recommended to switch to the “Download Originals” option in Photos’ settings window.
Duplicate a library on an APFS volume Apple introduced a new volume format called APFS (Apple File System) starting in macOS High Sierra. APFS supports a feature called “cloning” that can save space when making copies of large files and folders. Instead of making a separate copy of all the library data up front when duplicating a library, a “clone” is made that references the same data as the original library. As further changes are made to one copy of the library or the other, APFS will automatically copy individual files as they are modified, making sure that the changes you make to one library don’t apply to both libraries.
The end result of this is that:
If you wish to move one of your libraries to a new location on a single drive, PowerPhotos will automatically track the library when you do so. Select the library you want to move in PowerPhotos and select “Reveal Library in Finder” from the File menu to show the library in the Finder. Then, use the Finder and move the library to the new location on the drive. You will see PowerPhotos update the path for that library as soon as you bring its main window back to the front.
If you wish to move your library from one drive to another, you will need to copy the folder to the new drive and then add the copied library to PowerPhotos’ list. After you have opened up the newly copied library with Photos and confirmed that it displays correctly, you can go ahead and delete the original copy of the library. Another way to do this is to use PowerPhotos’ “Duplicate Library” command in the File menu to make a copy of the selected library on another drive.
You can assign any name you wish to each of your libraries in the list by first selecting the library, and then clicking on its name to begin editing it (just like renaming a file in the Finder). Alternately, you can control-click on the library and select “Rename Library” from the contextual menu that pops up.
When you first add a library to PowerPhotos, it will be given the same name as the library package has in the Finder. The Finder name and the name in PowerPhotos are separate though, so you can change one without having to change the other. For example, if you’ve added a library that belongs to another user, and that library is named simply “Photos Library”, you can give it a different name in PowerPhotos such as “Bob’s Library” without affecting the name of the actual library on disk.
When renaming a library in PowerPhotos, only the name in the PowerPhotos library list will be changed, and the library will keep its same name on disk. You can also change the name of the library on disk separately via the Finder. When you bring PowerPhotos to the front, it should see the change and update the path for the library to point at the new location. PowerPhotos will not automatically change its own display name for the library in this case.
If a library shows up in red in the list, it means that the package for that library does not exist on the disk (e.g. it was moved or deleted), or the disk the library resides on is not currently available. If the library is kept on another disk, insert or connect the disk, and the library name should change back to black, indicating the library is now available. If it’s a library that you intentionally deleted or no longer need to access, you can use the “Remove Library” command to remove the library from the list.
When renaming a library in the Finder (not in PowerPhotos) on macOS Monterey or later, it can sometimes cause an issue that will cause PowerPhotos to either hang when trying to read the library in its new location, or sometimes display the library as being empty. If you experience either of these behaviors, especially after renaming or moving a library, logging out of your account and logging back in is often what needs to be done to get things working smoothly again.
If you have a large number of Photos libraries, PowerPhotos allows you to organize your libraries into groups in the library list.
Creating groups To create a new library group, select File > New Library Group, and the new group will appear in the library list, allowing you to type a name for it. Each group has an indicator showing how many libraries are in that group, and a button containing a menu with several actions that can be taken on the group.
Arranging libraries and groups To add your existing libraries to a group, drag the library from where it is in the list and drop it into the group. You can also drag libraries directly from the Finder to add them to groups. Libraries can be reordered within a group by drag and drop, and groups themselves can be reordered as well. Once you have libraries organized into groups, you can click the triangle next to a group’s name to collapse it, making it easier to browse your groups without having to scroll through the long list of libraries.
Renaming a group To rename a group, click the “…” button and select “Rename Group” from the menu that appears.
Deleting a group You can delete a group by clicking the “…” button in the group’s row and choosing “Delete Group” from the menu that appears. When deleting a group, you’ll be given a choice for what to do with the libraries that are currently in that group. You can either remove all the group’s libraries from the library list as well, or you can move the libraries to a different group. The default “Photo Libraries” group at the top of the list is always there and cannot be deleted.
To share your Photos library across a network, you first need to decide where the library itself will be stored. Choose which computer will hold the library, then open System Settings on that computer and enable Personal File Sharing in the Sharing pane. Details on enabling file sharing on macOS can be found on Apple’s support site at these links:
How to connect with File Sharing on your Mac
Once that’s done, go to another computer that you’d like to access the library from and go the Finder. To connect to the shared computer, follow the directions on Apple’s support site at:
Connect your Mac to shared computers and servers
When you connect to the remote machine, it’s easiest to log in with your default admin username and password, since that will let you access any hard drive on the machine, and thus let you store your photos anywhere you want on the machine. Once you’re connected, you can open up PowerPhotos and set up your machine to use the remote library. Note that Photos requires both read and write access to a library in order to open it, even if you don’t intend to actually make any changes, so make sure you log in as a user that is able to modify the library.
If you have a Photos library set up on the remote machine that you want to use on your machine, all you have to do is add the library from the network drive to PowerPhotos just like you would any other library, either by selecting File > Add Library or by dragging the library into the library list. Once the library shows up in PowerPhotos, you can access it just like any other library.
When accessing this library, the machine where the library is stored must be awake and available on the network, and the other machine must be connected to that machine via file sharing, otherwise Photos may display an error when you try to open the library. PowerPhotos will automatically attempt to connect to the remote machine when you try to open the library. The machine still must already be awake for this to work, and you’ll need to type in the appropriate username/password to connect to the machine, but this can save you from having to remember to connect to the machine manually before opening the library.
In order to access the same library from multiple Macs, both Macs must have exactly the same version of macOS (and Photos) installed. If you open a library from a Mac with an older version of macOS, Photos will ask to upgrade the library to the newer version, after which the older version of macOS will no longer be able to read it.
Note: whichever library is designated the “System library” on the Mac where the library is stored will effectively always be open by macOS in the background. Since there is no way to fully close the library in this case, your system library cannot be opened from another Mac. If you wish to access a library from more than one Mac, you must designate another library to be your system library instead. This also means there is no way to create a setup where a library is both synced with iCloud and accessible locally from multiple Macs.
Your photos are some of your most valuable data on your Mac, containing special memories that you want to make sure to preserve. Making regular backups is a critical step in managing your Photos libraries, and there are several methods you can use to make those backups, depending on your particular setup.
Time Machine is a feature that comes built-in to macOS and is a very good and simple way to keep your photos backed up. Once you have an external drive set up with Time Machine, all your Photos libraries will automatically be backed up for you in the background. Time Machine can be used with a USB/Thunderbolt external drive attached to your Mac, as long as the drive is formatted as MacOS Extended or APFS, or with some NAS systems that are compatible with Time Machine (consult your NAS’ documentation for details on setting that up).
If you only occasionally have a backup drive connected to your Mac, or don’t want everything on your machine backed up like Time Machine does, you can back up your libraries manually by simply copying each one to an external drive. Each library is a self contained unit (with the notable exception of referenced photos), so you can just copy the library package to your external drive either using the Finder or the File > Duplicate Library command in PowerPhotos.
Some cloud storage services (e.g. Dropbox, Google Drive) can be used to store a backup copy of your library, but only as a one way backup and not to sync between multiple Macs. (read more here about why you can’t sync libraries with cloud services). If you store your library (or periodically make a copy of your library) in the folder that syncs with your cloud service, then that will upload a copy of those files to the cloud so that they can be restored if your Mac should be lost, stolen, or otherwise meet an untimely demise.
Note however that iCloud Drive will ignore any photo library that you place in the iCloud Drive folder and will not upload it at all. The only way to put your photo library in iCloud is to use iCloud Photos.
These are cloud services that are designed to do a one way back up of your data to the cloud, services such as Backblaze, CrashPlan, and a number of others. These differ from cloud storage services like Dropbox or Google Drive which are aimed at syncing files between multiple computers.
Most cloud backup services will do a good job of backing up your photo libraries to their cloud storage. If you store any of your libraries on an external or network drive, the one thing you’ll want to check is if your service supports backing up content that you store on external drives, or if it will only back up what’s on your internal drive.
iCloud Photos is a very useful service that lets you easily have a copy of your photos in the cloud and access your photos from multiple devices. However, you should not rely on iCloud Photos to be your primary backup solution for your photos. The main reason for this is because any changes you make to your photo library automatically get synced to iCloud, and to the rest of your devices. This includes things like deleting photos and albums, which means if you accidentally delete something you want to get back, you won’t be able to get it from iCloud Photos. You need to have another backup strategy in addition to iCloud Photos.
If you use iCloud Photos with the “Optimize Storage” option enabled, then Photos will only download the full size versions of your photos on demand, e.g. when you go to view or edit individual photos in full size. This means that if you directly back up your Photos library, you will only be backing up whichever photos that Photos has happened to download to your local hard drive.
If you don’t have room on your internal drive to store everything that’s stored in iCloud Photos, then you’ll need to set up a separate library on an external drive that syncs to iCloud using the “Download Originals” option, then also back up that library to ensure you have backups of all your photos. Here are two way you can do that.
If you have a setup where you can keep your external drive connected to your Mac most of the time, then you can do the following:
If you can only plug in your external drive periodically, you can still use the procedure above, or you do something similar as follows:
PowerPhotos lets you manage multiple Photos libraries, but only one of your libraries can be open in Photos at any given time. In your list of libraries, whichever library has a green checkmark appearing next to it is the active Photos library. Opening Photos, either by using the “Open Photos” button in PowerPhotos, or by clicking on Photos in the Finder or on the dock, will display the active library in Photos.
To switch to another library, just double click the library’s icon in PowerPhotos, and it will take care of quitting Photos, changing the active library, and then reopening Photos to display the library that you double clicked. PowerPhotos keeps a separate copy of your Photos settings for each of your libraries, and will swap the settings whenever it switches to a different library. This allows you to have different settings in the Photos settings window on a per-library basis.
An alternate method is to double click the library itself in the Finder to open that library up in Photos. This works, but using this method will not swap out the Photos settings like PowerPhotos does when switching libraries.
If you have multiple Photos libraries, at any given time there will be only one that is designated as the System Photo Library. This library is the one that is made available by macOS for other applications to access directly. This library will appear in the photo browser in apps like Mail, iMovie, and Pages, as well as other services like your screen saver settings. Applications that offer to import into Photos will import into the system library. The system library is also the only library that can be synced with iCloud.
To specify which library you want to be the system photo library, open the library in Photos, open the settings window, and click the “Use as System Photo Library” button. (if the button is disabled, that means the library is already the system photo library) Simply opening a library in Photos will not switch the system photo library, so you can feel free to open and work with other libraries without changing which library is set as the system photo library.
For more information on the system photo library, visit this support article on Apple’s website.
Apple offers a service called iCloud Photos that allows you to easily sync the photos you have on your Mac with those you take on your iPhone, iPad, or even another Mac. Using iCloud Photos is optional, and is off by default - you can store your photos on your Mac without doing any syncing to iCloud if you wish.
Only one library can be synced with iCloud at any given time. You must first designate that library as the system photo library in Photos’ settings, at which point you can enable iCloud Photos, also in Photos’ settings. When viewing your libraries in PowerPhotos, an “iCloud Library” label will appear below the library’s name.
There are currently not any options provided by Photos to sync a subset of your library with iCloud - it’s all or nothing. PowerPhotos can help with this limitation by allowing you to create separate libraries to store the photos that you don’t want to have synced with iCloud. For example, if you just want a relatively small selection of photos to sync with iCloud, you can set up a library just for that, then store the bulk of your photos in other libraries that are not synced. This helps save storage space used on your iCloud account.
Optimize Mac Storage Photos also provides an option to “Optimize Mac Storage” when using iCloud Photos. When enabled, if your disk starts to run low on free space, Photos will not store the full size original versions of photos on your Mac. It instead leaves the full size copies on iCloud, and only downloads the ones it needs on demand (e.g. when you view or edit a particular photo).
When you have this option enabled, viewing or copying photos or videos with PowerPhotos may mean that Photos needs to download data for some or all of the items being copied. This may cause some operations to take longer to complete, and make your library take up more local disk space.
In addition to iCloud Photos, Photos offers two other way to transfer photos between devices: My Photo Stream and Shared Albums. These two features can be enabled or disabled independently of iCloud Photos, but like iCloud Photos, they can only be enabled for your system photo library. Photos from these sharing options will not appear in PowerPhotos.
Starting in macOS 10.13 Ventura and iOS 16, Apple now offers the ability to have a Shared Library that allows multiple people to contribute to a single shared library that is synced via iCloud Photos to all of their devices. If you have the Shared Library feature enabled in Photos’ settings, all of your photos will either be in your personal library (accessible to only you) or your shared library (accessible to other users who share the same library).
In Photos, you will see a menu at the top of the window that lets you switch between viewing just your personal library, just your shared library, or the contents of both libraries combined together. In PowerPhotos (and any other third party app), you will always see the combined contents of both libraries when browsing through your photos. Apple doesn’t provide a way for PowerPhotos to tell which photos are from the personal library and which are from the shared library, so you will need to view your library in Photos to see that information.
Whenever you use PowerPhotos to import, copy, or merge photos into your system library when you have the shared library enabled, those photos will always be imported into your personal library, and not the shared library. After photos have been added to the personal library, if you want to move them to the shared library, you can open up Photos, select and control-click the photos you want to move, and select the “Move to Shared Library” menu item.
Note that all of this only applies to your system library, and only if you have both iCloud Photos and Shared Library enabled in the Photos settings window. Any other libraries you have set up in PowerPhotos act as libraries that are local to your Mac and don’t interact with iCloud at all.
Known Photos bug when duplicating a library As of the initial release of macOS Ventura, there is a bug that you may encounter if you make a duplicate copy of your system library while Shared Library is enabled, either using the Finder or the Duplicate Library command in PowerPhotos.
If you open up the new copy of the library in Photos, it will still show the controls for switching between your shared and personal library up at the top of the Photos window. However, despite the presence of these controls, the copy of the library is not connected to iCloud Photos or your Shared Library at all. You can even use the menu commands in Photos to move photos between the personal and shared sections of the library, but those changes will not sync to iCloud and will not appear in the actual shared library for any users.
One of the primary uses of Photos is to import and organize photos you have taken with your digital camera. There are a couple things you should know about how this works when you have multiple Photos libraries.
If you have Photos set up to launch automatically as soon as your plug your camera in, this will cause Photos to open whichever library you had last chosen to work with in Photos. This can sometimes cause the wrong library to be opened up, at which point you have to quit Photos, go open up PowerPhotos, switch to the correct library, and then open up Photos again. If this happens to you a lot, you might want to instead set PowerPhotos to open up when you attach your camera rather than Photos. This way, you can be sure that you have the right library selected before opening up Photos, and avoid importing photos into the wrong library.
To set this up, open up the Image Capture application located in your main Applications folder on your hard drive. Plug in your camera, and it should appear in the “Devices” section. Select the device, then use the pop-up menu at the bottom of the list and select “Other…”, at which point you can select PowerPhotos in your Applications folder, and click OK. Now, when you plug in your digital camera, PowerPhotos should automatically open instead of Photos. Note: on some systems, even after selecting PowerPhotos to open, the pop-up menu may still read “No Application”, but PowerPhotos will still launch when plugging in the camera.
It is common for Mac users to want to store their photo libraries in a folder managed by a cloud syncing services, such as Dropbox, Box, or Google Drive (just to name a few). Theoretically, having your library stored here would allow you to access your whole photo collection from multiple Macs and keep them easily synced. Unfortunately, the Photos library format is not designed with this in mind, and storing your library in one of these services can result in corruption of your library. This is not due to any fault of the cloud services provider: the library format simply doesn’t mesh well with the per-file syncing engine used by these services. It is highly recommended that you do not store your library in one of the folders managed by a cloud syncing service.
iCloud Drive
Apple’s own iCloud Drive feature (not to be confused with the iCloud Photos feature of the Photos app) has similar issues to the ones experienced with third party cloud syncing services. Photos will allow you to create a library in iCloud Drive, but you will see a small icon next to the library in the Finder, indicating that the item is “ineligible” for iCloud Drive syncing. Your library will remain there and function fine, but its contents will not sync to iCloud at all, and you will not see it appear on other Macs you use with iCloud Drive.
Simply put, if you wish to sync your photo collection across multiple Macs, iCloud Photos is the best solution available.
You can store an Photos library on an external or removable hard drive just the same as you can on your computer’s built-in hard drive. To create a new library, follow the normal procedure for creating a new library, and choose the external drive as the location for the library. If you have an existing library that you would like to store on your external drive, use the “Duplicate Library” command in the File menu. You will be given a choice of where to duplicate the library to, at which point you can choose the external hard drive that you’d like to copy the library to. Once you’ve created or copied your library on the external drive, you can then open it up just like any other Photos library.
Apple recommends that you store your Photos library on a Mac formatted drive (either MacOS Extended or APFS), and recommends against using SD cards and USB flash drives, as well as network drives. Unless you have a particular need for your external drive to be accessible from a Windows or Linux machine, make sure the disk is formatted as MacOS Extended or APFS, which you can check using the “Get Info” window in the Finder.
For network drives, on macOS Catalina and later a Photos library can be stored on a NAS as long as you’re connecting via the SMB 2/3 protocol, and not Apple’s older AFP protocol which is now deprecated. Photos is not optimized for working over a network, so working with a library there on a day to day basis will likely be slow, and the addition of network access gives one more possible way for data corruption to occur. We recommend working with your libraries on locally attached disks whenever possible and using a NAS primarily for archiving and/or backups. As always, you should make sure you have an additional backup of the library elsewhere as well.
macOS 14 Sonoma and later There are two issues to be aware of on macOS Sonoma when dealing with some network and external drives.
PowerPhotos provides a global status menu that appears in the icons on the right hand side of your menu bar at the top of the screen. You can enable the PowerPhotos status menu by opening the settings window in PowerPhotos and checking the “Show PowerPhotos in menu bar” checkbox. The menu item will remain in the menu bar, even after restarting your Mac. To remove the menu, uncheck the “Show PowerPhotos in menu bar” checkbox.
Clicking on the PowerPhotos status menu will show you a list of all the libraries you have in PowerPhotos. Selecting a library from the list will quickly open that library up in Photos for you to view and edit. This menu can remain in the menu bar even when PowerPhotos isn’t running, giving you fast access to all your libraries at all times.
macOS Ventura Login Items macOS 13.0 Ventura introduces a new Login Items section in the System Settings app that lets you control what apps have permission to launch background tasks at login. If you enable the PowerPhotos status menu, PowerPhotos will appear in this list in System Settings, indicating that is has permission to open its helper app (called PowerPhotosMenu) in the background, which controls the status menu.
Once PowerPhotos has been granted permission here, it will remain visible in the Login Items list even if you later turn off the PowerPhotos status menu in the PowerPhotos settings window. Its presence in the list only indicates that it has permission to launch its helper in the background, but does not necessarily mean that the helper is actually running. If you want to see whether the helper is running, open Activity Monitor and search for “PowerPhotosMenu”. This is the only background process that PowerPhotos launches, and PowerPhotos will not run anything else in the background after the main PowerPhotos app has been quit.
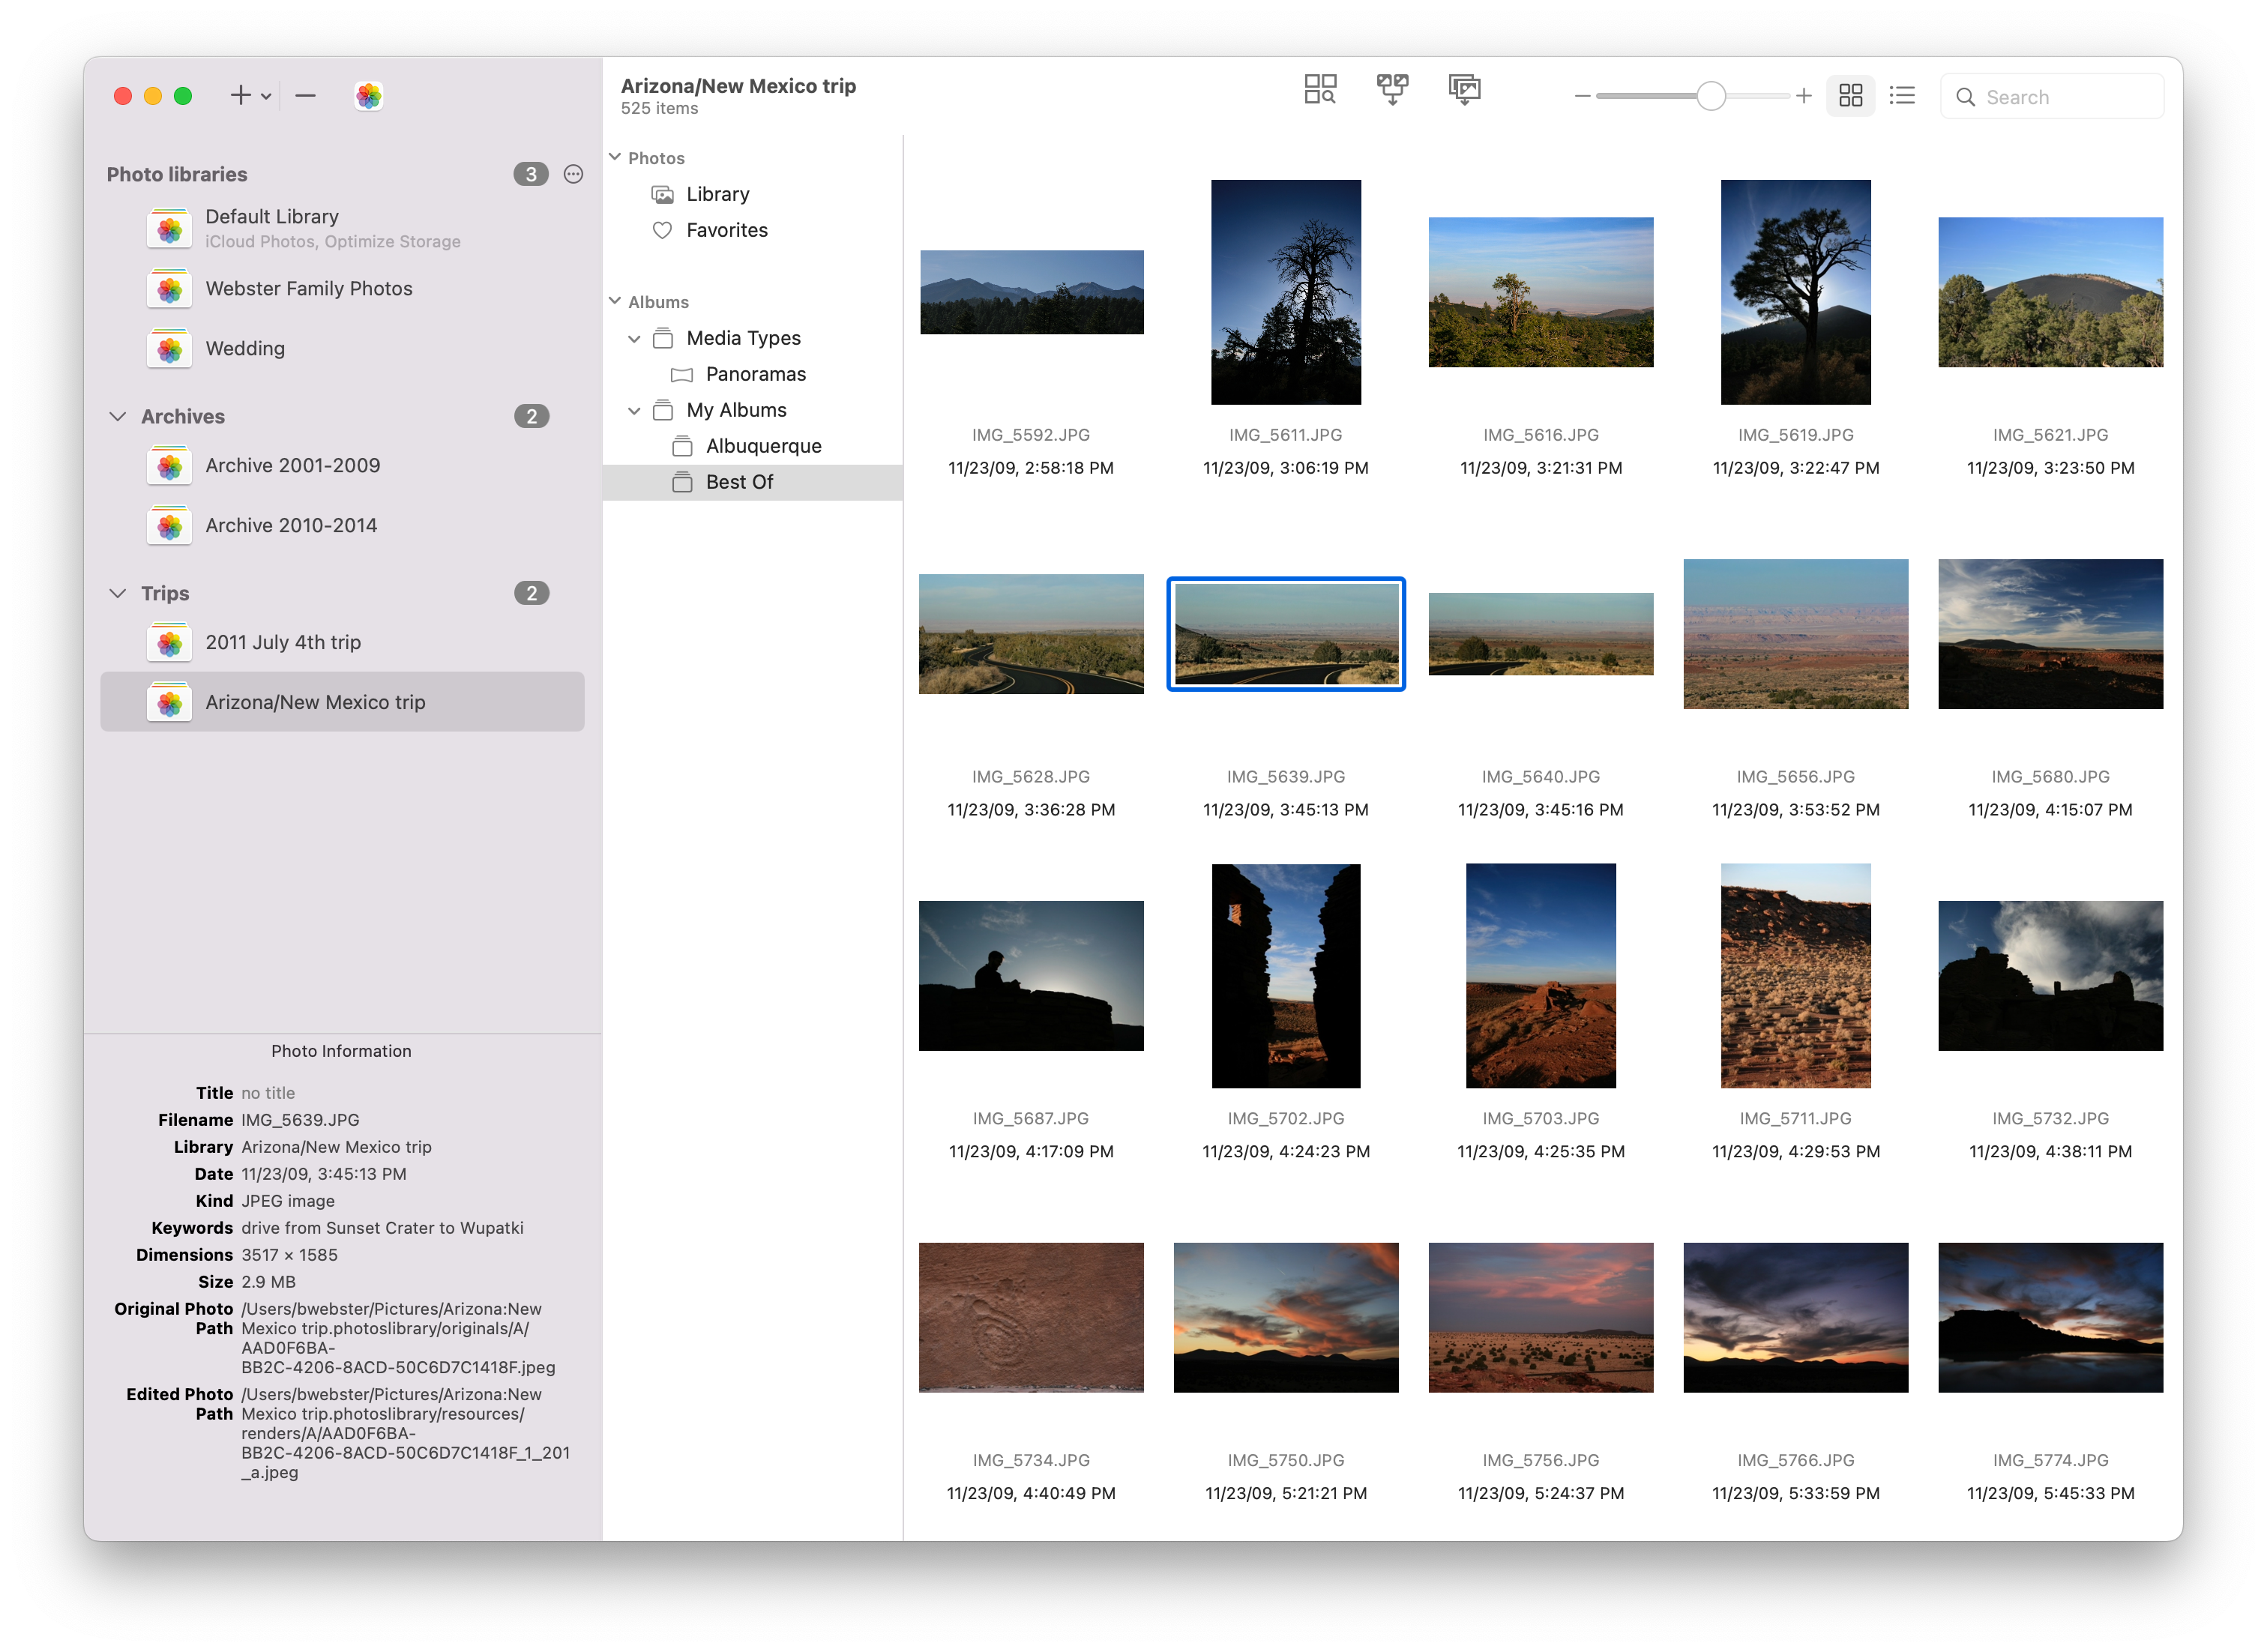
The grid view of the photo browser allows you to look through your photos much like you do in Photos, with your photos arranged in a grid, showing a small preview of each photo with some basic information below the photo itself. The slider in the lower right corner allows you to change the size of the photos, and selecting an individual photo will display that photo’s information in the info pane in the lower left corner of the window.
You can customize the appearance of the grid view by using the various commands available in the View menu. These include:
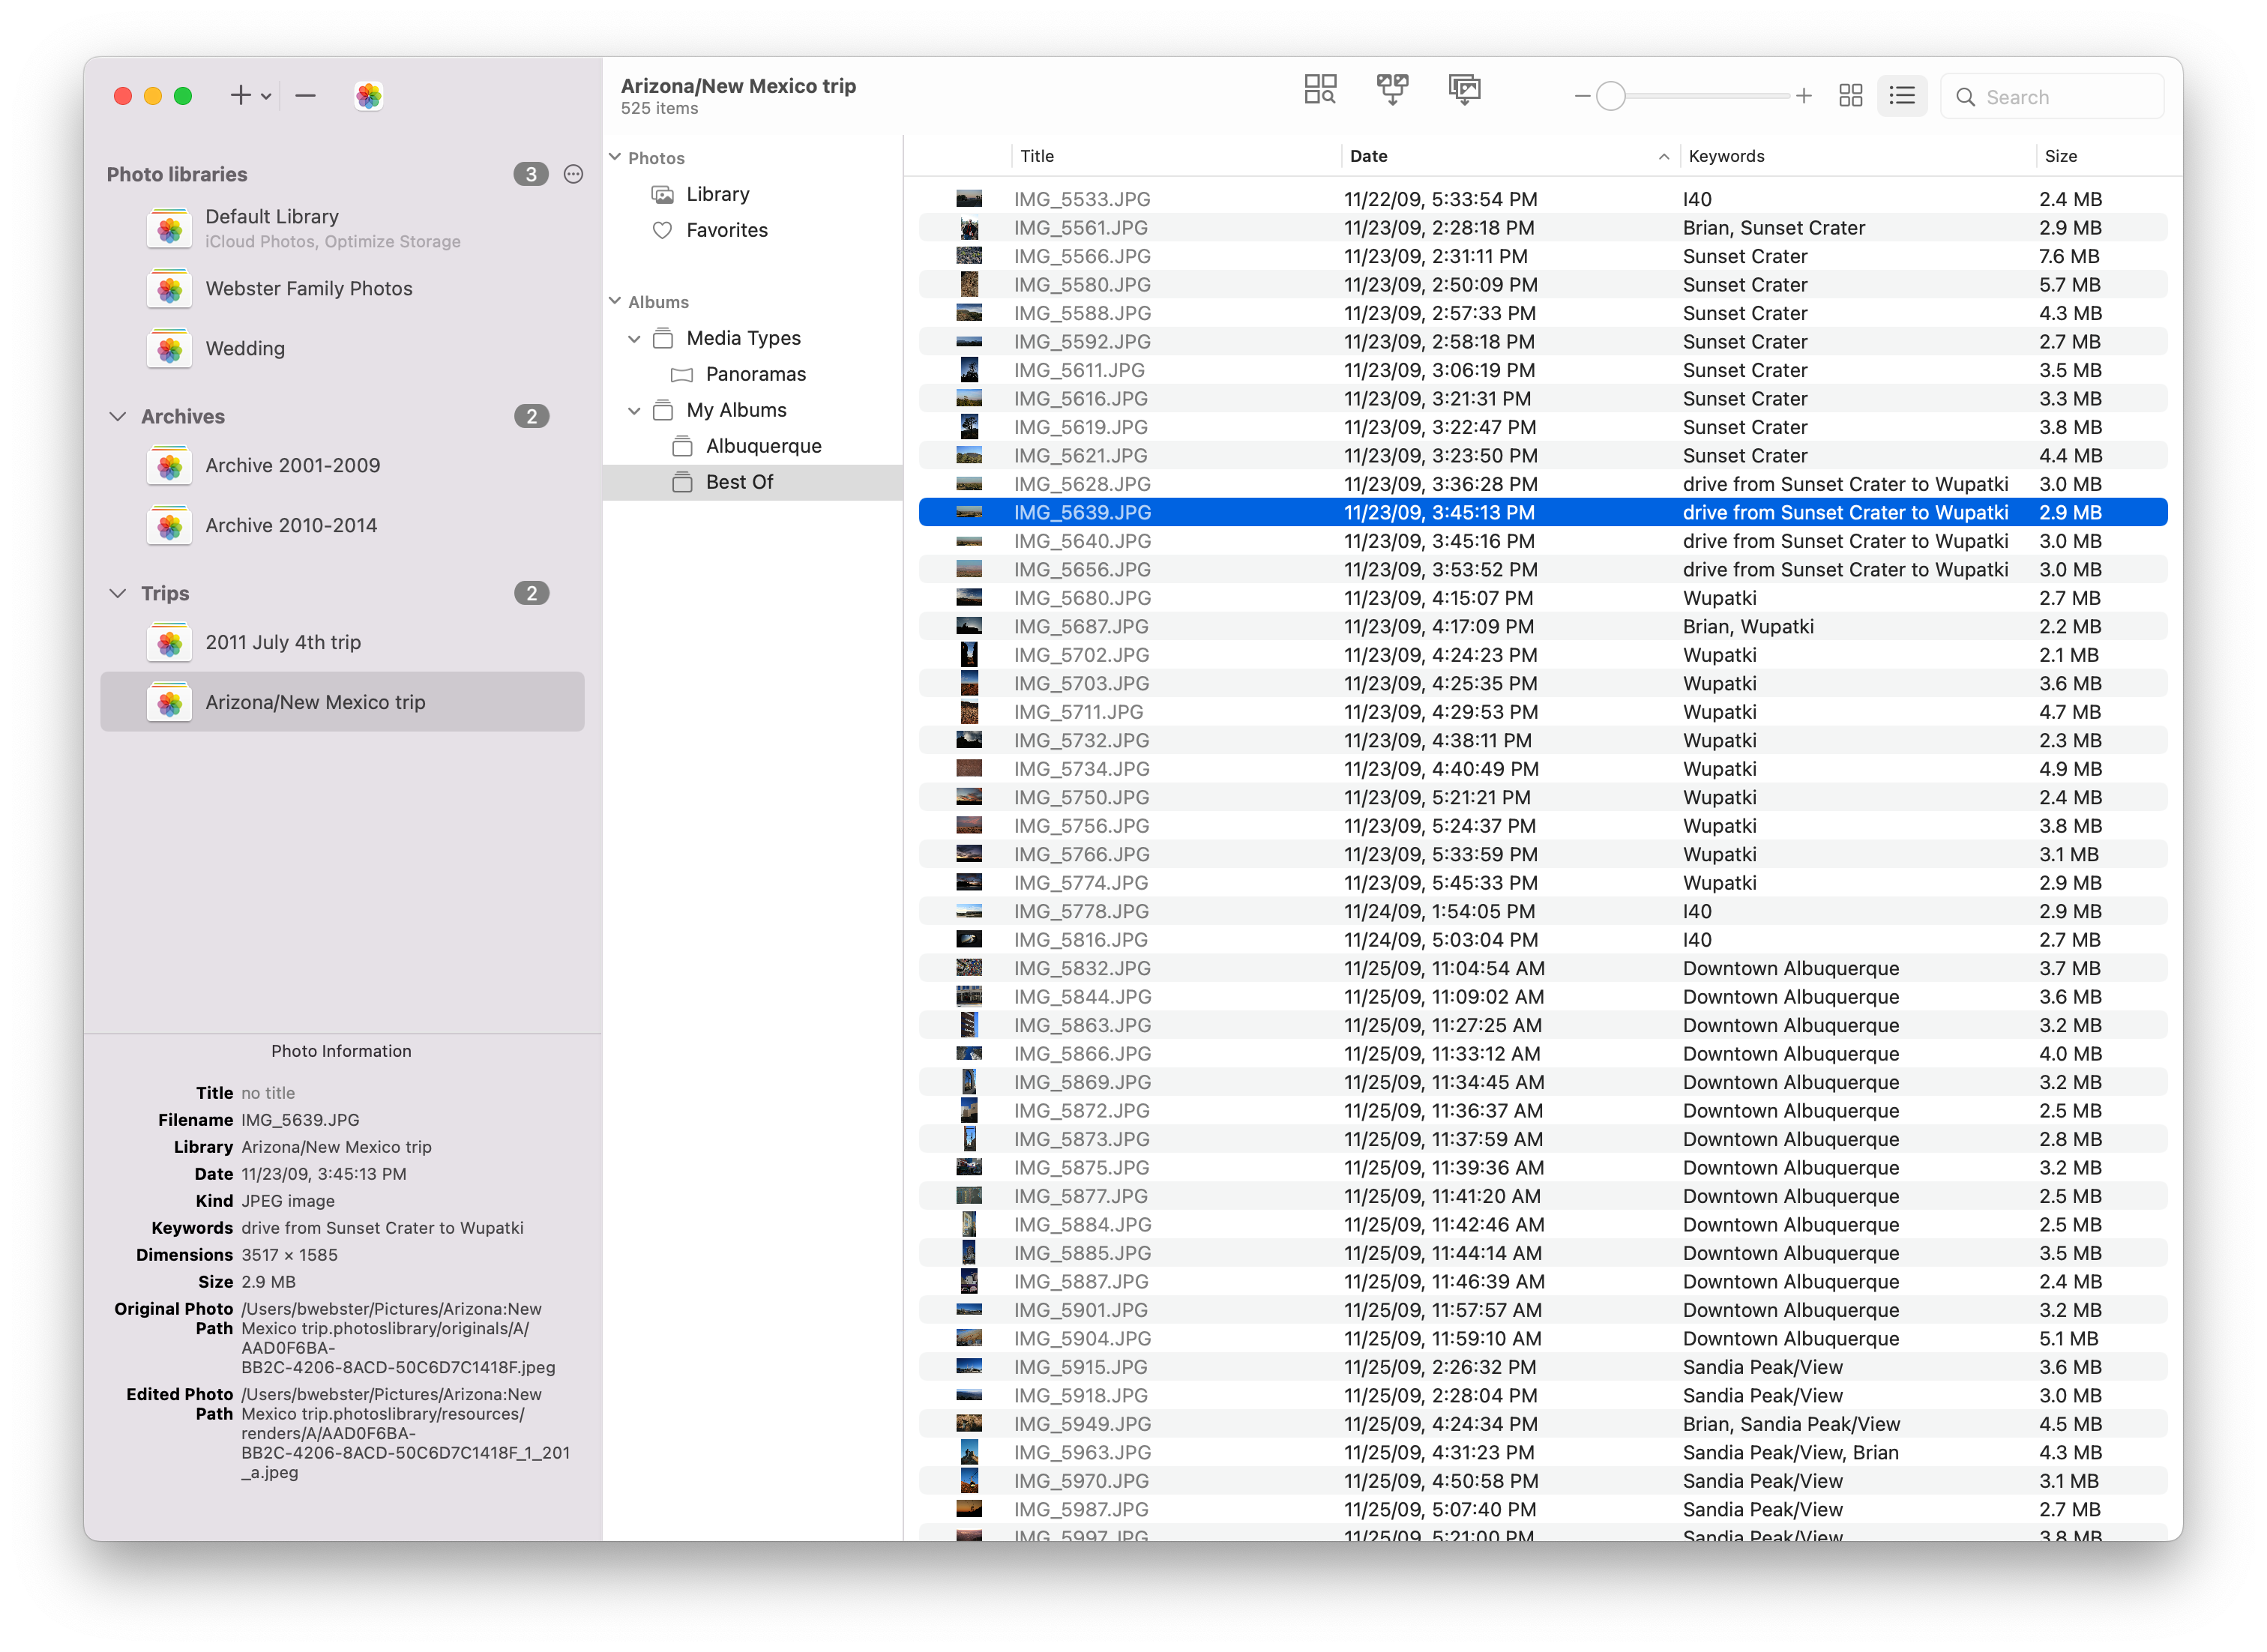
In addition to the Photos-style grid view, PowerPhotos also provides a list view, which is useful when you’re more interested in looking through your photos’ attributes, such as keywords, sizes, descriptions, and so forth. You can switch between grid view and list view using the control in the upper right, next to the search field.
You can customize the appearance of list view using the commands available in the View menu. These include:
In both grid view and list view, PowerPhotos provides a few different options for seeing the full size version of one of your photos.
If you double click a photo, or select one or more photos then hit the space bar, that will open a QuickLook panel that shows you the full size version of the selected photo(s). Note that the QuickLook panel has a button that lets you expand it to fill the screen, which can be useful for a quick, full screen slideshow of multiple photos.
If you want to reveal the actual photo file in the Finder, control-click on a photo, and select either “Show File” or “Show Original File”.
If you want to do something with a particular photo in Photos itself, control-click on the photo, and choose “Select in Photos”. That will open up that library in Photos and select the image in Photos’ main window, so you can then do whatever you want with it.
In the lower left corner of the window, you’ll find the information pane, which will display detailed information about whatever object you have selected in the rest of the window. You can use this to see information for a library, album, or individual photo. The following information is displayed here:
Libraries: the library’s name, version, size, and location on your computer.
The size shown is for the entire library package, including all of Photos’ own data files. Note that this size will be larger than the size shown in Photos itself, which only adds up the space taken up by the photos themselves.
Albums: the album’s name and description, and the number and size of the photos it contains.
Photos: all of the photo’s attributes (name, date, favorite, keywords, description, place, kind, and size) as well as the full paths to both the original and edited versions of the image. Note that if you’re view your iCloud library and the selected photo hasn’t been downloaded locally yet, then no path will be shown for that photo.
{% include full_width_image.html image_path=”screenshots/search_photos.png” %}
The search field in the upper right hand corner of the window allows you to search your Photos libraries for photos directly from within PowerPhotos. Simply type the text you’d like to search for in the search field, and your photos will be filtered down to only show those matching what you typed.
By default, all supported attributes are searched for the text you typed in. This includes the photo’s title, filename, description, keywords, faces, place, and the names of the albums/event to which the photo belongs. Once you’ve started a search, a search scope bar will appear at the top of the photo browser. You can narrow your search to look at just a single attribute (e.g. faces, keywords, etc.) by clicking that attribute’s name in the scope bar.
To cancel your search and resume normal photo browsing, click the “X” button located inside the search field.
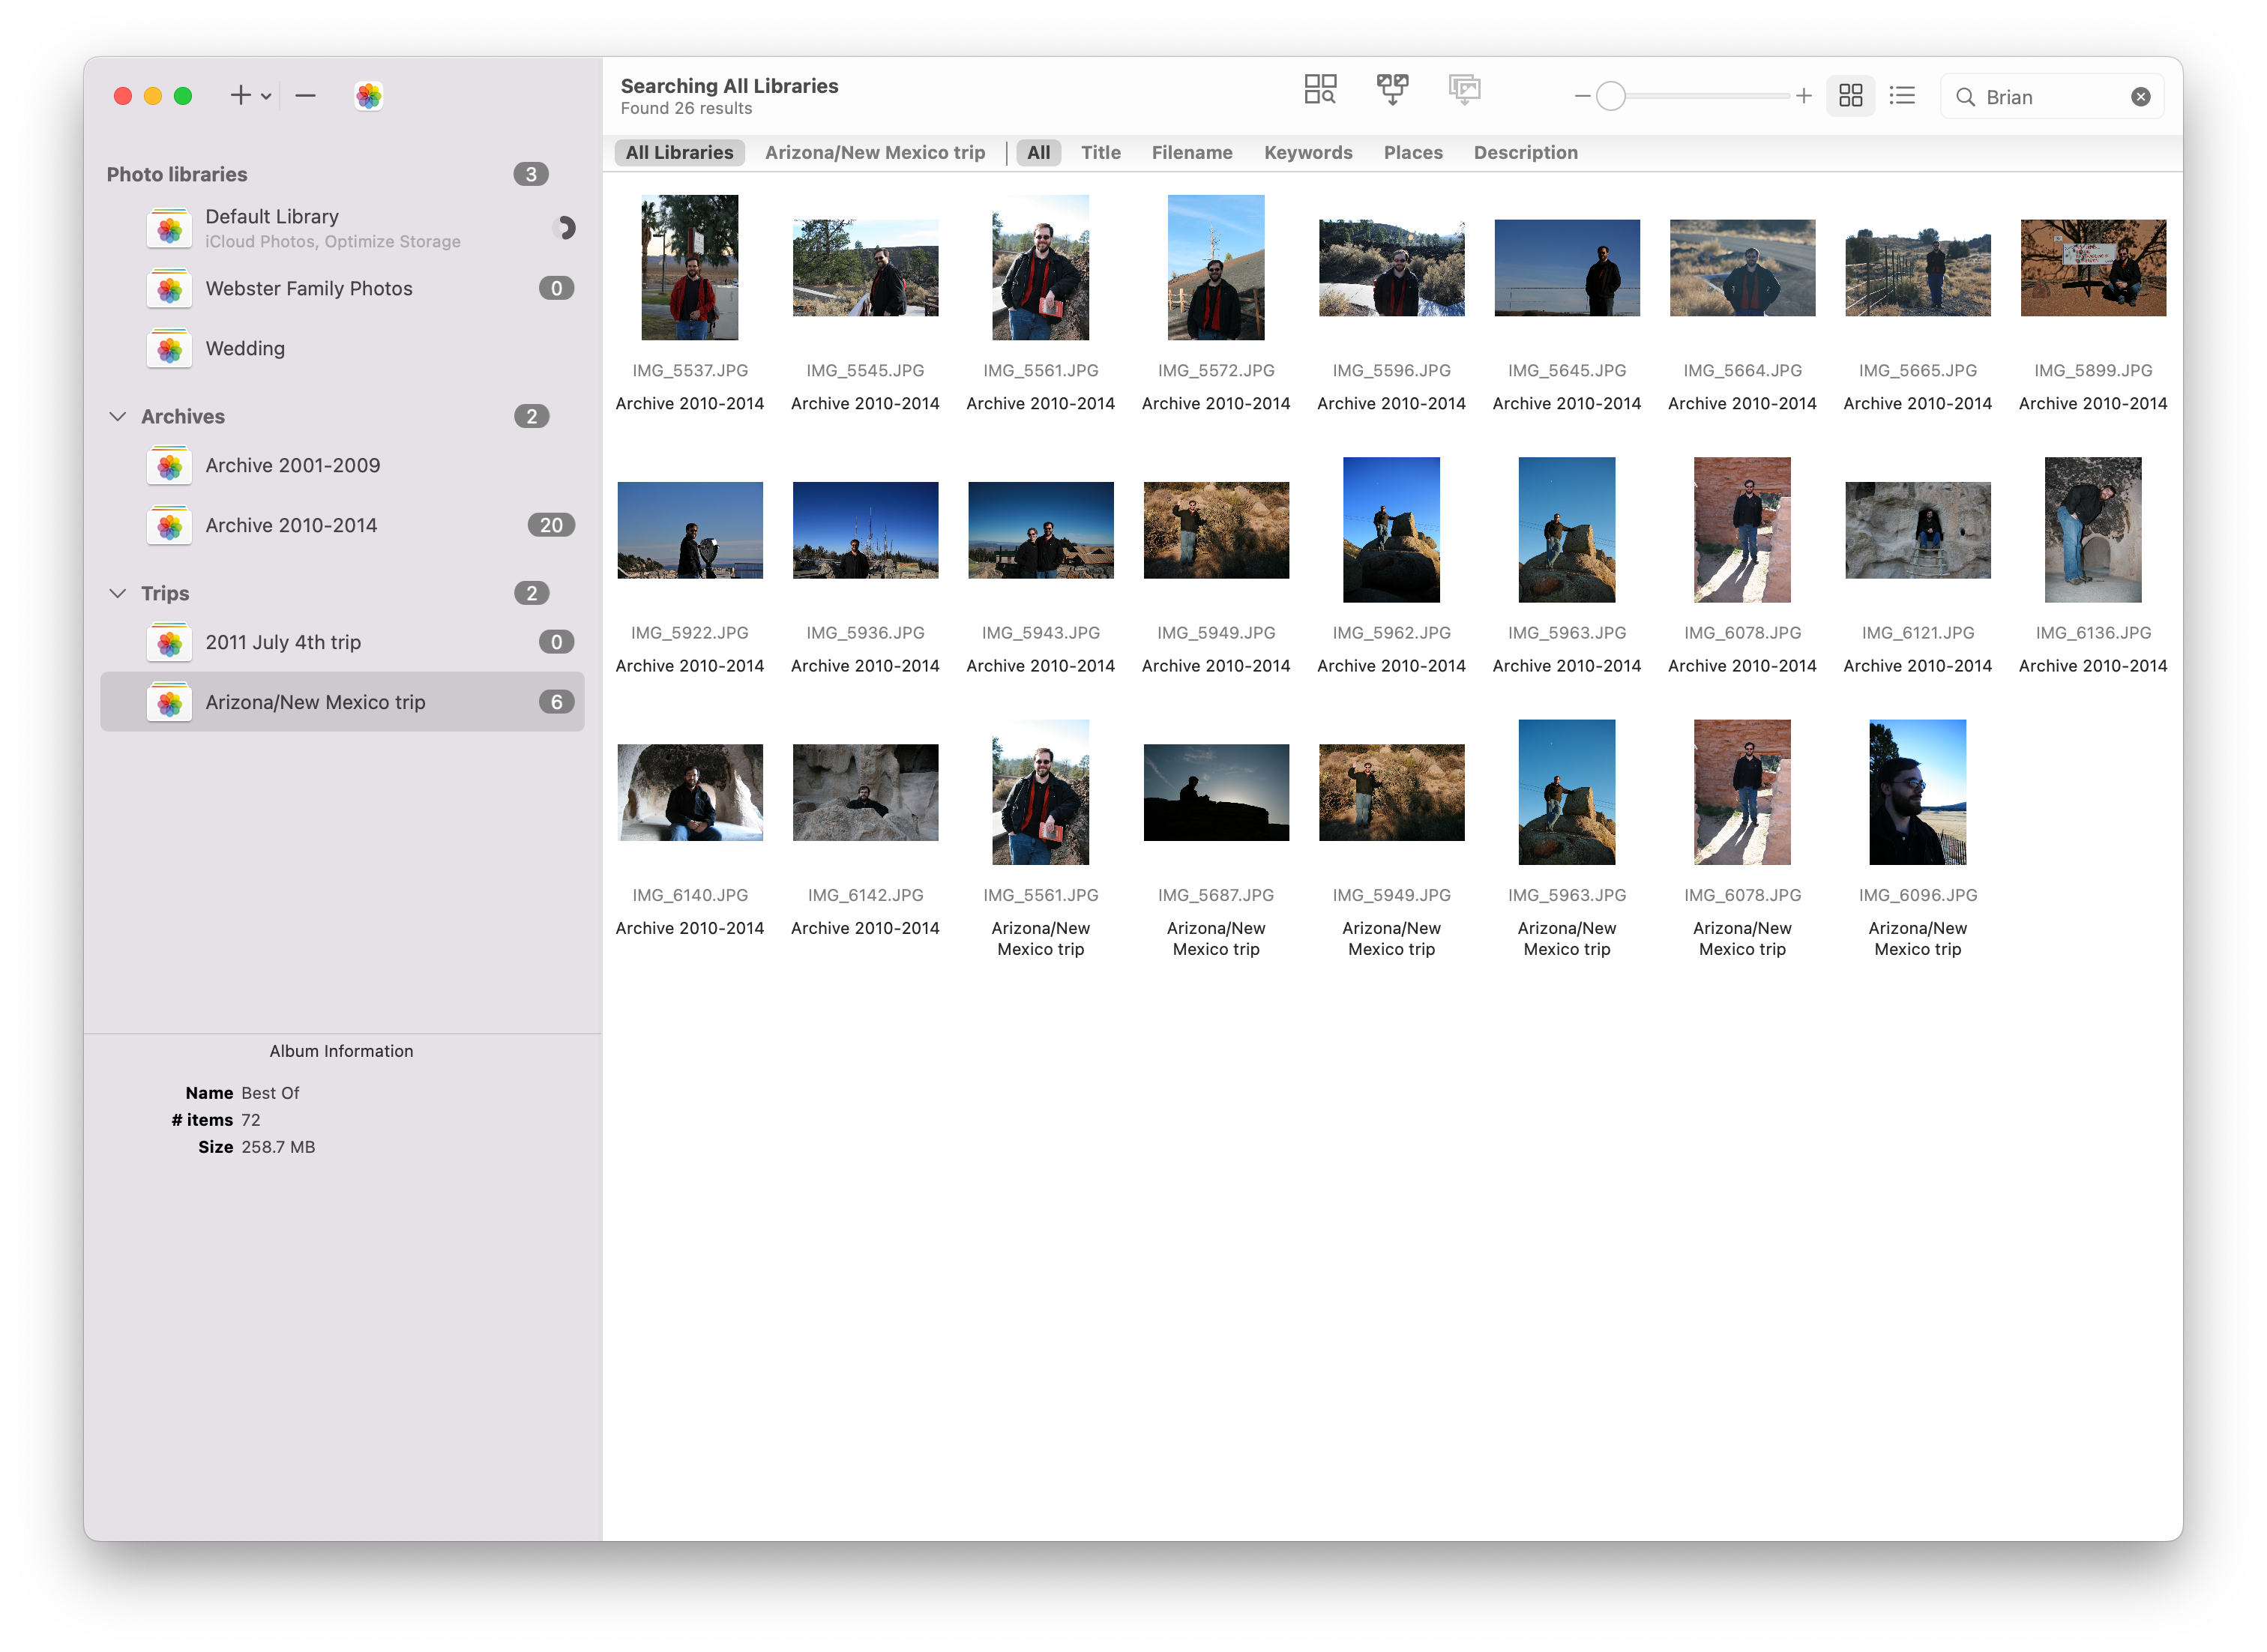 

In addition to searching a single library, PowerPhotos can also search all your libraries at once, by clicking the “All Libraries” button in the search scope bar. This will begin a search in all the libraries in your library list, and display all photos matching the search in the photo browser. A progress indicator is displayed next to each library’s name in the library list while the search is still in progress for that library, then once the search has completed for that library, a number will be displayed next to the library name, showing how many photos in that particular library match the search criteria.
You can customize the display of your search results in many of the same ways as when you’re just browsing a single library. There are a few differences:
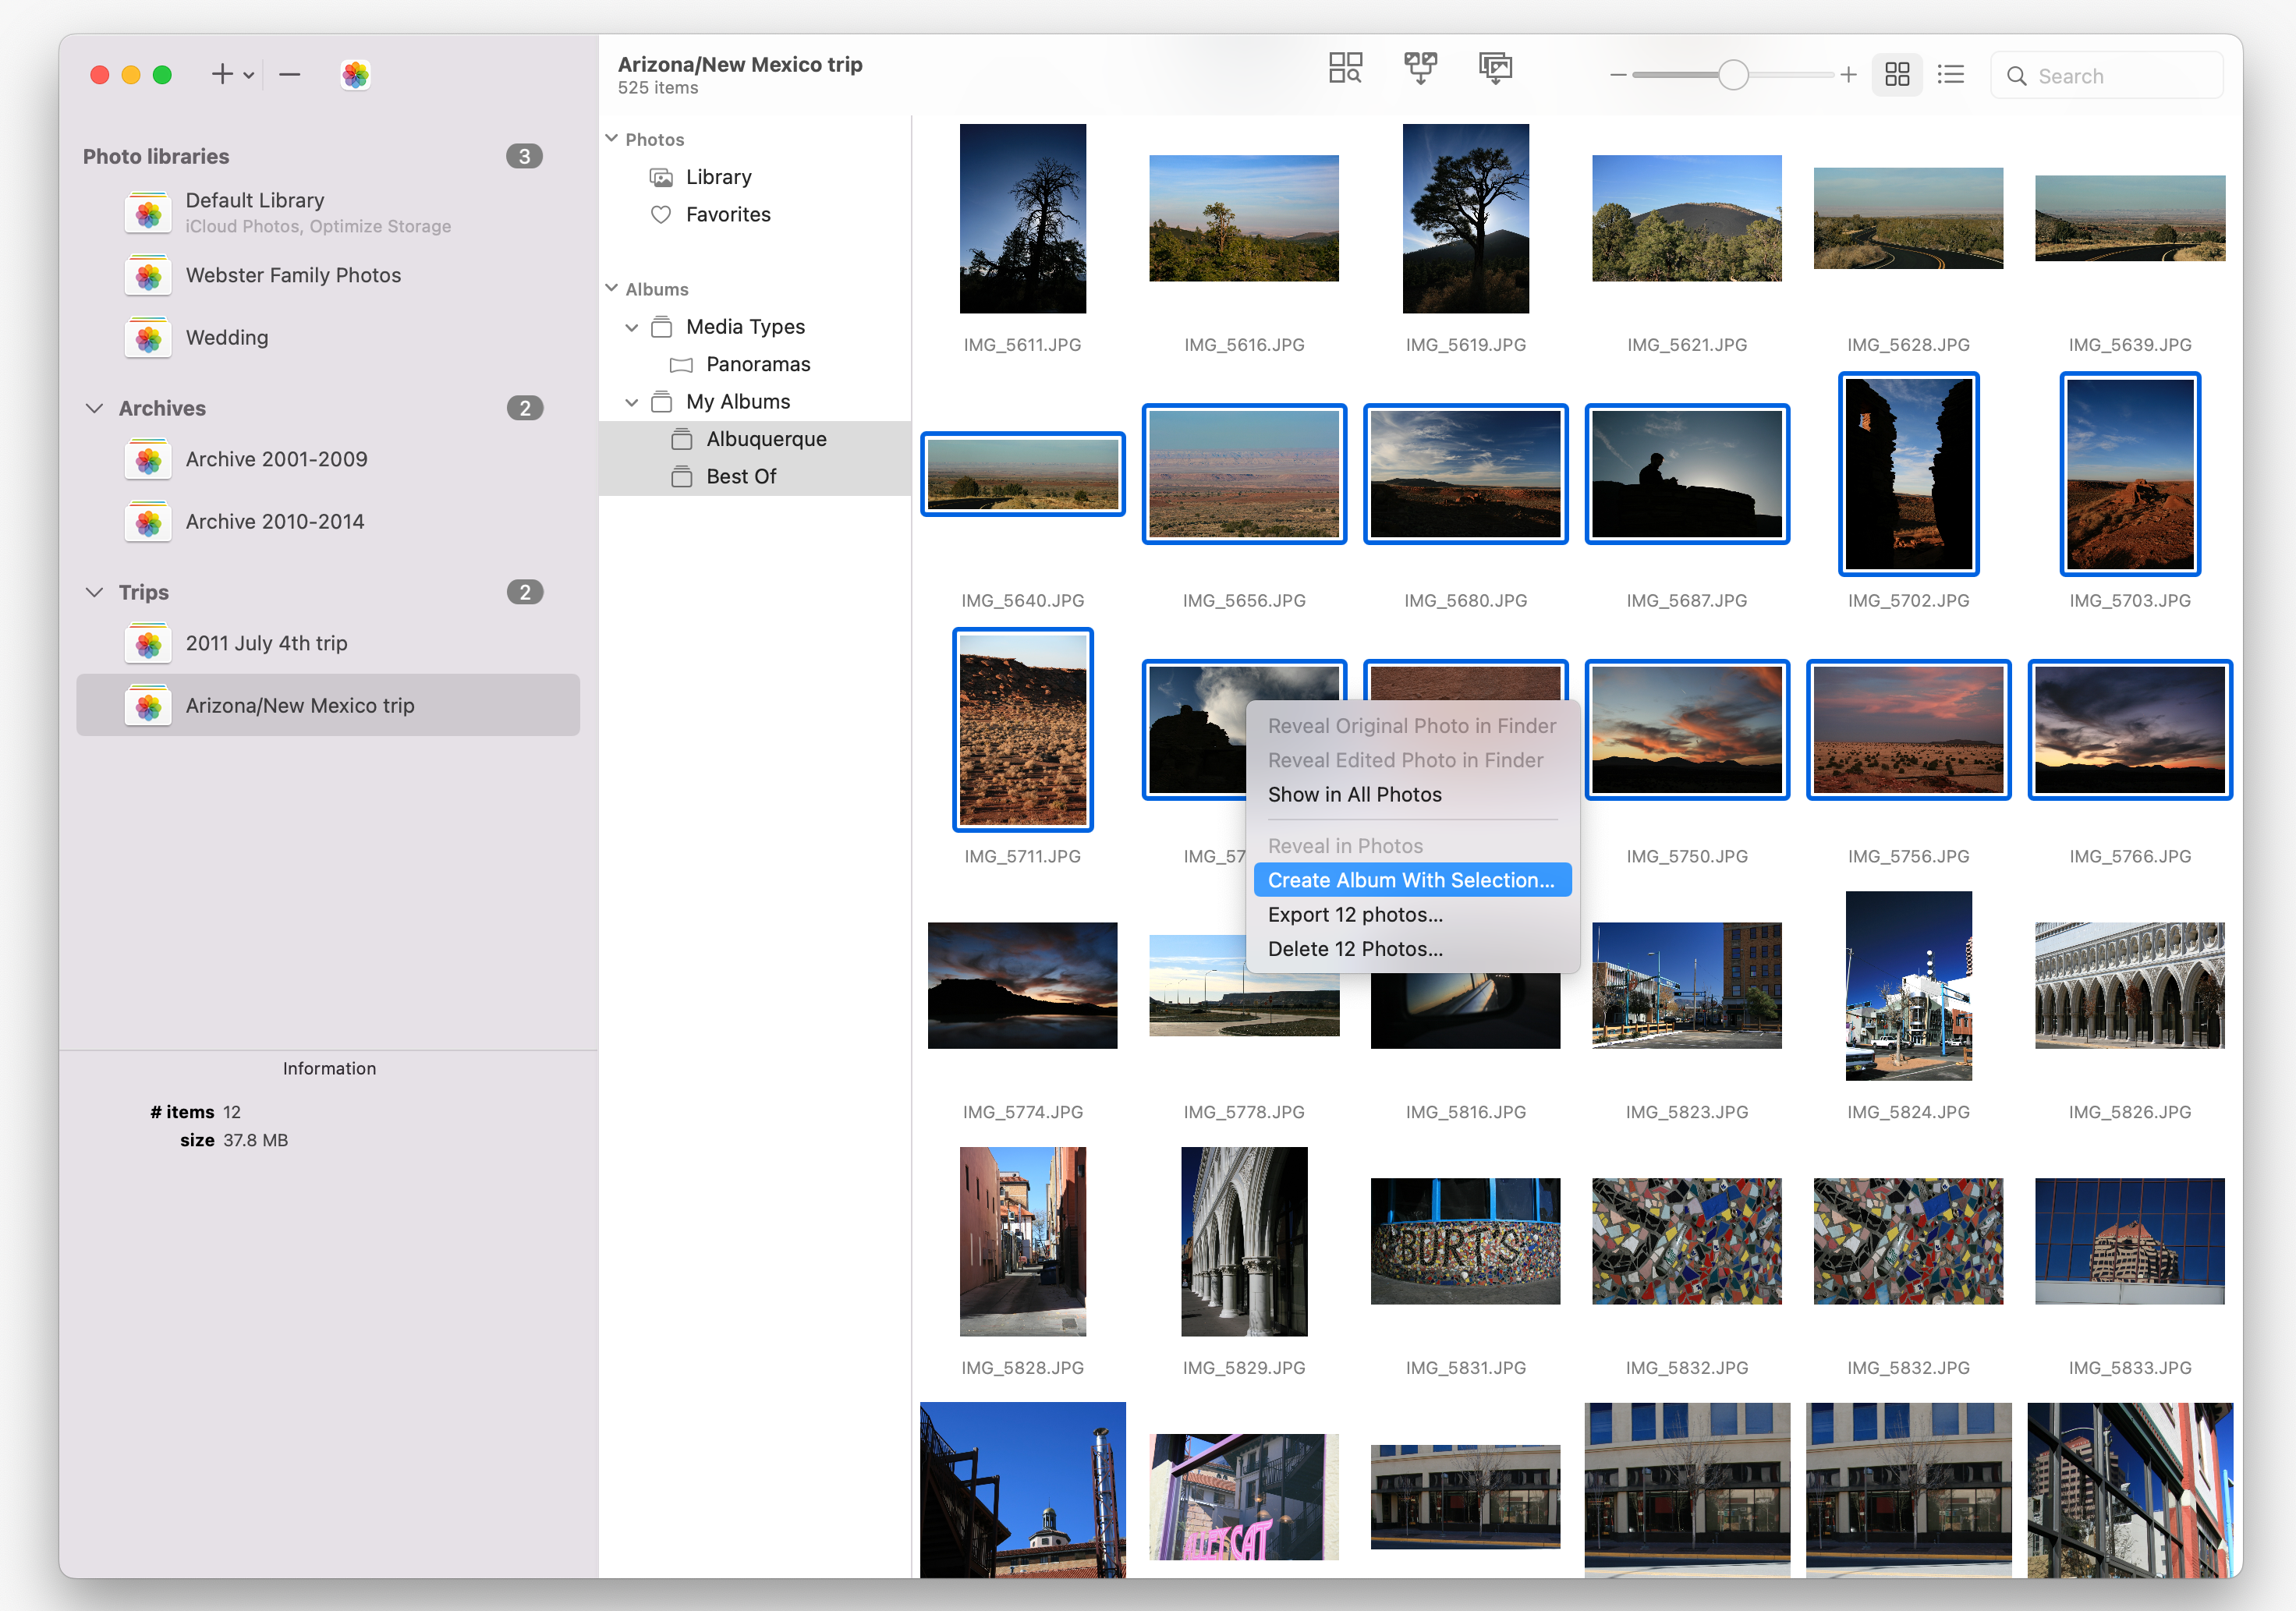
When browsing in PowerPhotos, you may sometimes find a set of photos you’d like to do something with, such as editing or deleting them. While these operations can’t be done directly in PowerPhotos, what you can do instead is create an album that contains a selection of photos, then open that album in Photos and do whatever you want with them there.
To create an album, first select the photos you’d like to work with in the PowerPhotos photo browser. Then, control-click one of the photos and select “Create Album With Selection” from the menu that comes up. You’ll be prompted to enter a name for the new album, then PowerPhotos will open the library, create the new album, and populate it with the photos you selected.
Note: On macOS 15.2, photos can only be deleted from the system library directly from PowerPhotos, not other libraries. Update to macOS 15.3 to avoid this limitation.
To delete photos from one of your libraries, select them then either press command-delete or control-click the photos and select “Delete Photos” from the menu that appears. The photos will be deleted from the library, which will also remove them from any albums they belong to.
The photos are not deleted permanently when doing this though, but rather are moved to the “Recently Deleted” album in the library and will be automatically deleted by Photos after 30 days. If you wish to immediately delete the photos (e.g. to free up disk space), open the library in Photos, select the “Recently Deleted” album, then click the “Delete All” button in the upper right.
You can also “undelete” photos from the Recently Deleted album by selecting them and clicking the “Recovery” button. This will move the photos back into the main library, and add them back into any albums they belonged to before they were deleted.
In addition to browsing your photo libraries in the main PowerPhotos window, you can also open individual libraries in separate windows. This lets you view different libraries side by side, and set up drag and drop photo/album copies between windows.
To open a library in a separate window, select the library and select File > Open Library in Separate window, or control-click on the library and select Open Library in Separate window from the menu that comes up. You can also option-double click a library to open it in its own window.
Library windows can also be combined into a single window with tabs for each library. Start by opening multiple libraries in their own window, then select the Window > Merge All Windows menu item. This will combine the separate library windows into a single window with tabs for each library.
Because the main window is still crucial for many functions of PowerPhotos, PowerPhotos will automatically quit when the main window is closed. If you like having libraries open in separate windows and want to keep them open between launches, open System Settings, go to the Desktop & Dock section, and uncheck the box labelled “Close windows when quitting an app”.
Using the Find Duplicates feature in PowerPhotos consists of three main steps.
Searching for duplicates The first step is to tell PowerPhotos what libraries you would like to search for duplicate photos, and how you would like it to compare photos to determine whether they are duplicates or not. You can read about this step in “Starting the duplicate finding process”. Once you start the duplicate finding process, PowerPhotos will perform an analysis of your photos and try to determine which photos are duplicates of each other. The result of the analysis is a list of duplicate groups. Each duplicate group contains two or more photos which have been identified as duplicates of one another. These groups will be shown to you in PowerPhotos’ duplicate browser.
Choosing keepers Next, PowerPhotos will choose a keeper from each duplicate group. You can customize how keepers are chosen from each duplicate group by choosing a duplicate rule, which will look at various attributes of the duplicate photos and choose one of them based on those attributes. A bunch of built-in duplicate rules are included with PowerPhotos, or you can create your own custom duplicate rule. You can read about this step in “Choosing keepers with duplicate rules”.
Trashing duplicates After choosing which photo(s) you want to keep from each group, the rest will be marked to be trashed. You can read about this step in “Deleting your duplicate photos”.
To begin finding duplicate photos in your Photos libraries, either click the magnifying glass button in the toolbar, or select “Find Duplicates” from the Library menu. This will present you with a view to set up your duplicate finding.
{% include full_width_image.html image_path=”screenshots/duplicate_setup.png” %}
There are two areas you need to set up to begin your duplicate search
What to search The Find Duplicates command can search one or more Photos libraries at once, looking for duplicate photos. To search a library, drag it from the library list on the left into the area labelled “Choose Libraries to Search”. To remove a library, click the X next to its name.
How to compare photos PowerPhotos bases its search on an algorithm that looks for photos that are visually identical. This allows PowerPhotos to find duplicate photos even if one copy has been scaled to a different size, saved as a different file format, or even had minor edits applied to it.
If you wish to further restrict what PowerPhotos considers to be a duplicate, you can select one or more of the metadata comparison options.
Once you’ve set up your search, click the “Begin Duplicate Search” button in the upper right corner of the window, and PowerPhotos will begin analyzing your libraries for duplicate photos.
When copying photos, merging libraries, and searching for duplicate photos, PowerPhotos uses a visual matching algorithm to find duplicate photos by analyzing the photo content to find photos that are visually identical. This will identify cases where the two photos may not be exactly the same, such as when one copy of the photo is scaled down to a smaller size, has been saved in a different format, or has had minor edits performed on it.
In some cases, you may want PowerPhotos to be more strict in what it considers to be a duplicate photo. If you want to narrow down its matches, you can enable one or more of the following options that will look at other aspects of the photo in addition to the content.
Once PowerPhotos has determined which photos are duplicates, it will display those duplicates to you so you can see what it has found.
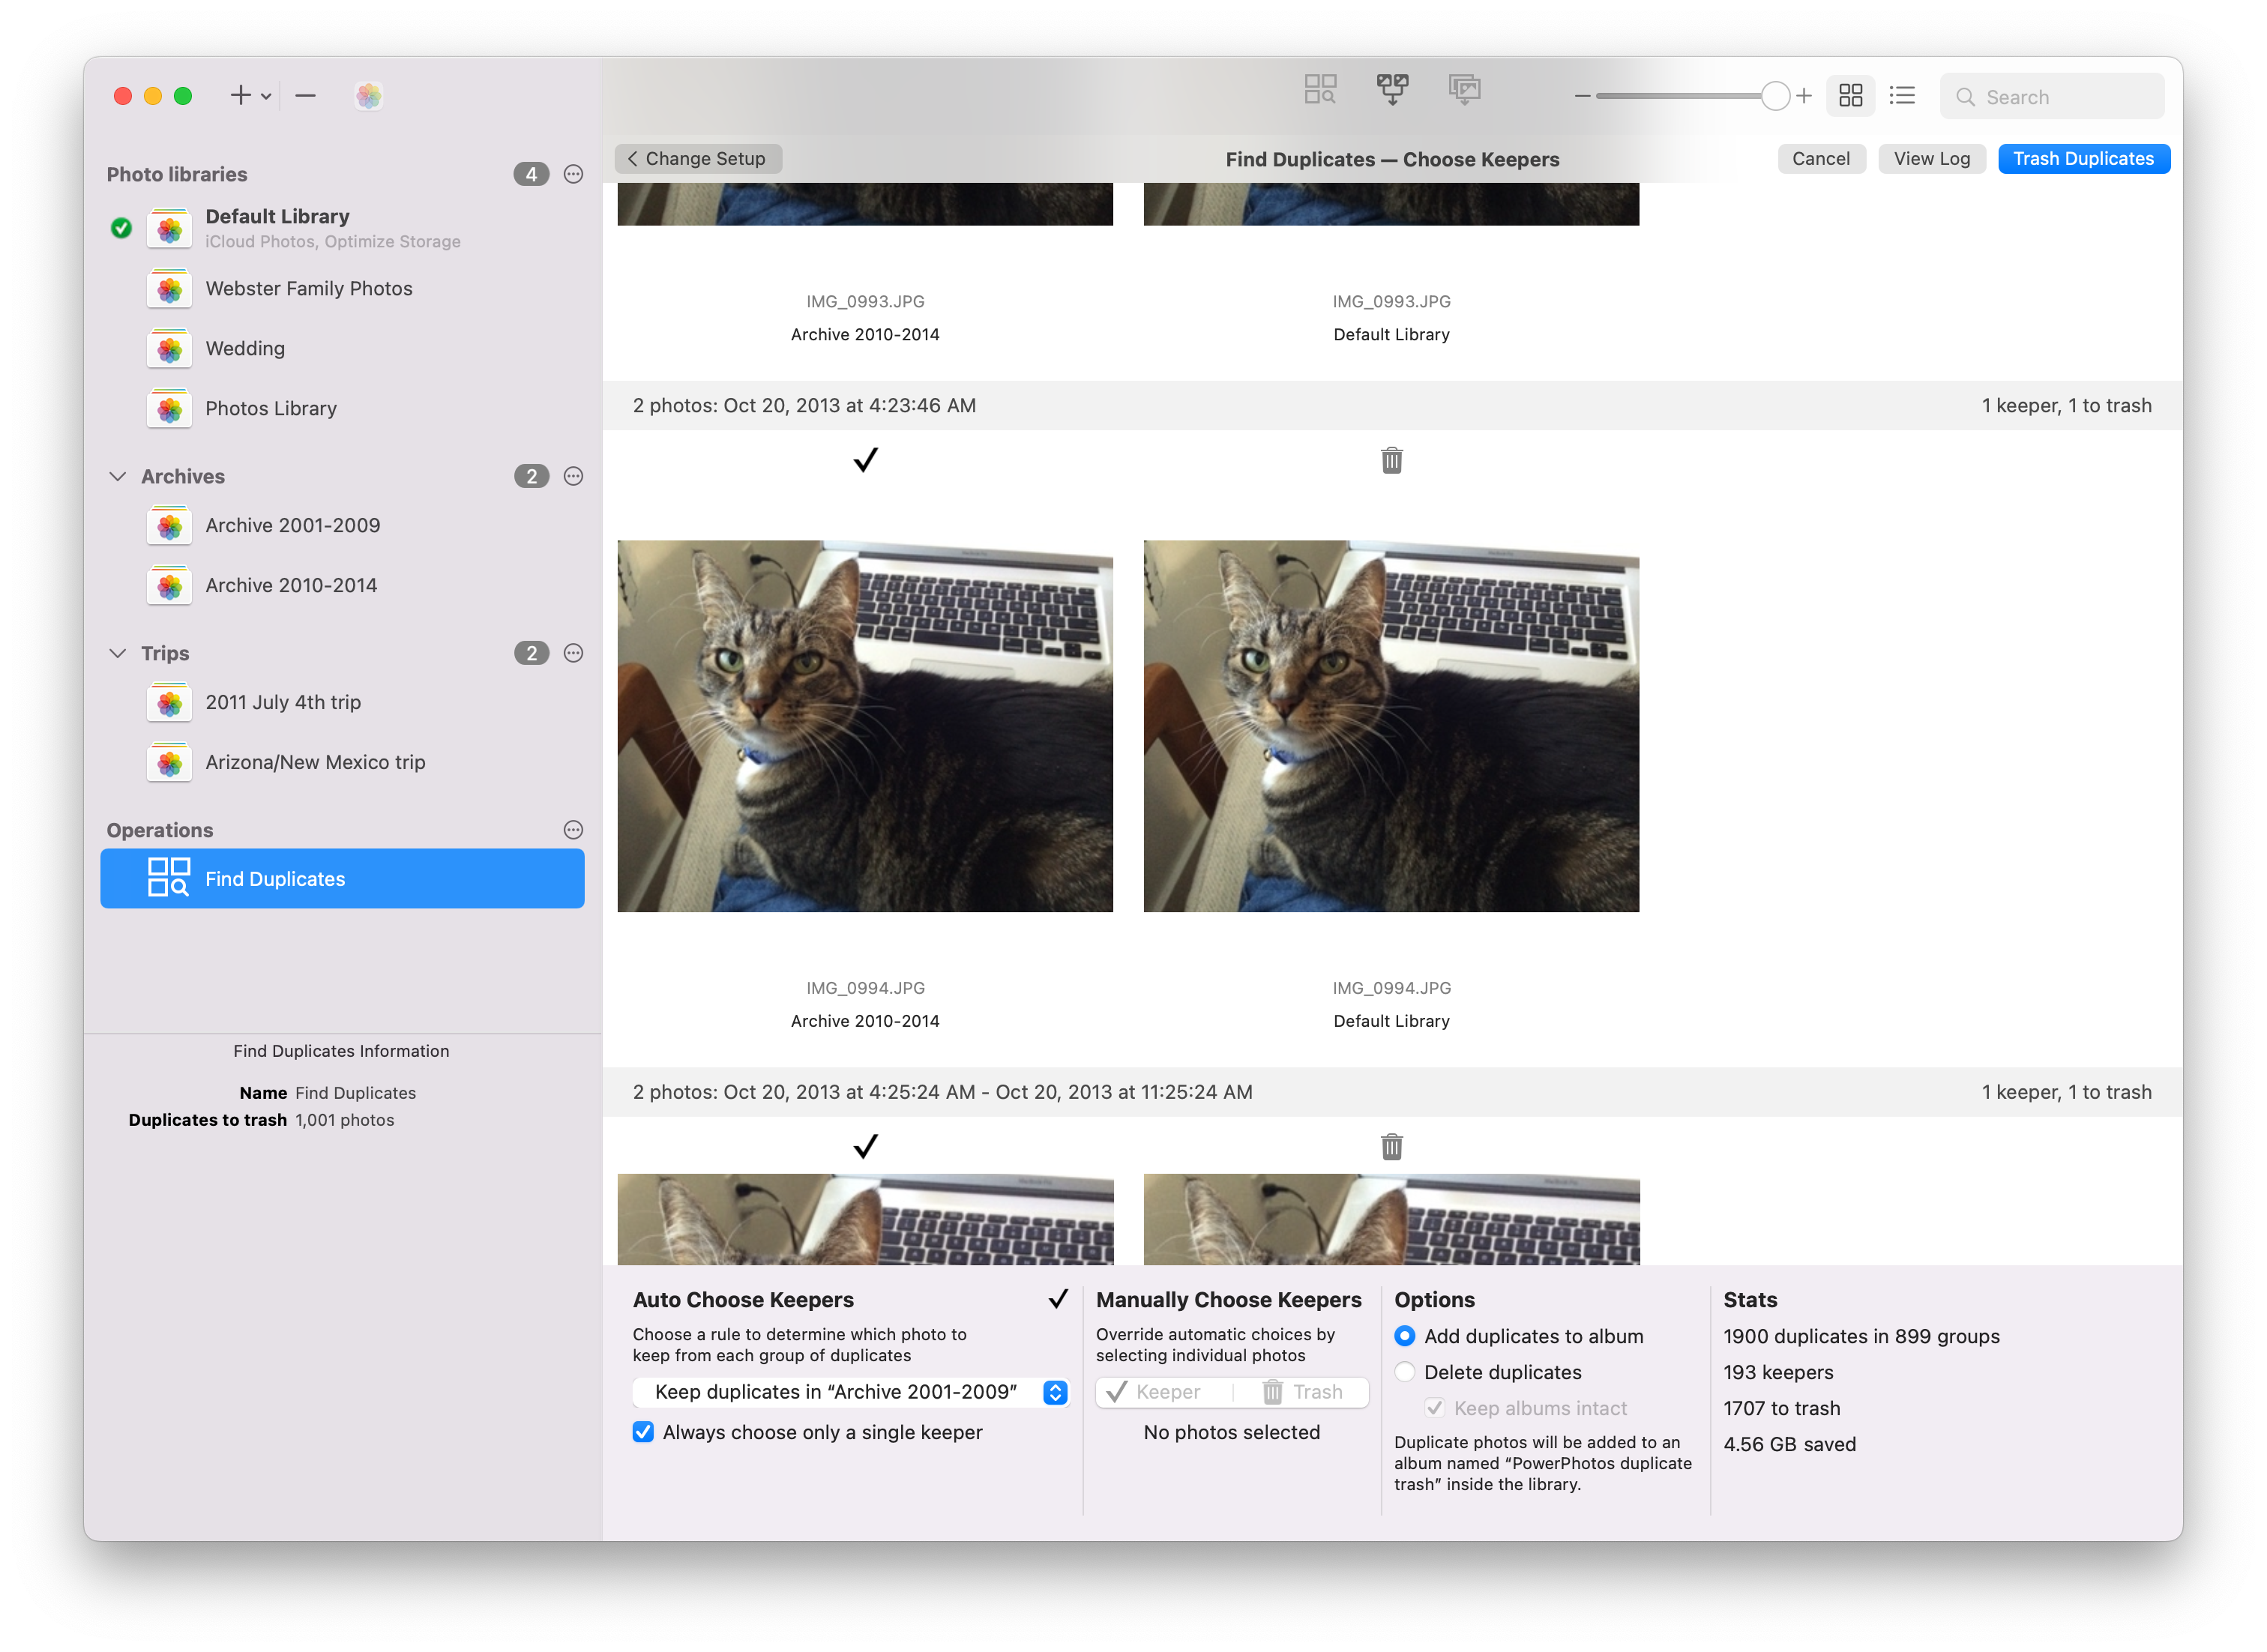
Your duplicate groups are displayed in a grid, with each group separated from the others. Just like when browsing a regular library, you can zoom in and out on the photos, select an individual photo to see its attributes in the information pane, and so forth.
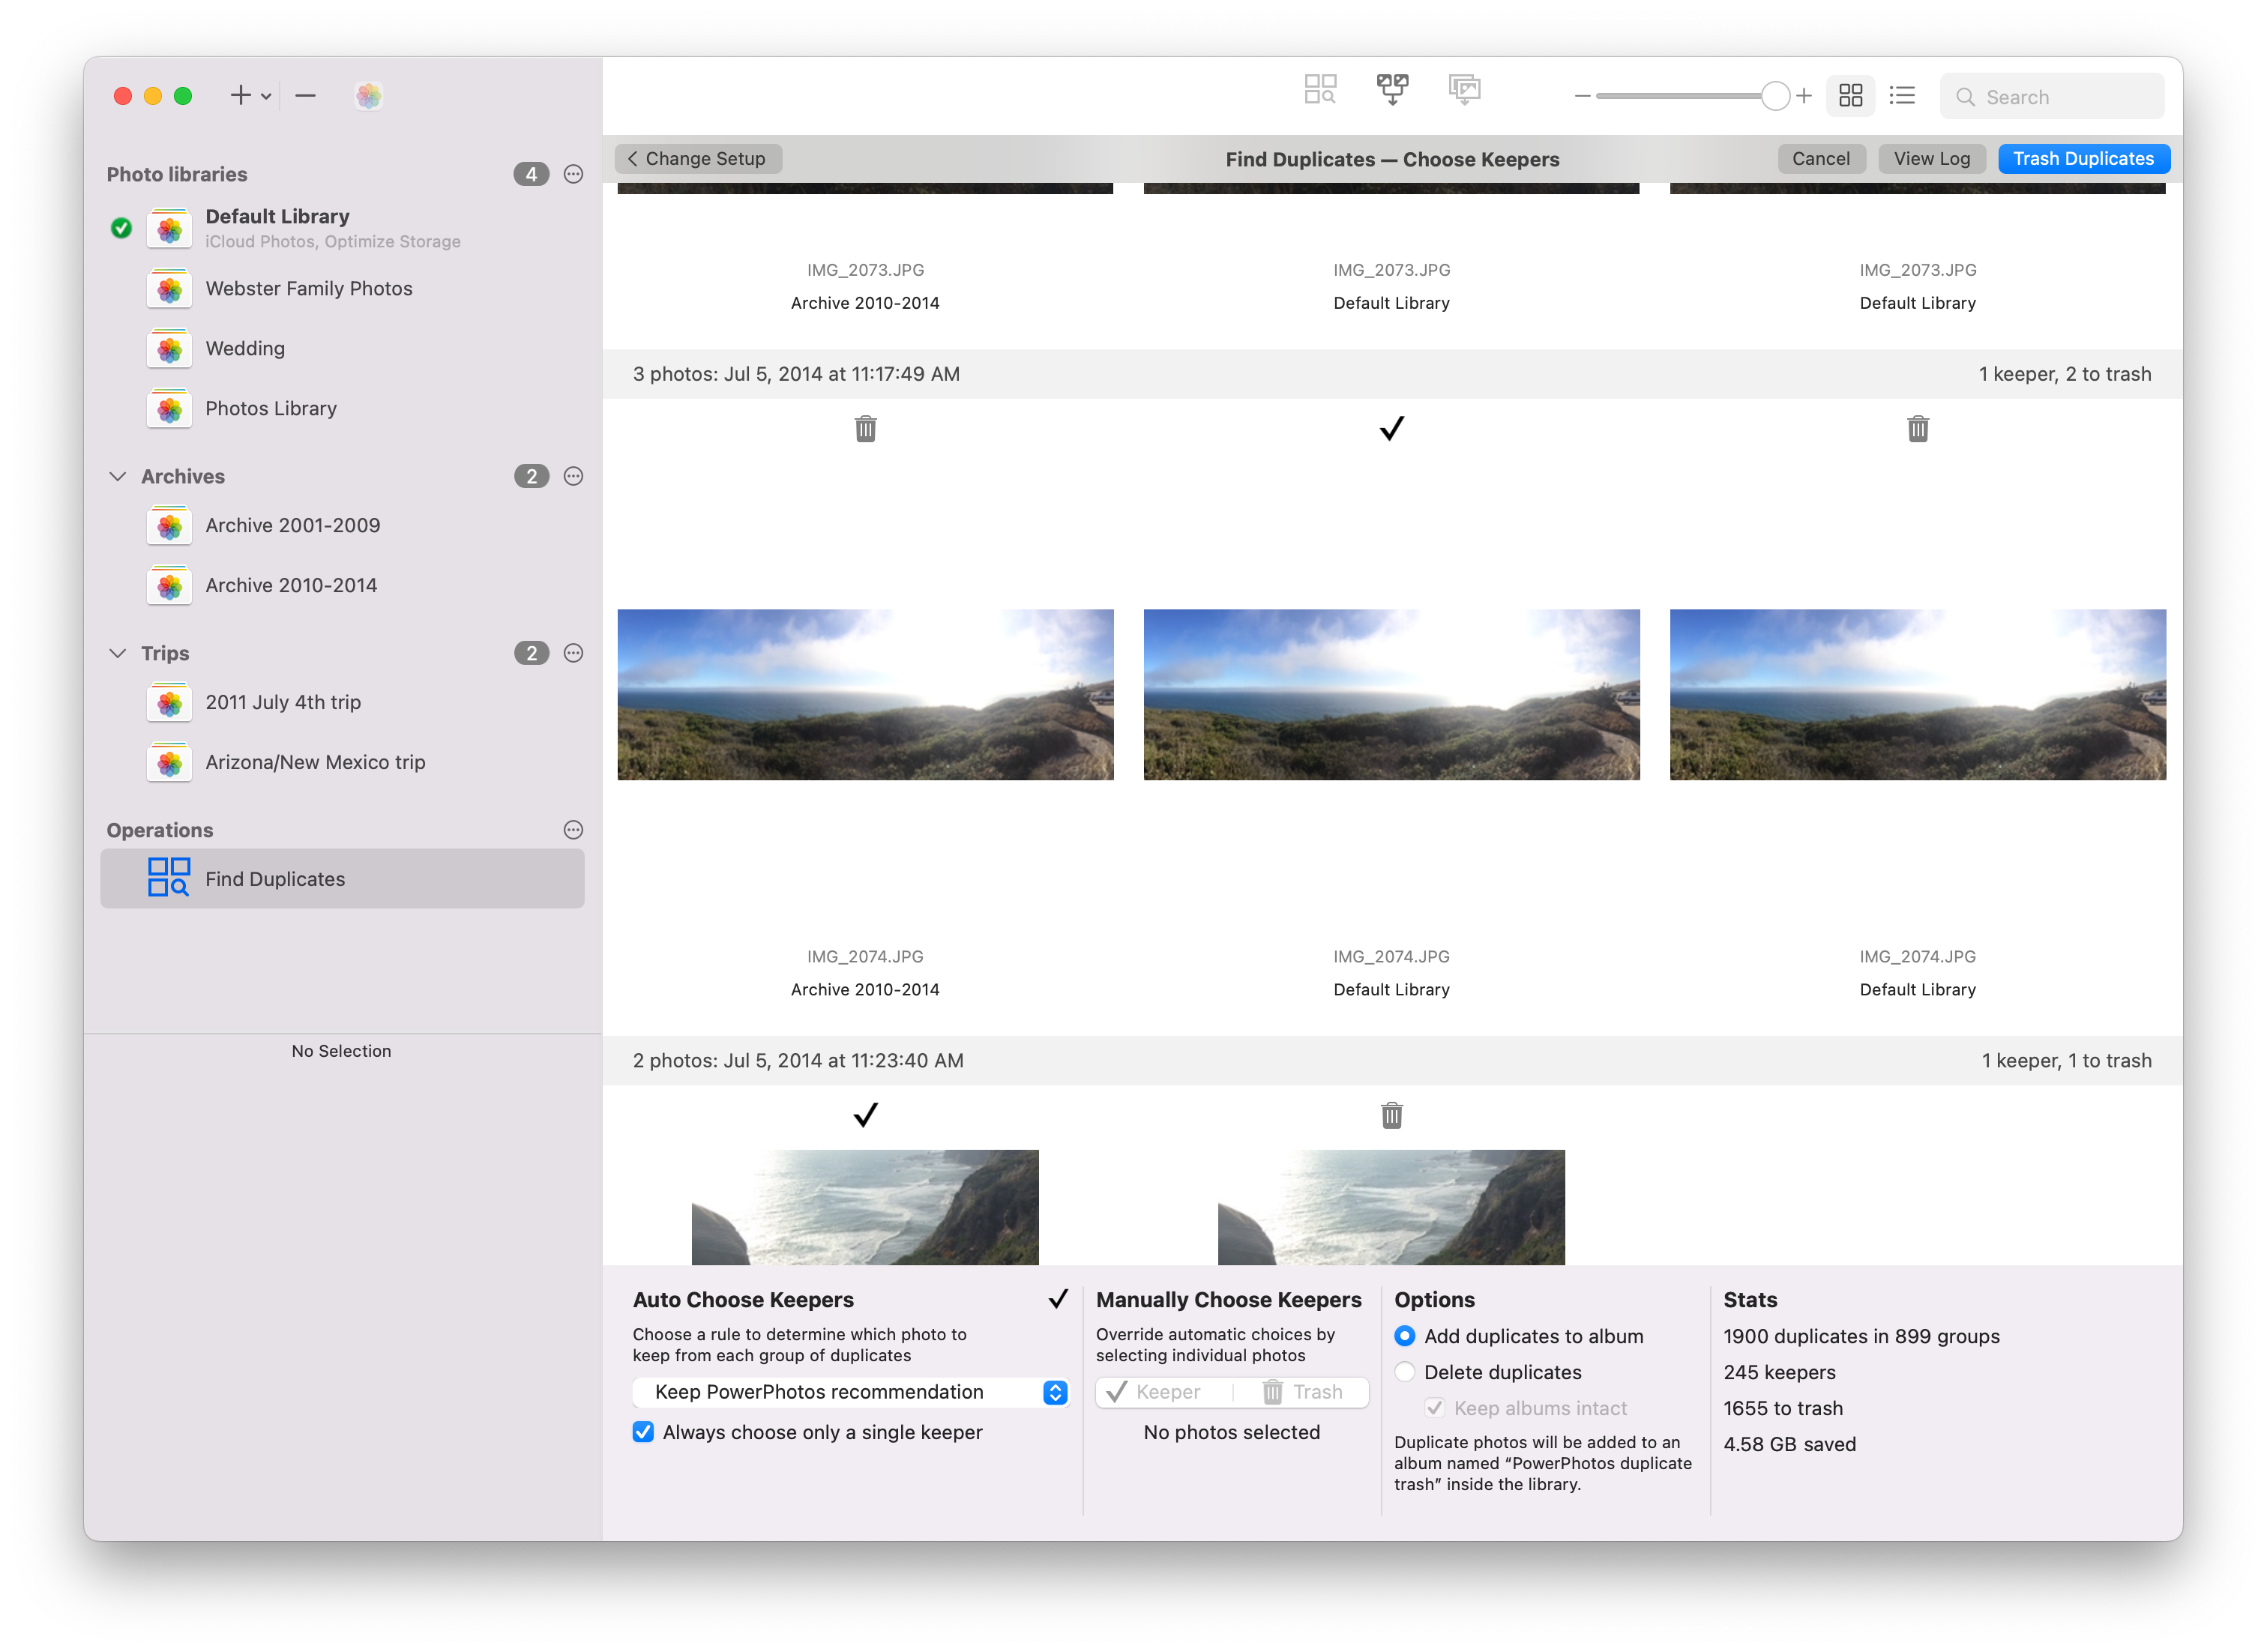
Once your duplicate rule has successfully chosen keepers from your duplicates, icons will appear above each photo.
 - indicates the photo has been chosen as the keeper for that duplicate group
 - indicates the photo will be trashed
The “View Log” button will display information logged by PowerPhotos during the duplicate analysis. This lets you see in more detail the paths of the photos that were identified as duplicates, which photos have been marked as keepers, and which ones will be marked to be trashed.
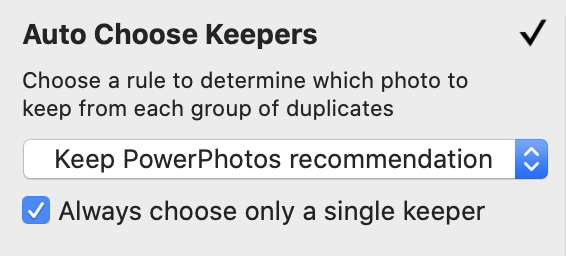
PowerPhotos uses a rule-based system to choose a keeper from each group of duplicate photos. The keeper will typically be the one photo that you want to keep around, with the rest of the duplicates getting moved to the trash, or having some other action performed on them. You can choose from several built-in duplicate rules using the pop-up menu down at the bottom of the window.
Once a rule has been chosen from the pop-up menu, PowerPhotos will evaluate all the duplicate groups based on that rule. In the duplicate browser, you will see a checkmark above whichever photo from each group has been chosen as the keeper.
The built-in duplicate rules include:
Editing rules
The built-in rules are a good start, but since everybody’s photo collection is unique, you may need to create a custom duplicate rule to choose keepers according to what makes the most sense for your own photos. To create a custom rule, click the rules pop-up menu and select “Edit Rules…” from the bottom of the menu. This will present you with the following window:
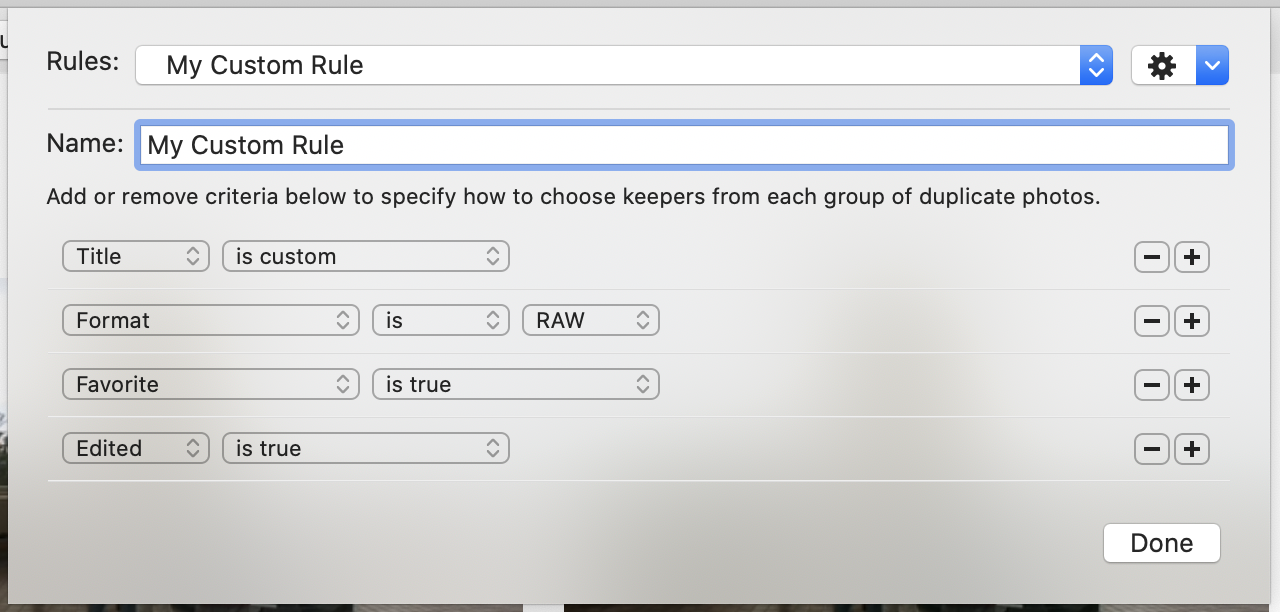
You can view (but not edit) the built-in rules to see how they are implemented. To create your own rule, click the gear button in the upper right and select “New Rule” from the menu that appears. If you’d like a rule similar to one of the built-in rules, select that rule from the pop-up menu, then click the gear button and select “Duplicate Rule” to make a copy of that built-in rule. You can specify a name for your new rule by typing it in the “Name” field.
Each duplicate rule is made up of one or more criteria that you’d like to use to compare the photos in each duplicate group. By evaluating these criteria, one or more photos from the group will be chosen as the keeper from that group. The criteria available to compare include the photos’ rating, modification date, size, format, and much more. See the Criteria Details section for more information.
Because in many cases the duplicate photos will also have identical values for many of these attributes, you can specify multiple criteria to evaluate the photos by. If the first criteria is identical for some or all the photos in the group, the evaluation will then proceed to the second criteria, and so on, until they have all been evaluated.
How rules are evaluated
In the example above, we have three photos that have been identified as duplicates by PowerPhotos, and the four criteria from the rule displayed above that were specified to evaluate the duplicate photos.
The first criterion says to choose whichever photo has a custom title. However, none of the photos have a custom title set, so this criteria does not choose any photos, and evaluation continues to the next criteria.
The second criterion says to prefer RAW photos over other formats such as JPG. There are two RAW photos in the duplicate group, and one JPG, so PowerPhotos will not choose the JPG as being the keeper. This leaves the two RAW photos as possible keepers, and we proceed to the next criterion.
The third criterion says to prefer photos that have been favorited. The photo in the middle is marked as a favorite, so that photo is choosen by PowerPhotos as the keeper.
Since we have now narrowed down the group to a single photo to keep, the fourth criteria is not needed, and is skipped. The middle photo is chosen as the keeper and will appear with a checkmark over it in the duplicate browser, and the other two photos are marked to be trashed.
Single vs multiple keepers
By default, only a single photo is marked as a keeper from each duplicate group. If your duplicate rule does not narrow things down to just a single photo, then PowerPhotos will pick one of the remaining photos for you as the keeper. However, if you uncheck the “Always choose only a single keeper” checkbox, then all the photos that make it to the end of criteria evaluation will be marked as keepers.
For example, let’s say you have a duplicate group with two photos from “Library A”, and two photos from “Library B”, and that you have a duplicate rule set up with a single criteria that says “Library is Library A”. Both photos from Library B will be eliminated by the criteria, leaving just the two photos from Library A. If “Always choose only a single keeper” is checked, then PowerPhotos will only mark one of the two photos from Library A as a keeper; if it is unchecked, then both photos from library A are marked as keepers.
The following is a list of the criteria that can be used in duplicate rules to select photos from among a set of duplicates.
While duplicate rules provide a very flexible way to decide which duplicate photos to keep and get rid of, sometimes you may still want to make some decisions yourself, rather than leaving everything up to the automated rules.
You can do this by selecting one or more photos, then clicking either the “Keeper” or “Trash” button at the bottom of the window to mark your selection to either be kept or trashed. Alternately, you can also control-click a photo and use the contextual menu, or press the return key to toggle a photo between keeper and trash.
Note that while duplicate rules will always leave at least one keeper in each duplicate group, if you’re changing actions manually, it is possible to mark all photos from a group to be trashed. Be careful when doing this, since you want to be sure you’re not deleting all copies of a photo unless you really want to get rid of them all.
If you would like to review all selections manually, but would prefer not to have to do it all in one sitting, you can do so like so:
Once you’ve finished choosing which photos to keep and which to trash, click the “Trash Duplicates” button in the upper right corner to get rid of your duplicate photos. You can specify how to deal with your duplicate photos in the “Options” section at the bottom of the window.
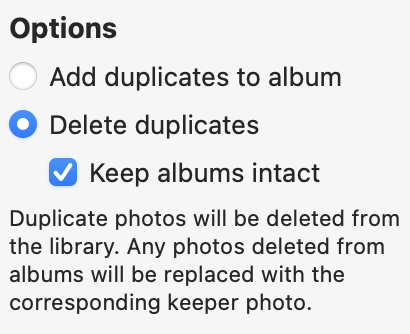
Delete duplicate photos
PowerPhotos can directly delete the duplicate photos from your library for you, so there are no additional steps you need to take. You will see an additional confirmation warning displayed by macOS before the deletion is finalized.
Keep albums intact
When deleting photos from your library, it’s possible that some of those photos currently belong to one or more albums in that library. Deleting the photos will also remove those photos from their albums, but with this option enabled, PowerPhotos will replace each deleted photo with the corresponding keeper photo from the same duplicate group. The end result is that all your albums will remain intact with the same number of photos even after doing your duplicate deletion.
Note that this option only applies when the trashed photo and the keeper belong to the same library. If your duplicate search spans multiple libraries (let’s call them “Library A” and “Library B”), then if the photo being trashed is in library A, and the keeper is in library B, then any albums in library A that contained the trashed photo will not have the photo be replaced.
Add duplicates to album
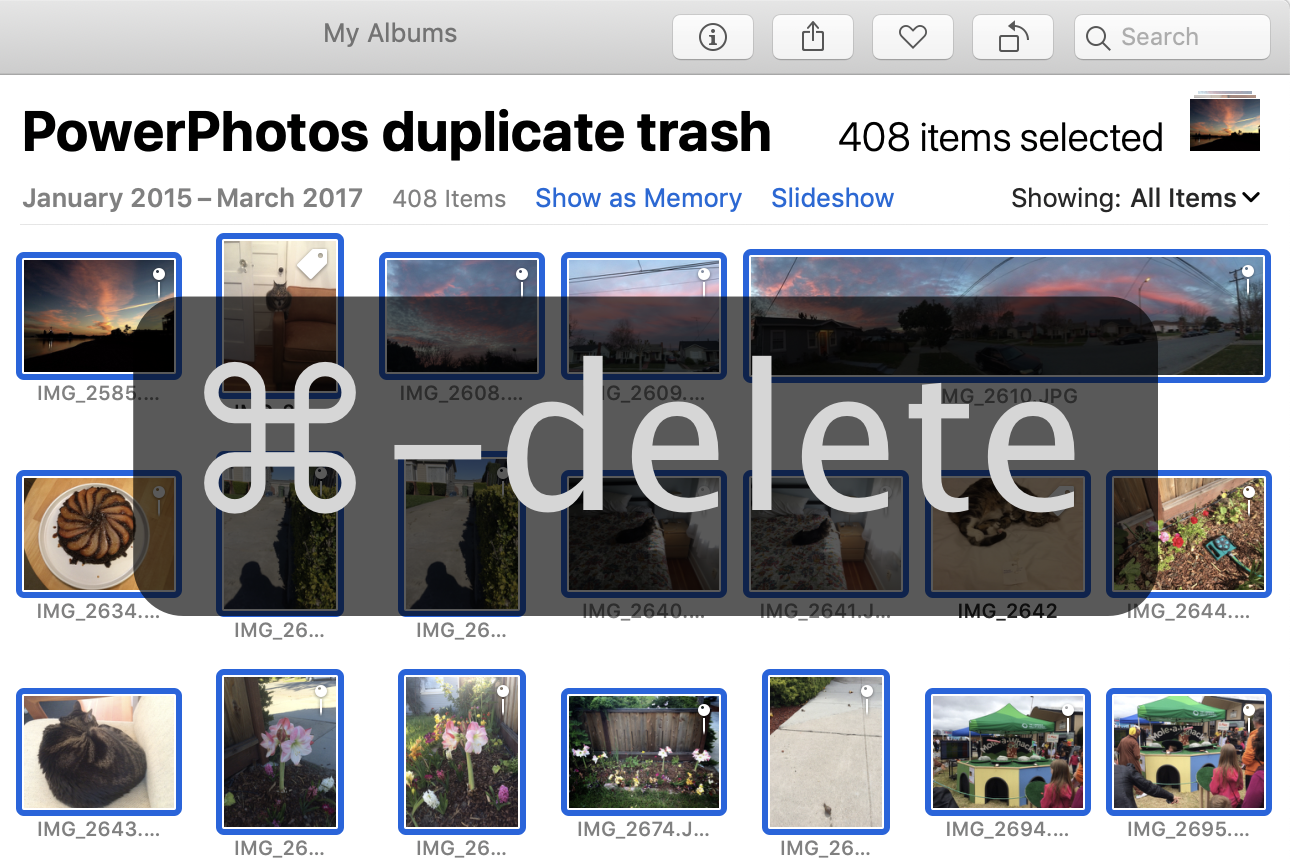
If you’d rather not delete your photos right away, you can have PowerPhotos collect them into an album for you instead.
PowerPhotos will create an album named “PowerPhotos duplicate trash” in your Photos library and populate it with all the photos that have been marked to be trashed. PowerPhotos will then walk you through the steps needed to delete the photos from the library. Note that all these steps are done in the Photos app, and not from within PowerPhotos.
1.Select Trash Album Bring Photos to the front and select the “PowerPhotos duplicate trash” album in your album list. PowerPhotos can perform this step for you by clicking the “Select the album for me button”.
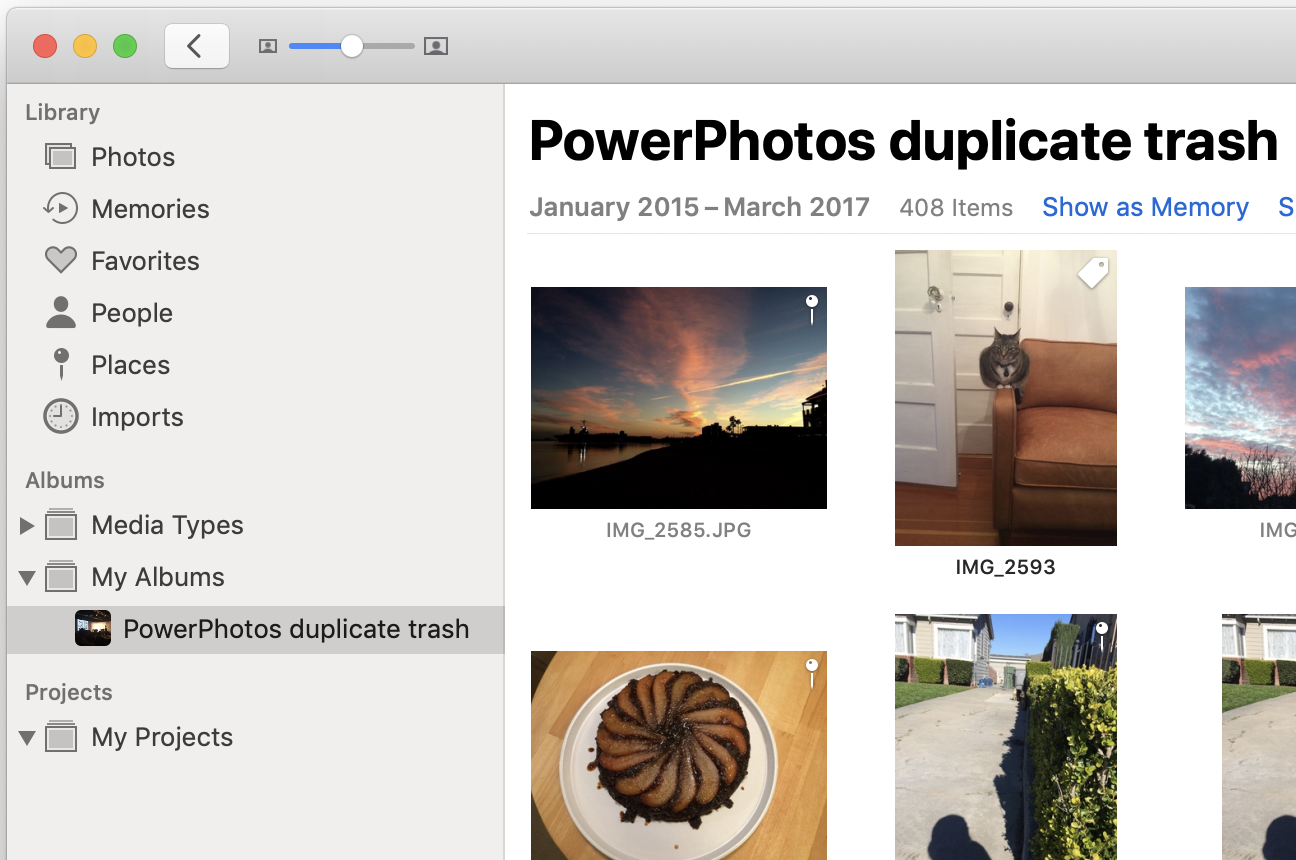
2.Select All Photos Select all the photos in the “PowerPhotos duplicate trash” album, either by pressing command-a or choosing “Select All” from the Edit menu.

3.Delete Photos Press command-delete to move all the photos into the “Recently Deleted” album, removing them from the library. Note that just pressing the delete key alone will only remove the photos from the album, and not delete the from the library.
After deletion Once the photos have been deleted, they will remain in the “Recently Deleted” album until Photos permanently deletes them in 40 days. This gives you a chance to “undelete” them for a while in case you change your mind. You can do that by selecting the “Recently Deleted” album, selecting the photos you want to undelete, and clicking the “Recover” button. If you want to delete the photos right away to free up disk space, you can instead click the “Delete All” button, which will delete them immediately and permanently.
Here are a few tips and tricks that might be helpful when using PowerPhotos to deal with duplicate photos in your libraries.
Make sure to try out the various duplicate detection options to see which settings work best for your particular photo collection. For instance, if you are having some photos which you think should be identified as duplicates but aren’t, make sure you have all the metadata comparison options disabled when you set up your search. This is the most inclusive, and will identify photos that are not byte-for-byte matches of each other.
Duplicate rules can be very helpful in eliminating the laborious work of going through all the found duplicates and picking which one(s) you want to take action on. Some common examples include:
When keeping your photos separated in multiple libraries, you sometimes need to copy a set of photos from one library to another. With Photos, the only way to do this is to manually export the photos from one library, switch over to your other library, and then manually import them into that library. PowerPhotos provides a way to copy photos directly from one library to another in one step, while retaining photo metadata such as keywords, dates, favorites, titles, and descriptions.
To copy albums to another library, select them in PowerPhotos, then drag them them onto the library you would like to copy them to. PowerPhotos will first collect the information about those photos from the source library, and then import those photos into the destination library and restore all the photo information as it was before. If you drag more than one album at once, and a photo belongs to more than one of those albums, the photo will only be imported once, but will be added to all the appropriate newly created albums in the destination library.
You can also open libraries in separate windows and drag albums from one window to another to copy the macross.
Note that you cannot drag albums from Photos itself into PowerPhotos - you must drag the albums from PowerPhotos’ own window in order to perform a copy. Also, only regular albums and folders can be copied as-is between libraries. Copying a smart album to another library will copy all the photos in that smart album, but a regular album will be created in the destination library containing those photos rather than a smart album. Copying “project” items like calendars, books, and slideshows between libraries is not supported.
Unregistered users are limited to only copying albums totalling no more than 20 photos.
In addition to copying albums, you can also drag individual photos from the PowerPhotos image browser and drop them on another library in your library list to copy the photos and their metadata over. No albums will be recreated when copying individual photos this way.

To ensure that the extra photo information such as edits, titles, descriptions, keywords, dates, and favorites will come over, you should drag the photos from PowerPhotos’ image browser, and not from a Finder window, the Photos app window, or some other program that lets you drag files. If you drag from somewhere else, they will be treated as regular photos, and the extra information associated with them from Photos will not be brought into the destination library.
In addition to copying photos from another Photos library, you can also import new photos directly into one of your Photos libraries by dragging the photos from the Finder and dropping them onto a library in the PowerPhotos window. PowerPhotos will automatically open up the library they were dropped onto and import the photos in Photos for you.
Unlike when copying directly from another library, there will be no additional metadata such as ratings, keywords, etc. for PowerPhotos to copy across, though Photos will still recognize information embedded in the photos such as the date it was taken. This does still have the advantage of being more convenient than opening the library manually, plus you can still take advantage of PowerPhotos’ duplicate detection system when importing photos this way.
Additionally, if the folder you drop has your photos organized into a hierarchy of subfolders, PowerPhotos will recreate that same folder hierarchy as albums organized into folders in your photo library.
PowerPhotos allows you to merge the contents of multiple libraries together into one, while preserving all your albums and photo metadata. To begin a merge, click the “Merge Libraries” toolbar button, or select “Merge Libraries” from the Library menu. This will present you with the following view for setting up your merge:
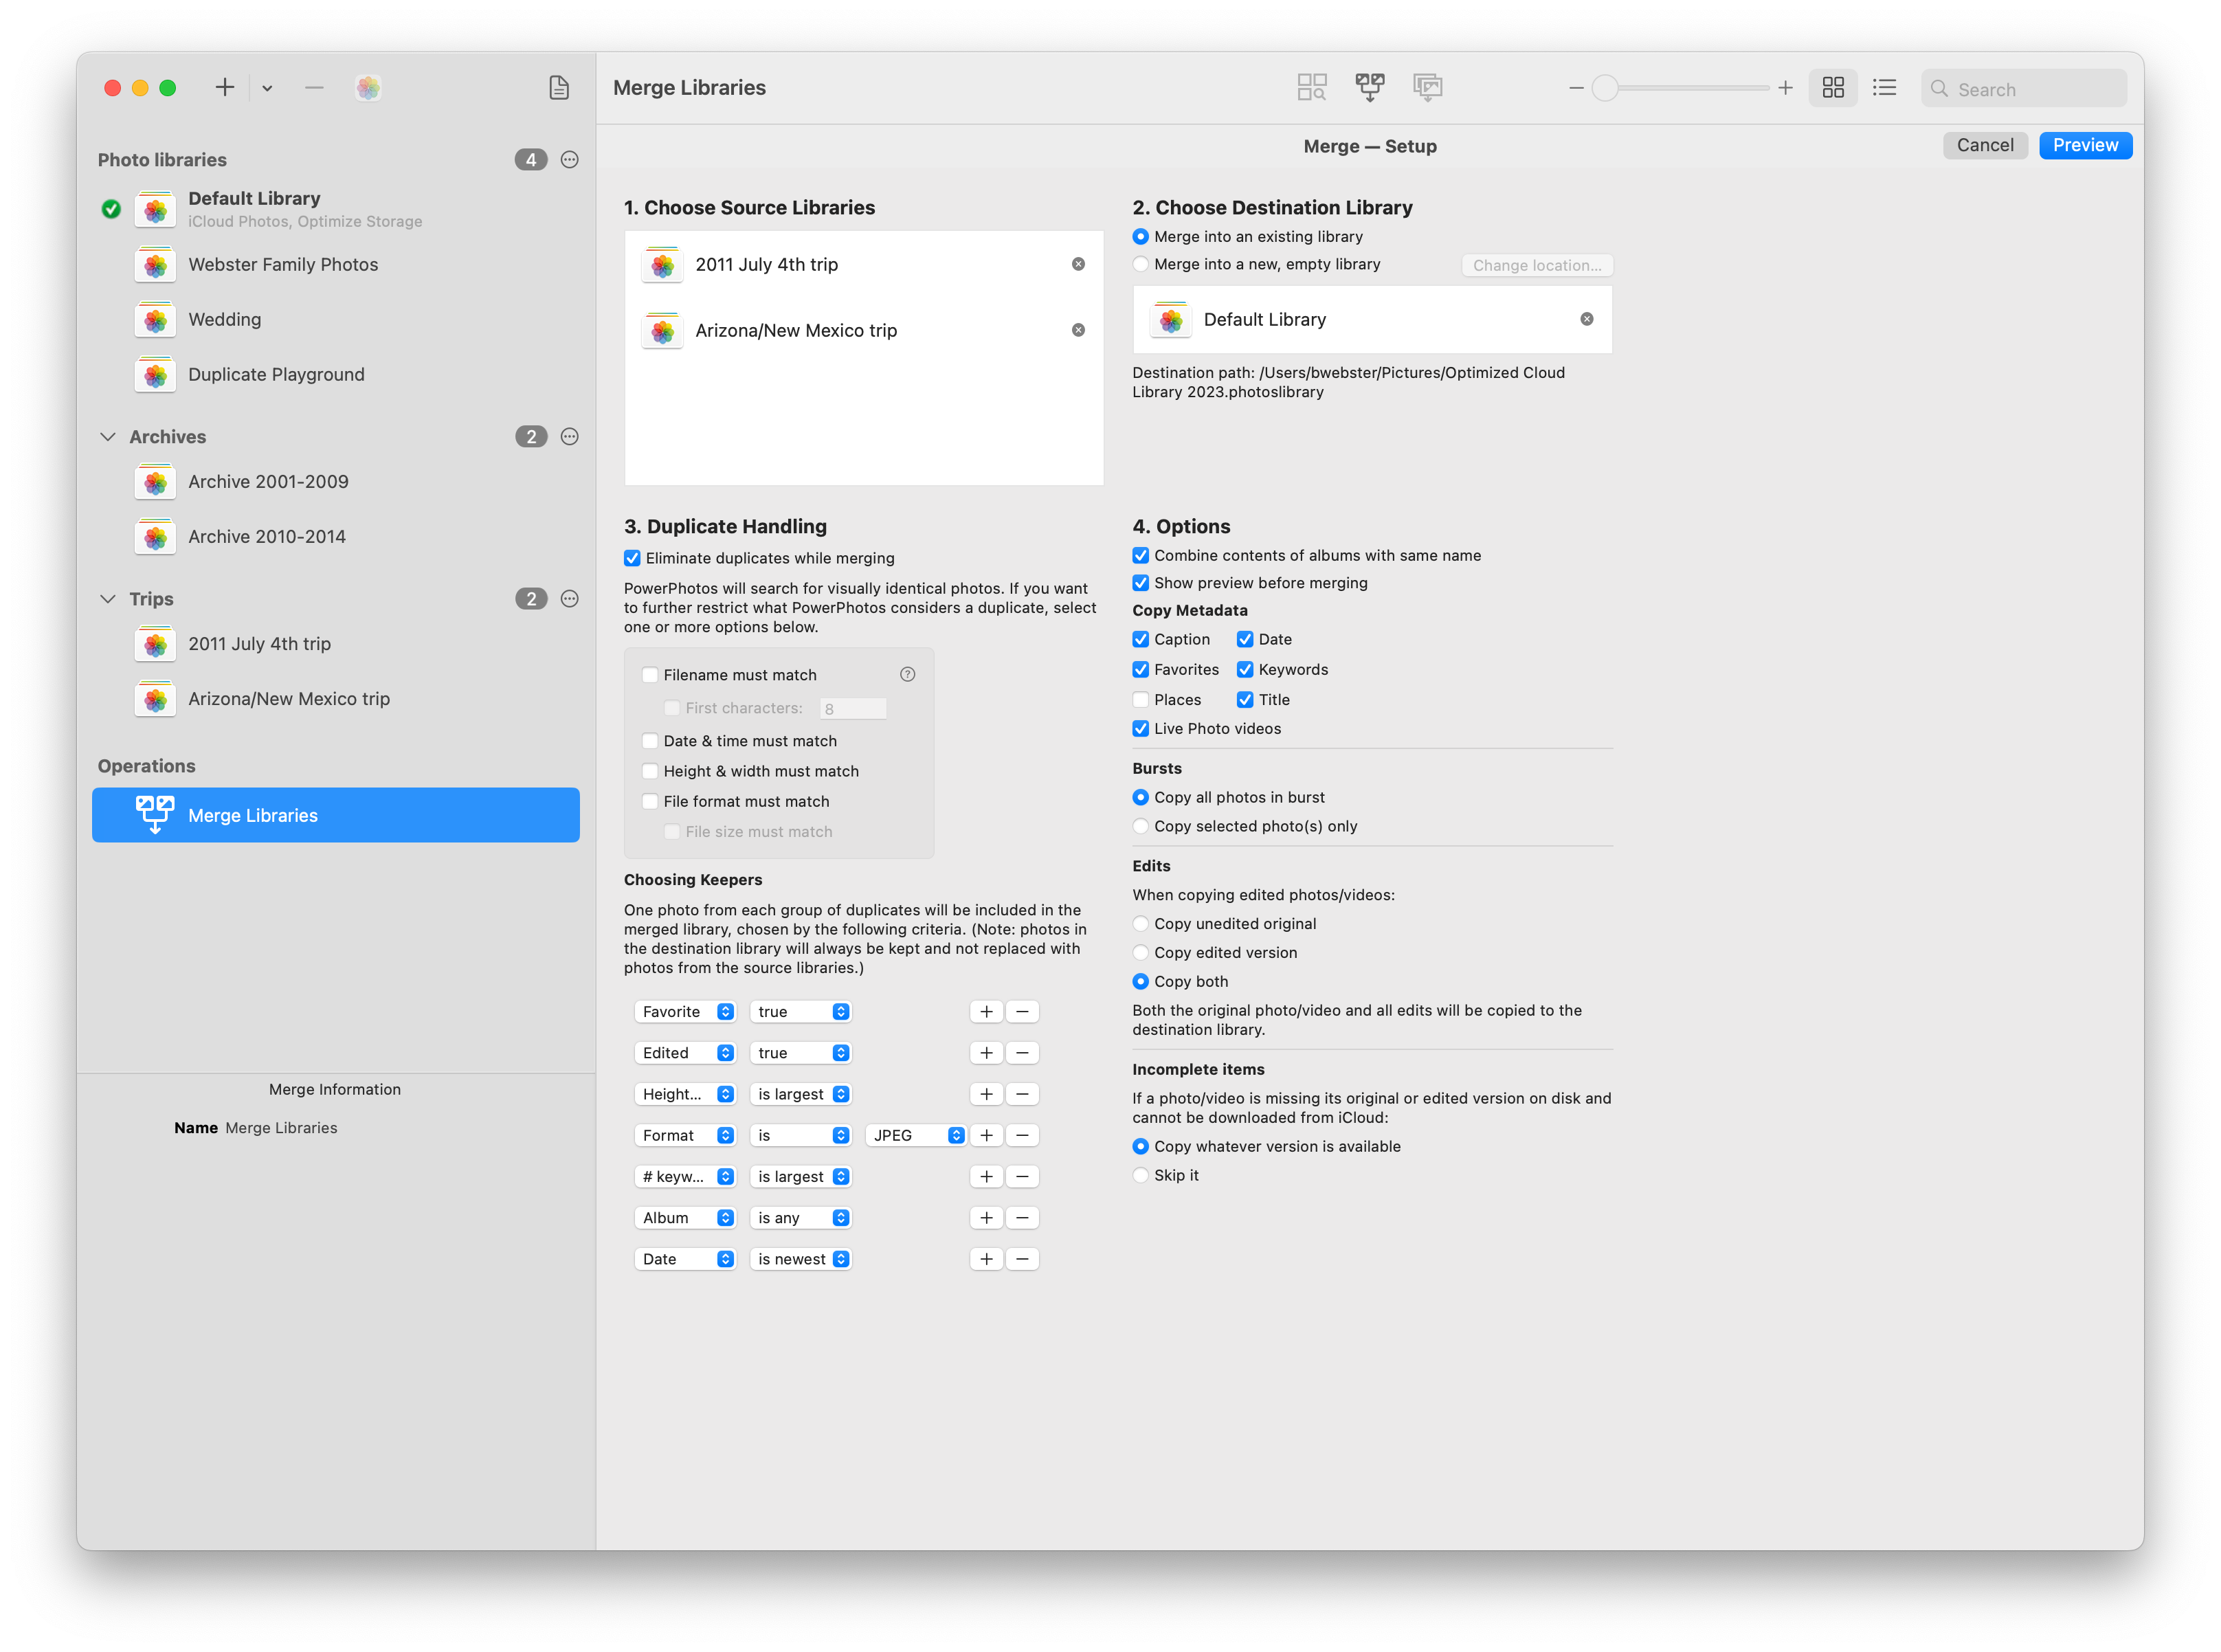
There are four main parts to setting up your merge
Choose Source Libraries To specify one or more libraries whose contents you would like to merge into another library, drag the libraries from the library list on the left and drop them onto the area labelled “Choose Source Libraries”.
Choose Destination Library Then, you must specify what Photos library you want to receive all the photos and other content you’re merging. You can either drag one of your existing libraries to where it says “Drop destination library here”, or if you wish to start a brand new library instead, click the “Merge into a new, empty library” button. You will then be prompted to choose a name and location on your hard drive to store the new library. If you wish to change this location later, click the “Change location” button to do so.
Duplicate Handling When merging libraries, PowerPhotos provides an option to only import a single copy of any duplicate photos that occur multiple times among the libraries being merged together. If the “Eliminate duplicates while merging” checkbox is off, then all photos will be imported, regardless of whether they are duplicates. You’ll almost always want to leave this option enabled.
The “Duplicate comparison options” gives you control over how PowerPhotos looks for duplicates in the libraries being merged. You can find details on how these work in the “Starting A Duplicate Search“ chapter of the manual.
The “Choose which photos to merge by these criteria“ allows you to specify how PowerPhotos should decide which photo from a group of duplicate photos should be included in the merged library. You can read more about how these criteria work in the duplicate rules chapter of the manual.
Note that unlike when using Find Duplicates, the merge process never deletes any duplicate photos. PowerPhotos is simply using the rules to choose a single photo to import from each group of duplicate photos. You can read more about how this works in the Handling Duplicates When Copying section of the manual.
When merging into an existing Photos library, if a group of duplicate photos contains one photo that is already in the destination library, that photo will always be the one to be kept rather than a photo from any of the source libraries being merged. The reason for this is because there is not a reliable way to replace an existing photo with a different one in Photos, including making sure that photo appears in the correct place in albums, projects, and other various aspects of the library structure. The best way around this limitation is to merge into a new library rather than an existing library.
Options
Combine contents of albums with same name. This option determines what to do if an album with a particular name is present in more than one library that’s being merged. For example, say you’re merging two libraries that both have an album named “Vacation”. If this option is checked, then a single “Vacation” album will be created in the merged library, with the combined contents of the two original “Vacation” albums. If unchecked, then each “Vacation” album will be copied separately, resulting in two albums in the merged library.
Show Preview. By default, PowerPhotos will show you a preview of what the merged library will look like before it starts the actual merging process. You can disable this preview if you want PowerPhotos to automatically proceed to performing the merge without needing to approve it manually.
Copy Metadata/Bursts/Edits/Incomplete items. Lets you control various aspects of what exactly PowerPhotos will copy over for each photo/video being merged. See more details on these options in the settings manual page.
If you choose to merge into an existing library rather than a new one, you’ll be prompted with the option to make a backup copy of the destination library before proceeding with the merge. This is a convenience in case you end up wanting to revert back to the library in its pre-merge state.
Once you have set up your merge, click the “Preview” button to advance to the preview screen, where you can see what the results of your merge will look like.
Whenever you use PowerPhotos to copy albums/photos or merge libraries, PowerPhotos will give you a chance to see what the results will look like before actually copying any photos. This step will be skipped if you have the “Show preview before merging” option disabled when doing a merge, or the “Show preview before copying” option is disabled in the settings window if you’re copying individual albums or photos. There will be four tabs at the top of the screen.
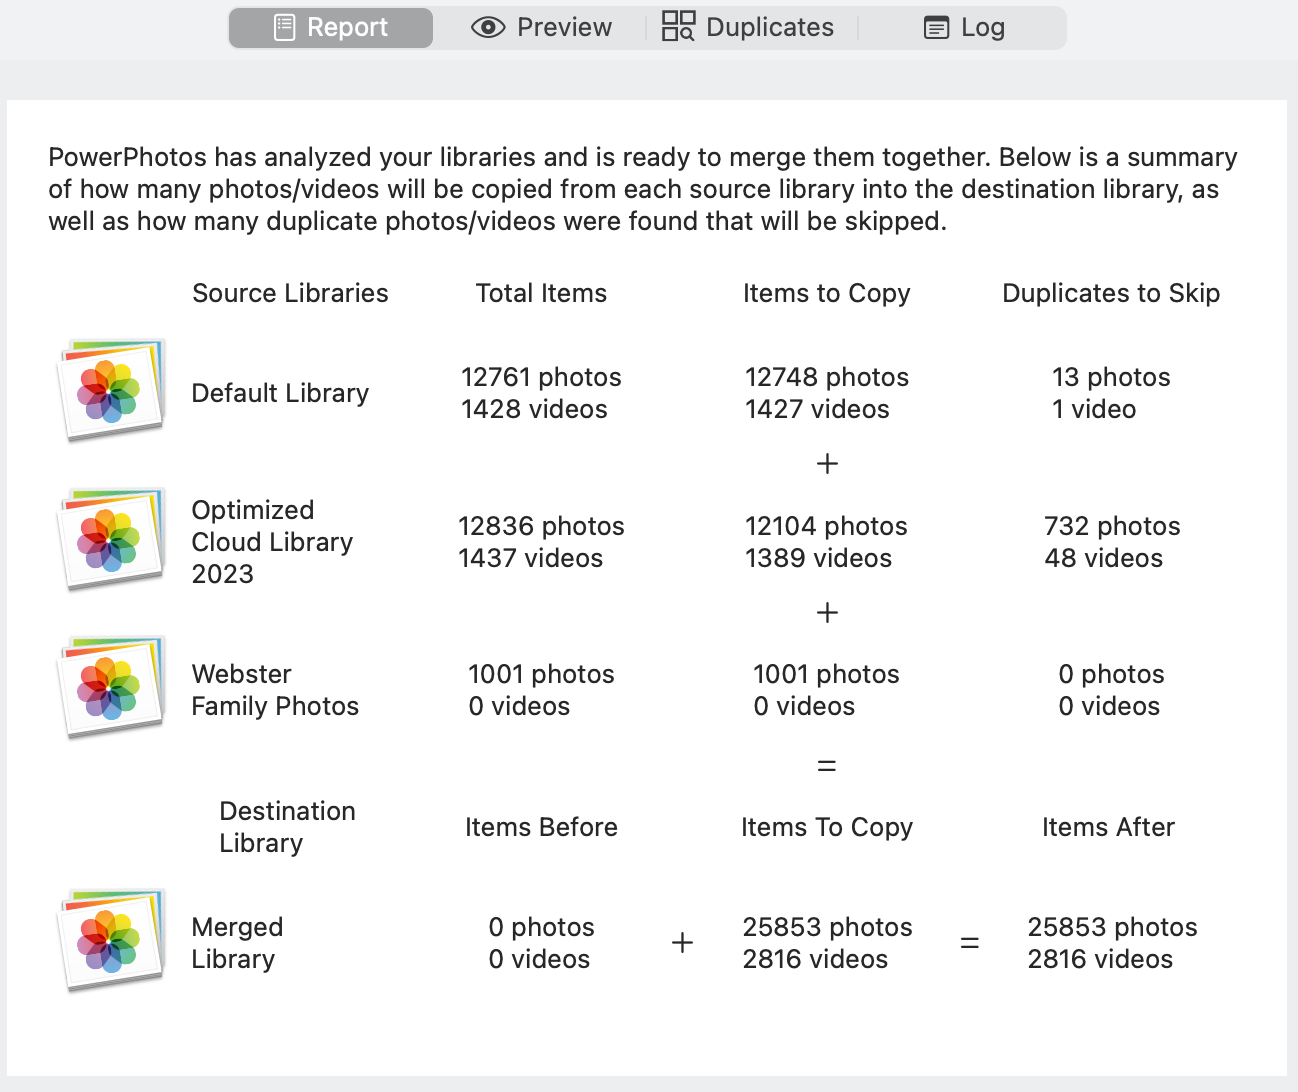
This presenst a report giving an overview of how many photos and videos will be copied from each library and how many duplicates (if any) will be skipped. This lets you see how the numbers add up and how many new photos and videos will be added to the merged library. If some of the libraries being merged have incomplete or missing items, the report will tell you how many of each are in each source library.
This tab gives you the opportunity to preview what the destination library will look like before actually proceeding to copy the photos over. You can browse the library preview just like you can do with a normal library, including both grid view and list view, customizable subtitles and columns, performing searches, and so on. By default, the name of the library each photo is being copied from will be shown below the photo.
The preview will also show you what your albums will look like in the destination library after the photos have been copied over, which lets you see the effects of several different settings. For instance, when merging, if you have the “Combine contents of albums with same name” option enabled, you can see how those albums will be combined.
If you are performing a merge or copying photos and have specified to skip copying duplicate photos, this tab will let you see what duplicates PowerPhotos has found among the photos being copied. In each group of duplicate photos, a checkmark will appear above the photo which has been chosen to be included - the rest of the photos in the group will not be copied. If you wish to change which duplicate is kept, select the photo and press the return key, and that photo will be given the checkmark
For each copying operation does, PowerPhotos create a log file
Whenever you use PowerPhotos to copy photos or albums, or merge libraries, you can have PowerPhotos attempt to detect duplicate photos in the photos being copied. This works much the same way as when you use the Find Duplicates command, except that once the duplicate analysis has been done, instead of taking specific actions on the duplicate photos (e.g. deleting or adding to an album) one photo from each group of duplicates is chosen to be the one that is copied, and the rest of the duplicate photos will be skipped.
When looking at the preview of the photo copying you’re about to do, you can click the “View Duplicates” button in the upper right to see what duplicates were found among the photos being copied. In each group of duplicate photos, a white checkmark will be displayed over the photo which will be included when copied, and the rest of the photos in the group will not be copied. If any of the photos which are not being copied belong to any albums which are being copied, the checked photo will be added to that album in place of the other photo. If you wish to change which photo is used for a particular group, either control-click the photo and choose “Use This Photo” from the menu that comes up, or select the photo and press the return key.
Note that regardless of the duplicate criteria you specify, if one of the duplicate photos is located in the library that you are copying to, that photo will always be chosen over new photos that are being copied into the library. The reason for this is because, in order to use one of the other duplicate photos instead, the duplicate already in the library would need to be deleted from the library, then the new photo would need to be added to all the places in the destination library (e.g. the albums the photo belongs to, and any slideshows, books, etc.) where the original photo was. Unfortunately this is not possible due to technical limitations with Photos, so we just keep the existing photo in preference to any photo being newly copied into the library.
Due to various technical limitations on what’s possible with the Photos app, there are some types of items and pieces of information that cannot be copied between libraries by PowerPhotos. Below is a summary of what can and cannot be copied, and some caveats that apply to certain types of items.
Fully supported: photos and videos, keeping keywords, descriptions, titles, dates, favorites, locations, reversible photo edits, bursts, and Live Photos intact; albums and folders.
Partially supported: smart albums
Not supported: faces and projects
Photos and videos with basic metadata: Photos and videos can both be copied from one library to another. In addition, PowerPhotos will also copy each photo’s keywords, description, title, date, and favorite status over to the new library. Photos that are marked as hidden will not be copied, except if you specifically copy them from the special “Hidden” album.
Albums and folders: Both albums and folders will be copied between libraries, and populated with the same photos that they contained in the original library. When copying to the system library, albums that have their photos manually ordered
Smart albums: A smart album cannot be recreated with its rules intact when copying between libraries. If you copy a smart album, all of the photos in that smart album will be copied to the destination library, and a regular album will be created and populated with those photos.
Original and edited versions of photos/videos: When you edit a photo in Photos, it actually keeps around two copies of the photo: the unedited original, and a new JPG version that contains your edits. This allows you to later discard your edits and revert to the original version of the photo if you wish. PowerPhotos can copy both the original and edited versions of each photo, keeping reversible edits intact in the destination library, as well as RAW+JPG pairs. Edits made to videos will be preserved as well. If you wish, you can choose to copy only the original or the edited version of each photo/video in the settings window, rather than keeping both. macOS 15.2 has a particular limitation that requires appending “PWP_0000” to some photo filenames in order to retain edits. macOS 15.3 does not have this problem, so it’s recommended that you update to 15.3 to avoid this limitation.
Bursts: If you have used burst mode on your iPhone to take a series of photos that is shown by Photos as a single burst, PowerPhotos can copy all the photos in the burst to another library. The Photos app will let you select your favorite photo from a burst to display separately from the burst. PowerPhotos will keep that photo separated in the copying process as well. Optionally, you can use the PowerPhotos settings to only copy a single photo from each burst rather than copying every photo.
Live Photos: PowerPhotos supports copying Live Photos, preserving both the photo and the attached video that comes with it. This can be disabled in the settings if you only want to copy the photo without the video.
Locations: Geographic locations can be assigned to your photos in two ways: either automatically by your camera/phone when you take the photo (embedded in the photo’s EXIF data), or manually, by assigning a location to photos using the Info window in Photos. PowerPhotos will preserve these locations in either case when copying photos between libraries.
Faces: Photos does not support assigning face names programatically, so any faces identification that has been performed will not be preserved when copying between libraries with PowerPhotos.
Projects: Photos projects such as books, calendars, and slideshows cannot be copied between libraries.
Each photo or video you take or import into your library can actually have multiple pieces of data associated with it in addition to the original photo/video. Some examples include:
Usually Photos keeps track of all this behind the scenes and you don’t have to worry about it, but there are some cases where you can end up with an incomplete item, where one or more of these pieces is missing from the library on disk, or a missing item, where there are no pieces at all available on disk.
The most common example happens if you have your library syncing with iCloud Photos and are using the “Optimize Mac Storage” option. With this setup, Photos will only download a small thumbnail used while browsing. Photos will only download the full size original when it needs to, e.g. when you go to view or edit an individual photo.
Normally this is fine, because Photos will handle downloading photos and other pieces of data as needed behind the scenes. However, if you make a copy of your Photos library (e.g. by copying using the Finder, using the Duplicate Library command in PowerPhotos, or making a backup with Time Machine or other backup software) that copy of the library will not have its own copies of the full size original photos. Since that copy of the library is not syncing with iCloud Photos, those originals cannot be downloaded on demand, meaning that the library may have quite a number of incomplete items.
Another somewhat common example is if you have imported some of your photos as referenced photos, but then the original photos that are stored outside the library are deleted, moved, or otherwise inacessible, then those photos will be incomplete because their originals cannot be found.
The last common example is iPhoto/Photos bugs or disk corruption that have caused some of the pieces of a photo to go missing. It’s not uncommon for some edited photos in a migrated iPhoto/Aperture library to have the original photo intact, but be missing the edited version of the photo.
There are two main areas where PowerPhotos needs to do special handling for incomplete items.
Merging/copying. When you setup a merge, you can choose for PowerPhotos to either completely skip copying any items that are incomplete, or have it do a partial import, i.e. make a best attempt to import all the pieces that it does have, even if the result doesn’t match what was originally there in the library before pieces went missing. For example, if the original for a given photo is missing but the edited version is still in the library, then PowerPhotos will copy the edited version of the photo alone. If you choose to skip incomplete items, then those items will not appear in the merge preview, and errors will be logged to the PowerPhotos log file indicating which items were incomplete. When copying photos or albums by drag and drop, there is a similar setting in the PowerPhotos settings window that lets you choose how incomplete items should be handled.
Find duplicates. When performing a duplicate search, incomplete items will still be included in the search, but when it comes time to choose keepers, PowerPhotos will always prefer to keep a complete item over an incomplete one in the same group of duplicates.
Here is how PowerPhotos handles some common scenarios if you’ve selected the option to fall back to a partial import for incomplete items:
Lastly, there can be cases where a photo/video in the library is completely missing on disk and there are no pieces that can even be used for a partial import. PowerPhotos detects these before the merge or duplicate search starts and will simply skip over them, logging errors saying which photos/videos were missing.
The short answer is no - your library has whatever photos/videos it has, and there isn’t a simple way to make the existing library whole again (with one exception, below). The best way to get as much as you can out of the library is by using PowerPhotos to merge it into another library (you can even merge into a new empty library if you don’t want to alter your existing library).
In the case where the library with incomplete items was a backup of an optimized iCloud library, then in some cases you can designate that library as your new system library, reenable iCloud Photos, and let Photos sync the backed up library with what’s currently in iCloud. However, it’s only recommended to do this as long as:
The best way to prevent having to deal with incomplete items in the first place is to follow the advice given in the “Backing up your Photos Libraries” page of the PowerPhotos manual.
There are a few additional things you should consider if you’re copying or merging photos into the library you have syncing with iCloud Photos. If iCloud Photos is enabled when you do this, it will immediately start uploading any new photos that you copy into your library up to iCloud. This may not be desirable if you’re copying a large number of photos, especially if you want to double check your copy/merge results before committing to uploading the results to iCloud. Here are a couple techniques worth considering.
One approach you should be cautious with is merging multiple libraries, including your iCloud library, into a new, empty library. The downside to this is that none of the iCloud-specific syncing information associated with your photos will be copied into the new library. After finishing the merge, if you decide to enable iCloud Photos on the new merged library, Photos may have trouble matching up the photos in the merged library with the corresponding copies that are already in iCloud, resulting in duplicates of some or many of your photos. If you’re performing a merge that includes your iCloud library, it’s recommended that you use one of the two techniques above, as both of those methods will preserve the iCloud syncing information.
In many cases, e.g. when splitting up a library, you’ll find yourself wanting to move an album full of photos to another library instead of copying them. What this effectively means is first copying the photos to the new library, then deleting the photos from the old library. Unfortunately, Photos does not provide a way for third party apps such as PowerPhotos to delete photos from a library, so there is no way for PowerPhotos to implement a “move” feature in this manner.
This being the case, the best way available to perform a move is to copy the album using PowerPhotos, then go back and manually delete the photos from the original library. This is slightly tricky, since when you select photos in an album and press the “delete” key, it does not delete the photos from your library as a whole, it only removes them from the album. Deleting the album itself just deletes the album itself, and leaves the photos in your library. The trick is to select all the photos and hit command-delete, instead of just delete by itself. This will remove the photos from both the library and the album.
To entirely remove an album of photos from a library:
Whenever you perform any operation that alters a Photos library, such as finding duplicates, copying photos, or merging libraries, PowerPhotos will create a log file containing basic information about what’s going on as the copying takes place. You can access these log files by selecting “Show Logs” from the Window menu. In the folder that is revealed, you will see a separate log file for each copy operation that you’ve done using PowerPhotos. The name of each log file consists of the date and time that the operation began, followed by a brief description of the operation (e.g. “2009-04-09 093421-Merge (Hawaii, Florida) into ‘Vacation’.log”) The files will open by default in the Console application when you double click them, but they are just plain text files, and can be opened in any other program that can read text files, such as TextEdit or Microsoft Word. Log files that are older than thirty days will automatically be cleaned up by PowerPhotos, so that your logs folder doesn’t accumulate new log files forever.
Whenever you use PowerPhotos to copy albums or photos, import photos, merge libraries, or find duplicate photos, PowerPhotos will create a persistent report that contains details about what happened during the operation. You can view your reports by clicking the Reports button in the toolbar, or choosing Window > Show Reports from the menu bar.
{% include full_width_image.html image_path=”screenshots/reports.png” %}
Once you select a report in the list on the left, it will show you the details of what happened during that operation. Note that reports will be included even for operations you didn’t run to completion, e.g. a merge that got to the preview stage but then was cancelled, or a duplicate search where no duplicate photos were deleted.
The report can show different columns depending on the type of operation:
Some columns will show differently when viewing an operation that was run until the preview stage, but cancelled before performing the actual copying. For example, instead of “Items copied” the same column will be labelled “Items to copy”, and so forth.
If the duplicate search was run, but you opted not to trash any items, the last column will be labelled “Marked to trash” instead of “Moved to trash”.
Seeing what happened during a big merge is a good start, but PowerPhotos will also let you inspect and take action on some groups of photos. Some counts listed in the report will have a little magnifying glass ![]() icon next to them which you can click to view all the photos in that group. For example, if you had a number of photos that failed to copy during a merge, you can click to browse through the failed items and see if there might be something they have in common that might explain the failures.
icon next to them which you can click to view all the photos in that group. For example, if you had a number of photos that failed to copy during a merge, you can click to browse through the failed items and see if there might be something they have in common that might explain the failures.
You can do the following things with the photos you see in the report:
Some examples of useful things to do:
Also note that because a given library may have changed or been removed entirely since the operation in the report took place, you may not always be able to inspect all the photos that were in the library before. When this is the case, PowerPhotos will display a message at the top of the window saying “N photos are no longer present in the library X and are not displayed below.” If the library itself has been removed from PowerPhotos since the operation took place, then you’ll receive an error message when clicking the magnifying glass button.
PowerPhotos also generates a plain text log file for each major operation it performs. When viewing a report, you can click the “View Log” button in the upper right to see the contents of the log file. The log is more of a large information dump of everything that happens during the operation, and can sometimes contain further details not shown in the overview of the report. You can see all the logs generated by PowerPhotos by selecting the Window > Show Logs menu item.
If your Logs or Reports folder grows to larger than 200 MB, PowerPhotos automatically deletes logs and reports older than 30 days to ensure they don’t accumulate over time and take up too much disk space.
##
In addition to copying photos between libraries, PowerPhotos also lets you export copies of your photos from a library to a folder on your hard drive.
Starting an export
To start an export, select the albums or photos you want to export, then select “Export” from the File menu. PowerPhotos will then display a number of options for your export. After you’ve configured the export, click the “Export” button in the upper right to perform the export.
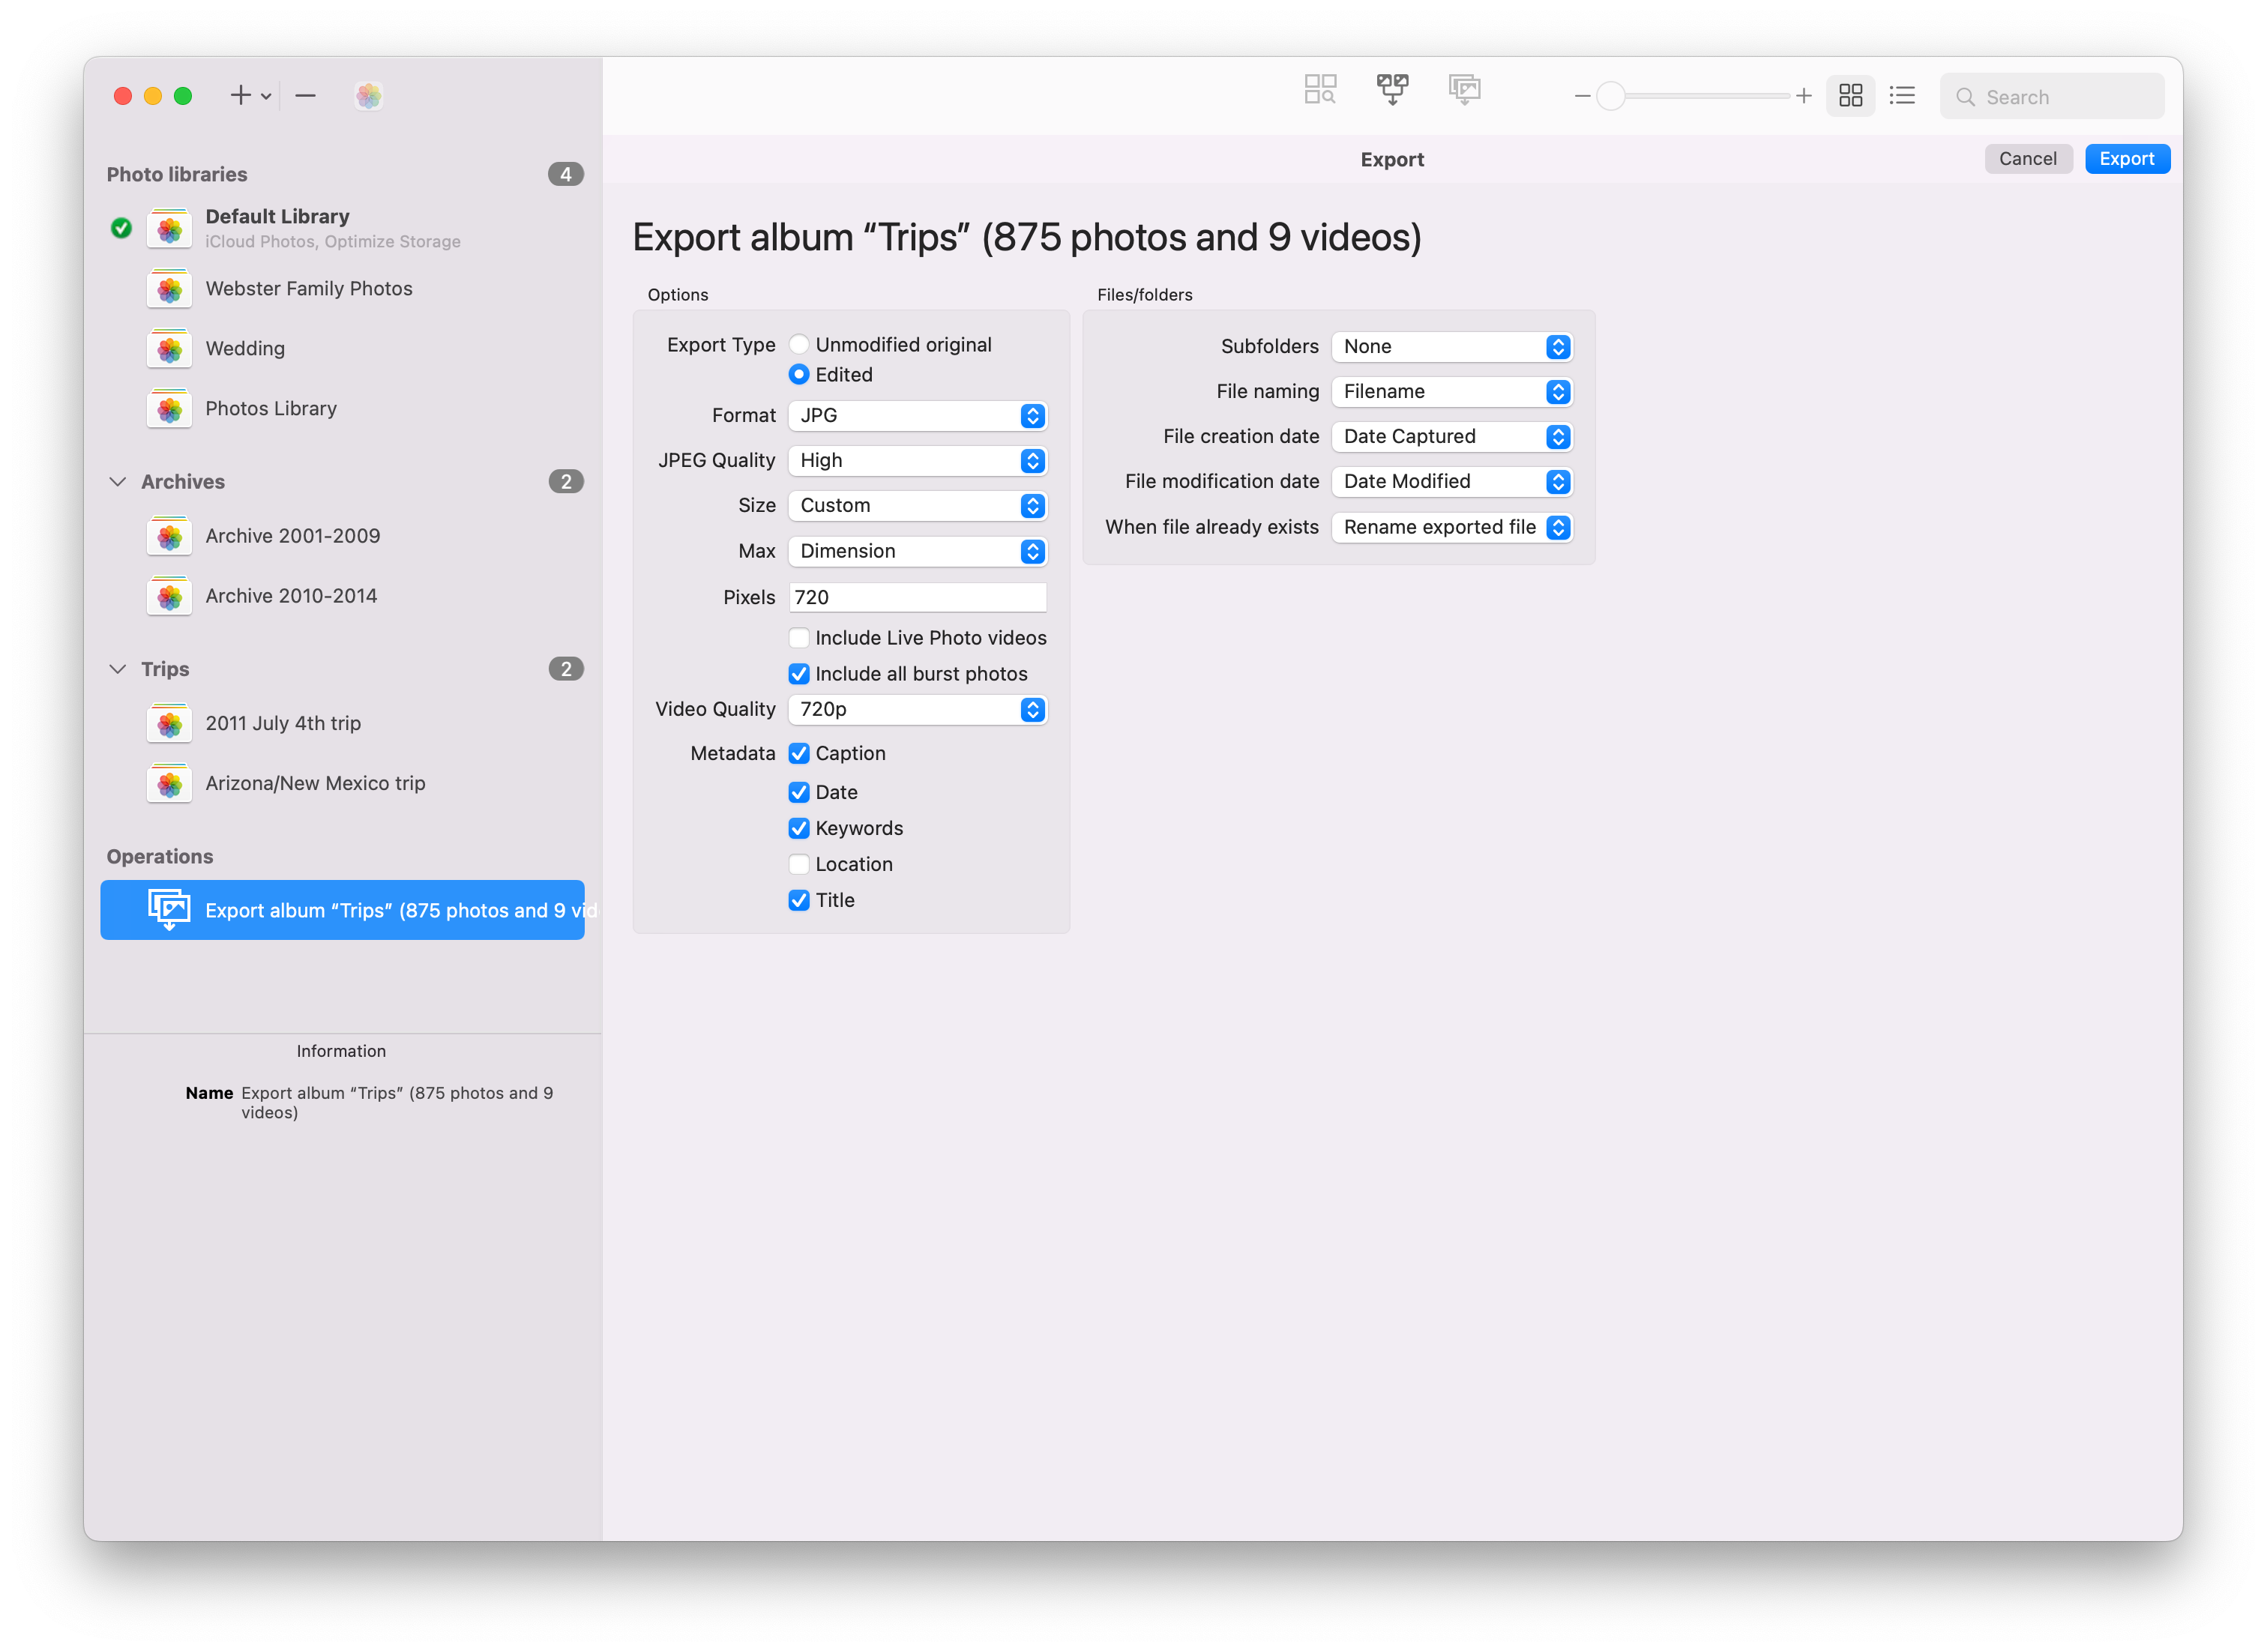
Original vs. edited
When exporting, you can opt to either export the current version of the photo, including any edits that have been made in Photos, or you can export the unedited photo that was originally imported into the library. If you’re exporting unedited originals, none of the other options to modify the exported photos will be available. Note that animated GIFs will always be exported as original since converting them to a format that only shows a single still photo doesn’t make sense.
Format & quality
PowerPhotos supports exporting photos as JPG, HEIF, PNG, or TIFF. The JPG and HEIF formats use lossy compression, and allow you to select what quality of compression you’d like to use. Higher quality will make the photo look better, but result in a larger file size, whereas lower quality will take less disk space, but the photo may lose some of its finer details.
Size
By default each photo will be exported at its current size, but you can also tell PowerPhotos to scale down the photos to a custom size. Enter a number of pixels to scale to, then choose to have PowerPhotos scale the photo to either have its height or width match that pixel count. Choosing the “Dimension” option will tell PowerPhotos to scale whichever side of each photo is largest to that pixel count. PowerPhotos will never scale an image to be larger than its current size. If a photo is already smaller than the size you specify, it will be exported without being resized.
Include Live Photo videos
When exporting Live Photos, PowerPhotos can export both the photo and video components of each Live Photo. If selected, a .mov file will be exported alongside the photo with the same filename as the photo (e.g. exporting “IMG_1234.JPG” will also export a “IMG_1234.MOV” file). If you later import the photo/video pair back into a Photos library, Photos will recombine the two parts to show them as an individual Live Photo. Only JPG and HEIC support Live Photos though, so videos will not be included when exporting as PNG or TIFF.
Video quality
PowerPhotos can export videos as well as photos. When exporting videos, you can choose a size and type of compression to use. The default choice is exporting as H.264 video at 720p. You can choose a different size, or you can also choose to export using the newer HEVC codec, which results in smaller file sizes, but may not be playable on older devices.
Metadata
PowerPhotos can include metadata that you’ve assigned to your photos embedded in the EXIF metadata of each exported photo. This includes dates, keywords, titles, captions, and GPS locations. If any of these options is unchecked, PowerPhotos will not add the metadata to the exported photo’s EXIF data, but if the original photo had any of this metadata, it may still be present in the exported photo. The exception to this is location data, which can be privacy concern. If the Location box is unchecked, then PowerPhotos will make sure to strip all location data from the exported photo.
Files/folders
If you are exporting albums, PowerPhotos can either export the photos into a single flat folder, or it can create a hierarchy of folders that mirrors the album hierarchy you’ve built in your library.
You can also choose what filenames PowerPhotos uses for the exported photos. The options are:
If the file naming option you choose results in more than one photo having the same filename (e.g. if the “Filename” option is selected, and you export two different photos named “IMG_0001.JPG” to the same folder), then PowerPhotos will automatically append a number to the end of the additional copies of the photo to avoid filename collisions (e.g. “IMG_0001 2.JPG”)
File creation/modification date
By default, the files created by PowerPhotos will have a creation date shown in the Finder of when the export was performed. If you select the “Photo date” option instead, then PowerPhotos will assign the date the photo was taken (including any adjustments you’ve made to the photo’s date using Photos) as the file’s creation date instead. A similar setting is provided for setting the Finder modification date as well.
When file already exists When exporting to an existing folder, if there are files already present in that folder, then it’s possible that PowerPhotos will need to export a file to a location where a file already exists. In this case, you have three options:
If you used iPhoto or Aperture before transitioning to Apple’s newer Photos app, up until macOS 12.0 Monterey, Photos has had the ability to migrate your old iPhoto/Aperture library to a Photos library. However, starting in macOS 13 Ventura, Apple no longer supports its migration process, leaving importing the iPhoto library into an existing Photos library as the only option. This is far from ideal, because unlike migration, importing does not retain your album organization, photo edits, or photo metadata in the process.
If you want to preserve all that information from your iPhoto or Aperture library, you can instead use PowerPhotos to convert your old library to an equivalent Photos library. To start, choose the File > Convert iPhoto/Aperture libraries menu item. PowerPhotos will search your Mac for any iPhoto/Aperture libraries it can find, and allow you to add them to the PowerPhotos library list. You can also just drag an iPhoto/Aperture library directly from the Finder and drop it into the library list.
Once the library is in the PowerPhotos library list, you can view it alongside all your Photos libraries, so you can see how many photos it has, what albums it contains, and even view or search the photo metadata, just like with your Photos libraries. You cannot use any functions that modify the iPhoto library, such as deleting duplicates, creating albums, and so forth, but in all other respects you can do all the same things you can with a Photos library.
If you simply want to convert the library to Photos, select the library and click the “Convert…” button in the upper right. This will create a new Photos library and copy the entire contents of the iPhoto/Aperture library into the new library. You can also set up a merge to merge the iPhoto/Aperture library directly into an existing Photos library, or copy individual albums or photos by drag and drop.
PowerPhotos conversion process does differ from the old Photos migration in a few ways.
| Photos Migration | PowerPhotos Conversion |
|---|---|
| Preserves albums, folders, and smart albums | Preserves folders and albums, converts smart albums into regular albums |
| Preserves photo titles, captions, keywords, dates, locations, and faces | Preserves all the same metadata except for faces |
| Converts star ratings and flags into keywords | Same |
| Preserves photo edits, but not lossless editing | Same |
| Books are converted to albums | Doesn’t preserve books |
| Preserves slideshows | Doesn’t preserve slideshows |
| Always creates new library alongside original | Choose any folder to create the new library, or merge/copy directly into an existing library |
| Always migrates the entire library | Allows copying individual photos/albums out of the library as well |
| Saves space by linking photos from the old library | Makes new copies of the photos, requiring additional disk space |
| Works only on macOS Monterey and earlier | Works on macOS Monterey and later |
| Does not support libraries before iPhoto 8 | Supports iPhoto 2 or later and Aperture 3.3 or later |
Because PowerPhotos’ conversion process is based on its predecessor, iPhoto Library Manager, there are some aspects of Aperture libraries that will not be preserved when converting an Aperture library. The primary things of note are as follows.
Projects: iPhoto had the concept of “events”, which divided up photos into groups based on the date they were taken, and could be later customized and rearranged by the user. Photos does not have a similar concept, so iPhoto events are converted into albums in the resulting Photos library, and will be stored inside a folder named “iPhoto Events”.
Aperture had a similar structure it called “projects” (not to be confused with iPhoto/Photos projects, e.g. books, calendars, etc.), which worked much the same way. The main difference was that iPhoto events were stored as a single flat list, whereas Aperture projects could be organized into a hierarchy. PowerPhotos does not support restoring the project hierarchy, and will instead recreate the projects as a flat list in the “iPhoto Events” folder.
Keywords: Aperture supported organizing its keywords into a hierarchy as well, but Photos keeps its keywords as a flat list, so keywords coming from an Aperture library will lose their hierarchical arrangements.
Labels: Aperture supported assigning color labels to photos. These are not converted by PowerPhotos
Stacks: Photos that have been grouped into “stacks” in Aperture will appear as individual items in the resulting Photos library.
Previews: Aperture had a setting labelled “Generate Previews” which controlled whether it would create and store a rendered JPG inside the library for any photo that had been edited. This was enabled by default, but could be disabled if you wanted to save disk space by not storing a separate JPG for every photo you had edited, and instead taking a small speed hit when viewing an edited photo while Aperture had to reapply its edits to show the photo. If you’re using PowerPhotos to convert an Aperture library that had this setting disabled, then it will not be able to retain the edits for any photo that was edited, and you’ll end up with just the original, unmodified photo in the resulting Photos library.
Vaults: Aperture vaults (which end in a .apvault file extension instead of .aplibrary) are not supported by PowerPhotos.
If you have a Photos library that has either become corrupt or had photos accidentally deleted from it, and you have been using Time Machine to back up your library, you can restore a copy of your older library to access those photos again. You can restore your library by following the instructions on Apple’s Restore items backed up by Time Machine support page. Once the library has been restored, add the library to PowerPhotos’ library list. The library will need to be opened once in Photos to allow it to complete the restoration process before PowerPhotos will be able to display the library’s content in its own window.
Merging libraries (or doing large album/photo copies) can be a very intensive operation, involving a lot of processing and data copying, and thus can take quite a while to complete. There are many factors that can affect how long a merge takes, so it’s very difficult to accurately predict how long a given merge can take, but here are some factors that may affect your merge time and a few ways to try to speed things up.
A “typical” merge involving maybe tens of thousands photos can easily take a few hours to complete. If you have lots of libraries, possibly involving 100,000 photos or more, then a merg can potentially take multiple days in extreme cases. The primary factors that affect how long a merge takes are as follows, with the most relevant first, decreasing in importance as you go down the list.
One factor that doesn’t affect merge speed very much is the amount of RAM in your Mac. The merge process is mostly limited by data transfer, and doesn’t use large amounts of RAM, so other than having some other app on your system using lots of RAM while the merge is taking place, system memory shouldn’t be a big factor. But quitting Slack couldn’t hurt.
All that being said, here are a few tips you can use to try to speed up your merge.
If you have a library that has gotten too large and you want to split it into multiple, smaller libraries, there are a couple different ways you can go about doing so.
Copying Albums/Photos
First, click the “+” button and select “New Library” to choose the location you want to create the second library.
Then, drag one or more albums or photos from your big library onto your newly created library in PowerPhotos. This will copy those albums/photos over to the new library, including all their metadata and edits. After you have copied the photos to your new library, you can use Photos to delete them from the big library to clear up the disk space in that library. You can repeat this process with small or large batches of albums and any number of libraries to split up your collection into smaller, more manageable pieces.
One common way of splitting up a library is to split things up by date, e.g. so you have one library per year. The easiest way to do that is to create a smart album in your Photos library that uses the “Date” field to show just photos from a certain range of dates. For example, if you wanted to make a library with just photos from 2013, you’d set up a smart album with a date range from Jan 1, 2013 to Dec 31, 2013. Then in PowerPhotos, you can just create a new library then drag that smart album over to the new library to copy all those photos across. Then just repeat for each library you want to create with a different date range.
Duplicate & Prune
Use the “Duplicate Library” command in the File menu to make a copy of the library folder that you want to split. You can then open one copy of the library and move whatever photos and albums you don’t want in that library to its trash. Then open the second library and move the rest of the photos into that library’s trash. After double checking to make sure that no photos have been trashed from both libraries, empty the trash of each library. This method is useful if you want to avoid some of the copying limitations that are imposed on PowerPhotos by what Photos itself is capable of.
iCloud Photos and Optimize Storage If you are using iCloud Photos and have the “Optimize Mac Storage” option enabled, then Photos will only download full size photos from iCloud as they are needed, which means that your library will likely not have full size copies of its photos stored locally. If you are using this setting, then it’s recommended you use the Copying Albums/Photos approach instead of Duplicate & Prune, since the duplicate copy of the library won’t actually have all the photos you want.
In order for photos to show up in the Photos window, they must first be imported into the Photos library. If you already have a folder full of photos you want to use with Photos, just pointing Photos to the folder full of pictures won’t make it automatically recognize and be able to work with them. To make a library with the folder full of pictures, you should first make a new library in PowerPhotos, open that library, then drag the folder of photos from the Finder into Photos.
In some cases, you might end up deleting a number of photos to the trash in Photos (e.g. when using the Find Duplicates command), but then decide you don’t want to delete the photos after all. Fortunately, deleting photos is not immediately permanent, and there is a way to return recently deleted photos to the main section of the library. To do so:
Photos is not designed with multi-user use in mind, which makes it very difficult to create a setup where a single Photos library can be accessed from multiple accounts on your Mac. If you wish to share a library this way, the following restrictions will apply (for the below discussion, assume we have two users named A and B that we want to share a library):
If you have libraries from more than one Mac that you’d like to merge together, you will need to first choose which Mac you want to run PowerPhotos on. You’ll need to set up that Mac so that it can access all the libraries you want to merge together. You can do that one of the following ways:
After making each library accessible from the Mac you’re running PowerPhotos on, you can then choose File > Add Existing Library to add each library to the PowerPhotos library list. Note that since network and external drives are often not indexed by Spotlight, your library might not show up automatically in the list that PowerPhotos presents when you bring up the Add Existing Library window. If you don’t see your library there, click the “Choose Manually” button to choose that library’s location manually.
Once all the libraries are present in the PowerPhotos library list, you can set up a new merge and proceed from there.
If you have a mix of one or more iPhoto or Aperture libraries and Photos libraries that you would like to merge together, you can directly merge the iPhoto/Aperture library into a Photos library just like you can with any other Photos library.
When not to merge an iPhoto library with your Photos library
There is one common situation in which many users believe they need to perform a merge of an iPhoto library and a Photos library, but is usually not necessary. If you have an iPhoto library that you already migrated over to Photos, the iPhoto library will remain on the hard drive after performing the migration. This will result in an iPhoto library and a Photos library appearing side by side in your Pictures folder.
It can be easy to forget that this happened, come across the iPhoto library later on, think that it has different content from the Photos library, and thus needs to be merged. However, since the Photos library starts out with everything that was already in iPhoto before the migration, performing a merge will usually just be a waste of time, since no new content will come in from the iPhoto library that wasn’t already in the Photos library.
The only exception to this is if you migrated to Photos, but then continued using iPhoto for some time after performing the initial migration. Only in this case, where you have added new content to the iPhoto library after the migration, should a merge be necessary.
Starting in iOS 16 and macOS Ventura, Apple added a feature to their Photos app that can detect and eliminate duplicate photos. The two function pretty similarly overall, but Photos’ system works differently from PowerPhotos in a number of ways, both with their advantages.
Photos system works automatically in the background, and will display a “Duplicates” album containing what it has found when it’s finished searching. It doesn’t give any progress information or let you control how or when it searches though, and Photos’ duplicate detection only operates on a single library at a time.
You can browse through the duplicates that it’s found and choose to merge one or more duplicate pairs together, which will take various data from both copies of the photos such as metadata and editing information and combine them into a single photo in the database. The exact way this works isn’t documented by Apple and doesn’t offer much control, but does a good job of trying to retain as much information as it can.
With PowerPhotos, you perform an explicit duplicate search, and can specify one or more libraries to search through. PowerPhotos does a similar visual duplicate search to Photos, but offers additional options that let you control whether other aspects of the photos need to match too, including things like filenames, dates, and photo size.
PowerPhotos doesn’t merge photos info like Photos does, but instead gives you control over choosing which photo to keep from each group of duplicates that it finds, either using its built-in rule system for automatically choosing keepers based on a number of criteria, or by manually selecting keepers yourself. In addition to simply deleting the extra duplicates, PowerPhotos will let you collect the extra duplicates into an album instead if you’d like to review them further before deleting them.
Which of the two will find more duplicates depends on the individual library - sometimes Photos will find more, and sometimes PowerPhotos will find more. Feel free to use both of them on your library to get rid of all the duplicates both of them can find. If you prefer Photos method of combining photos then try running it first, then PowerPhotos, or if you need PowerPhotos greater control, you can run it first instead.
When deciding how to organize your photos among multiple libraries, one common thing to wonder is what size you should make each of your libraries. There is no single answer to this question, but here are some tips to guide you in making your decision.
The primary reason to keep a library from getting too large is performance. Larger libraries do tend to be slower when used in Photos or PowerPhotos, so keeping your library from ballooning too large can help keep day to day use responsive. The exact size will vary greatly depending on a number of factors, including how old your Mac is, how much memory it has, and what kind of disk the library is being stored on.
No, there is no hard limit on the number of photos/videos you can add to a library. The library will tend to get slower as it gets larger, but you’ll never hit a point where Photos will prevent you from adding more items to the library.
When estimating how a library will slow down as it grows, the number of photos/videos in the library is much more important than the size of the library in GB. For example, a 900 GB library made up of 3000 videos will be much faster than a 900 GB library made up of 150,000 photos.
The speed of the disk that your library is stored on plays a major factor in Photos and PowerPhotos performance when working with a photo library. Generally speaking, your internal SSD is going to be the fastest, followed by external SSDs, then external “spinning platter” hard drives, and lastly network drives such as a NAS or another Mac accessed via file sharing. You might consider a setup where you keep your most recent and/or favorite photos in one library on your internal drive, and then copy older photos to one or more libraries on larger, slower external/network drives.
The age of your Mac, the processor it has, and the amount of RAM is has, all play a part in how fast everything on your system runs, including Photos. If your Mac is only a few years old, then upgrading to a whole new system probably isn’t worth the price. However, if your Mac is older than 5 years or so, and you’re experiencing slowness in Photos and/or your system as a whole, then getting a new machine might be worth it. This is generally viewed as a last resort.
The best advice is to simply not worry about your setup too much ahead of time until you actually start to experience slowdowns. If you’re looking to merge a bunch of libraries together, try merging one library at a time, and then use Photos after each library gets merged in and see how it behaves. If it seems OK, go ahead and merge the next library. If it seems to be getting slow, then maybe you stop there and start a new library to hold all the rest of your photos instead.
One common issue using iCloud Photos on your Mac is when the amount of data you have in iCloud Photos is too much for the internal drive on your Mac to hold all at once. Photo does include the “Optimize Mac Storage” setting, which will tell Photos not to download the full size copy of a photo until it’s specifically viewed in full size in the Photos app. This is convenient, but has a major downside: because you no longer have local copies of all your photos, any local backups that are made of your library will not contain all of your photos.
One solution for this problem is to move your iCloud library to an external drive that does have enough free space to hold all your photos. That way, you know all your photos are locally available and will be backed up by Time Machine or whatever other backup software you use on your Mac.
If you already have iCloud Photos enabled on your Mac, here is how to move your library to an external drive.
If you don’t have iCloud Photos enabled, then instead of copying your existing library, you’ll create a new library instead.
Now that you have your library on the external drive, it’s time to switch iCloud Photos to sync with that library.
Once you have your library setup, Photos will keep that copy of the library synced with iCloud Photos going forward. It’s safe to disconnect the external drive and reconnect it later - Photos will pick up syncing wherever it left off the last time the drive was connected. If you wish to switch back to using your internal library with iCloud Photos, repeat the “Switching iCloud Photos” steps, opening the internal library in Photos instead of the external library.
If you are having an issue that is causing PowerPhotos to crash or hang at startup, you can try enabling safe mode to see if that will let you at least get PowerPhotos open in order to troubleshoot the problem.
To enable safe mode, hold down the shift key while PowerPhotos is opening up. You should see a message saying that safe mode has been enabled.
When safe mode is enabled, the following things happen:
Since the vast majority of these types of crashes/hangs occur in the process of trying to display a library, enabling safe mode will let you experiment and figure out which of your libraries is triggering a hang or crash. You can then either remove that library, or select Help > Contact Support to get in touch with us to figure out what’s going wrong with that particular library.
When using the Merge Libraries command in PowerPhotos, it can sometimes be the case that the resulting library created by PowerPhotos is significantly smaller on disk that the original library/libraries were. There are several reasons why the new library can be smaller than the original:
If you run a merge or a large photo copying session, and the merge ends prematurely due to either a Photos crash, a PowerPhotos crash, or an error message that halts the merge, in most cases you can simply set up a new merge and get the rest of the photos from your libraries copied that didn’t make it the first time around. To do that:
If you have repeated problems trying to complete a merge or are unsure about the completion status of your merge, contact us using the Help > Contact Support menu item within PowerPhotos. To assist troubleshooting, make sure that all the boxes for including your PowerPhotos logs with your support request are checked.
If you ran the Find Duplicates command and removed all the duplicate photos that PowerPhotos was able to find, but are still seeing other photos in your library that appear to be duplicates, there are a couple things you can try.
If you have some of the additional comparison options selected, which narrow down the possible matches, try disabling all of them and let PowerPhotos do the widest search it can do.
If your duplicates are still not being found, then feel free to contact our technical support and send an example of a pair of photos that look to be duplicates but aren’t being found by PowerPhotos.
The best way to send all the data and metadata for a photos it to select it in PowerPhotos then press command-option-p. This will open up the “Contact Support” window with the photo selected to be sent as an attachment. Just do that for each photo you want to send, then click “Submit” in the support window to send the photos along for us to take a look at to troubleshoot the problem.
Recent versions of macOS have added a number of permission prompts displayed to the user when apps access certain categories of data on your system. There are two such permissions that you will need to grant to PowerPhotos in order to work with your photo libraries.
If a third party app such as PowerPhotos wants to work with your photo libraries, the first time it attempts to do so you will be prompted to allow or deny PowerPhotos permission with a window that looks like this:
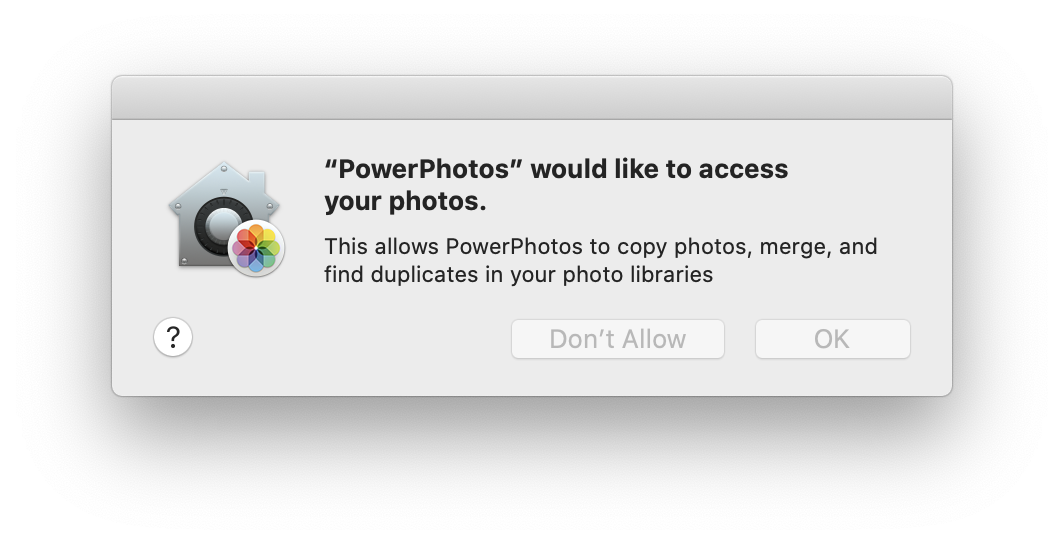
This prompt will only be displayed once, so if you clicked “Don’t Allow”, then when you attempt to view any of your libraries in PowerPhotos, you’ll receive an error message saying “Photos access not authorized”. If you see such a message, you’ll need to go into System Settings and manually give PowerPhotos permission to access your photo libraries.
When running on macOS Sonoma and later, an additional prompt is put up when any third party app tries to read data belonging to another app. In the case of PowerPhotos, it needs to read preference settings from Photos in order to determine which library was last opened, which library is the current system library, and whether iCloud Photos is enabled. This will trigger a prompt that looks like this:
Unlike the photo library prompt, macOS insists on showing this prompt every time you launch PowerPhotos. If you use PowerPhoto often and this gets annoying, you can optionally grant PowerPhotos full disk access to prevent this prompt from coming up any more.
macOS Monterey and earlier
macOS Ventura and later
In some cases, the system interface for this can be outright buggy, and will not actually let you toggle the setting successfully. In this case, you can instead reset PowerPhotos access permissions from the terminal. To do that:
tccutil reset Photos com.fatcatsoftware.PowerPhotos
Open PowerPhotos again, and it should give you that prompt to access to your Photos library again so you can click “Allow” there.
If you are performing a duplicate search, a merge, or another long photo copying operation and PowerPhotos reaches a point where it no longer seems to be making progress, here are the recommended troubleshooting options.
First, take a minute to look at the progress being shown by PowerPhotos and see if the progress bar or messages are changing at all. If things are still moving, even if very slowly, the best bet is to simply let it proceed.
If the progress is indeed stuck and has been so for at least several minutes, then you can click the “Cancel” button to cancel the current merge/copy/duplicate search. If you were doing a duplicate search, start a new search with the same setup as before. If you were doing a merge, you can follow the same instructions for restarting an incomplete merge as when a merge is interrupted by a crash. If you’ve tried the same thing multiple times and it gets stuck in the same way every time though, then it’s time to do something different.
The primary reason for PowerPhotos stalling in the middle of a large operation is if it has sent a request or command to Photos and is waiting for a response, but Photos never returns a response to PowerPhotos. The requests that PowerPhotos makes are handled by a background process called “photolibraryd” which handles actually reading and writing data from the library database, even if the Photos app itself isn’t running.
The best solution when this happens is to restart photolibraryd to get it out of whatever weird state it’s in. There are a couple ways to do this, here’s the order I recommend them in.
If you continue having trouble completing your merge/copy/duplicate search, then contact our tech support and we can investigate your case further.
To access PowerPhotos’ settings, click on the “PowerPhotos” menu and select “Settings”. There you will find the following settings:
General
Photo Copying
If you are experiencing a problem using PowerPhotos, you can contact tech support in two ways.
Open up PowerPhotos and select “Contact Support” from the Help menu. This will bring up a window where you can explain your problem and send it directly to Fat Cat Software support. This is the preferred method, as it will automatically transmit basic information about your setup that will help in making sure your problem can be diagnosed quickly and correctly. The following information will automatically be included with your request:
Checking the “Include logs & reports” checkbox will send the reports and log files created by PowerPhotos while performing various operations.
Additionally, if you are experiencing a problem that involves Photos crashing or PowerPhotos crashing, you can include the appropriate crash log(s) with your submission. All information that is submitted is transferred over an encrypted SSL connection.
Alternately, you can also e-mail for support at {% include support_link.html %}
Active Library The active library (referred to as “last opened” in some places) is the library that was most recently opened in the Photos app. In PowerPhotos, the active library is designated with a green checkmark next to it in the library list. If you open Photos directly via the Finder or Dock, the active library is the one you will see displayed there. You can change the active library either by clicking the checkmark next to it in the library list, or by double clicking the library in PowerPhotos or the Finder to open it in Photos.
Album To further organize your photos, you can create any number of albums in a Photos library, and add any number of photos to each album. Adding a photo to an album does not create a copy of the photo, so multiple albums can reference the same photo without taking up more disk space. Removing a photo from an album only removes it from that album, so that photo will remain in the library, as well as any other albums it belongs to. Similarly, deleting an album does not delete the photos it contains from the library.
Consolidate If you have imported some photos into your library as referenced photos, Photos provides a “Consolidate“ command in its File menu which will copy those photos from the folder they're located it into the library itself, converting them from referenced to managed photos. You may want to consolidate referenced photos if you plan on copying the library to another hard drive, since doing so will often break any references to external folders.
Convert If you have an old iPhoto or Aperture library that is no longer supported by your Mac, you can use PowerPhotos to convert the library to a Photos library. This replaces the migration feature that used to be available in older versions of the Photos app.
Duplicate Photo The term “duplicate photo“ is actually surprisingly hard to define, since different people have different concepts on whether they consider two photos to be duplicates. Photos that are 100% identical byte for byte are obviously duplicates, but many people also don't want to have multiple copies of what is essentially the same photo even if they're different in some ways, such as one being in a different format, a different size, or having different metadata.
PowerPhotos uses a visual duplicate detection engine that tries to match up photos that derive from the same original photo. It also provides additional comparison options to further narrow down its matches for people who want more precision in what they consider identical, e.g. requiring the photos' filenames or dates to match.
When PowerPhotos completes its search, it refers to all the photos it has found as “duplicates” which are displayed in a number of “duplicate groups”. Each duplicate group will have one photo marked as a “keeper”, with the rest of them marked to be “trashed“.
Event Events were a feature that was implemented by iPhoto, but no longer exists in the newer Photos app. Whenever you imported a batch of photos, they would be put into one or more events, which were an alternate way to organize photos in addition to albums. When you migrate a library from iPhoto to Photos, Photos will convert the events from the iPhoto library into equivalent albums, and store those albums inside a folder named “iPhoto Events” in your library. No new albums get added to this folder as you import new photos using the Photos app though. If you never used events or don't need them any more, you can safely delete the “iPhoto Events” folder from your library.
Export Exporting refers to copying photos from a Photos library to a plain folder outside of Photos. Photos has a built-in export command, but PowerPhotos provide one of its own that offers several additional options above what Photos offers.
Folder A folder, in the context of Photos, refers to a folder created in the album list of your library that you can use to organize your albums into a hierarchy. This is the same concept as a folder in the Finder, but used to group albums instead of files, and it only appears when viewing your Photos library.
iCloud Photos iCloud Photos is a service provide by Apple that will sync your Photos library across multiple devices, including Macs, iPhones, and iPads. On your Mac, only your system library can sync with iCloud Photos.
iCloud Shared Library iCloud Shared Library is a feature Apple introduced in macOS Ventura which lets you share part or all of your library with other people using iCloud Photos. Read here for more information on how PowerPhotos interacts with iCloud Shared Library.
Import Importing refers to adding new photos to a library from outside Photos, either by dragging them in from the Finder, or plugging in an iPhone or other digital camera. You can also import directly into a particular library by dragging photos into a library in PowerPhotos. Importing this way, PowerPhotos can also weed out duplicates in the process.
Incomplete item Some photos or videos in your library can have multiple pieces of data behind the scenes, e.g. an edited copy of a photo or a video associated with a Live Photo. If one of these pieces of data is not present on disk, PowerPhotos calls that an **incomplete item** and performs special handling for it. Read here for more information on how PowerPhotos handles incomplete items.
Keeper After finishing a duplicate search, PowerPhotos displays all the duplicates it has found in a number of duplicate groups. Each group of duplicates has one photo marked as the “keeper”, with the rest marked as to be “trashed”. You can use duplicate rules and manual changes to adjust which photos you want to be marked as the keepers.
Hidden Photos supports “hiding“ photos, by using the Image > Hide Photo menu item in the Photos app. Hidden photos are not displayed when browsing through your library, in either Photos or PowerPhotos, nor are they shown in albums. You can view your hidden photos by selecting View > Show Hidden Photo Album in the Photos app, then selecting the “Hidden” album in the album list. You can then unhide photos by selecting them and using the Image > Unhide Photo menu item. PowerPhotos cannot see or work with hidden photos, so any such photos will not be included when copying albums or merging libraries. If you want them included in your copying operations, you must first unhide them using the Photos app.
Library A Photos library contains a collection of photos and their associated metadata, along with any albums and projects that you've created that use those photos. By default you only have a single library, which PowerPhotos calls the “Default Library”, and that is the library you see when you open the Photos app. PowerPhotos lets you create multiple libraries and switch between them in the Photos app.
A library is a self-contained unit, so making changes in one library does not affect any other libraries. Each library can be seen as a single item in the Finder, and all the photos and other data for the library are stored inside there, so you can easily copy a library from one place to another either using the Finder, or the “Duplicate Library” menu item in PowerPhotos.
Library Group Library groups are a feature provide by PowerPhotos to help further organize your libraries in the PowerPhotos library list. Library groups only appear in PowerPhotos, and moving libraries between groups in PowerPhotos has no effect on where they reside on disk.
Merging Merging libraries is a feature provide by PowerPhotos that lets you combine the contents of multiple libraries into one. During a merge, the contents of one or more existing libraries will be copied into another library, including all photos and albums, with duplicate photos being skipped. Not to be confused with Migrating.
Migrating Migrating is the process of taking an old iPhoto or Aperture library and converting it into an equivalent Photos library containing the same photos and albums as the library. As of macOS 13.0 “Ventura” and later, Photos no longer supports migrating iPhoto libraries, but you can instead use PowerPhotos to convert your iPhoto/Aperture libraries to Photos.
Missing item If a photo or video listed in your library is not present on disk, then PowerPhotos calls that a **missing item** and performs special handling for it.. Read here for more information on how PowerPhotos handles missing items.
Optimize Storage When you have iCloud Photos enabled, you can choose the “Optimize Storage” option in the Photos settings window. With this setting enabled, Photos will not download the full size original photos to your local hard drive right away. You can still browse through your entire library, and Photos will automatically download photos on demand as needed when you view or edit them. This option only applies to your system library, and only when iCloud Photos is enabled.
PowerPhotos can work fully with the Optimize Storage option, and will also download photos as necessary when viewing or copying them. Special care is needed, however, when making a copy or backup of the entire library. Read more about this in the “Backing up your Photos Libraries” section of the PowerPhotos manual.
Partial copy If PowerPhotos encounters incomplete items when performing a copy or merge, you can choose to have PowerPhotos copy whatever data is available even if some is missing. Read here for more information on how PowerPhotos performs partial copies.
Original When you import a photo into your Photos library, that photo is called the “original” and is never modified after being imported into the library. When you edit a photo in your library, Photos create a separate copy of the photo and applies the edits to that copy of the photo. You can later use the “Revert to Original” menu item to discard the edits and display the original photo again.
It's important to note that PowerPhotos does not use the term “original” when talking about duplicate photos, because there is no solid way to define which of a group of duplicates might be considered the “original”. Instead, PowerPhotos chooses a “keeper” and the rest of the duplicates are marked to be trashed.
Referenced Photo Normally when you import photos into your library, Photos makes its own copies of those photos and stores them internally in the library package. In the Photos settings window, there is an option labelled ”Copy items into Photos library” which is on by default. If you uncheck that checkbox, then rather than making its own copies of imported photos, Photos will instead just reference the original photo in whatever folder it was in at the time you imported it. Photos that are not imported as references are typically called “managed” photos.
Referenced photos have the advantage that you can keep your photos organized in an external folder and organize them using Photos as well, but without having to keep two separate copies of the photo on disk. The disadvantage is that if you delete or move the photos from the folder they're located in, then Photos may lose track of them and no longer be able to edit, export, or share copies of those photos.
Shared Albums Shared Albums (not to be confused with iCloud Shared Library) allow you to create custom albums and add photos to them to share them with other people. Shared albums are stored separately from your Photos library, unlike regular albums and folders that are part of the library itself. Shared albums do not count against your normal iCloud storage, but there are limits to how many photos you can put in a shared album, the copies of the photos in the album get scaled down from the original size, and shared album photos cannot be edited like photos in your library. Read more on Apple's website about how to work with shared albums.
System Library You can have multiple Photos libraries set up on your Mac, but at any given time only one of them can be designated the “System Library”. The system library will be the one that appears in most other applications, e.g. when they provide a photo picker to insert photos from your library. The system library is also the only library that can have iCloud Photos enabled. You can switch the system library via the Settings window in the Photos app.