
Welcome to PowerTunes! Apple's iTunes program is popular and easy to use application that lets you organize your digital media. PowerTunes lets you take your organization to the next level while still being able to take advantage of iTunes great feature set. With PowerTunes, you can:
You can visit the Table of Contents to get an overview of how PowerTunes works, or continue reading and learn more about iTunes libraries and media folders.
There are two main components you deal with when organizing your music with iTunes: the iTunes library file, and the iTunes media folder.
The iTunes library file is a data file that keeps track of the contents of your iTunes library. This includes the list of all the music and video tracks you have in the library, as well as any playlists and smart playlists you have created. The library file also contains various information you assign to your tracks in iTunes, such as ratings, equalizers, volume adjustments, and more. By default, this file is located at ~/Music/iTunes/iTunes Library (where ~ represents your home folder). For simplicity, PowerTunes creates new libraries by default in ~/Music/PowerTunes, but you can also create a library file in any location you choose, including on an external drive or a network drive.
The iTunes media folder is a folder that contains the actual music and video files that iTunes refers to. It's important to know that the contents of the media folder don't necessarily match the contents of the library itself. There can be files in the media folder that aren't in the library, and you can also add files to the library which aren't in the media folder. By default, the media folder is located at ~/Music/iTunes/iTunes Music.
With PowerTunes, you can create any number of separate libraries, as well as any number of different media folders. Each library refers to a single media folder, and multiple libraries can use the same media folder if you wish.
Typically, each iTunes library is kept in a separate folder, along with several auxiliary files/folders that iTunes creates alongside the main library file. These items include:
Album Artwork: This is where iTunes stored downloaded and cached versions of album artwork for your library.
com.apple.iTunes.plist, com.apple.iTunes-ByHost.plist: These files are actually put there by PowerTunes, not iTunes. PowerTunes keeps a separate set of preferences for each of your libraries, and stores the saved prefs for a library in these files alongside the library file.
iPod Games: If you purchase games for your iPod on the iTunes store, iTunes saves them to this folder, rather than in the main iTunes Media folder.
iPod Games Library: Earlier versions of iTunes also keep a separate library file for keeping track of iPod games.
iTunes Library: This is the main iTunes library file, as described above.
iTunes Library Extras.itdb: A database file iTunes uses to store information from CDDB
iTunes Library Genius.itdb: A database file iTunes uses to store information for generating Genius playlists
iTunes Media: The default folder that iTunes uses to store music for an iTunes library, alongside the iTunes library file. (iTunes 8 and earlier names the folder "iTunes Music" instead of "iTunes Media")
iTunes Music Library.xml: This XML file is written out by iTunes so that other programs, such as iPhoto and iMovie, can easily read the contents of the iTunes library. Editing this file has no effect on the contents of the iTunes library, and any changes will be overwritten the next time iTunes saves its library file. In locations other than the default music library, this file is named "iTunes Library.xml" instead of "iTunes Music Library.xml"
Mobile Applications: Contains iPhone and iPad applications downloaded from the iTunes App Store. Note: as of iTunes 9, this folder is now stored by default inside the iTunes Media folder
Previous iTunes Libraries: Each time you install a new major version of iTunes, a backup copy of your iTunes library file is created in this folder by iTunes, in case you have problems and need to revert to a previous version of your library.
Most of what you do in PowerTunes will take place in the main PowerTunes window, shown below.
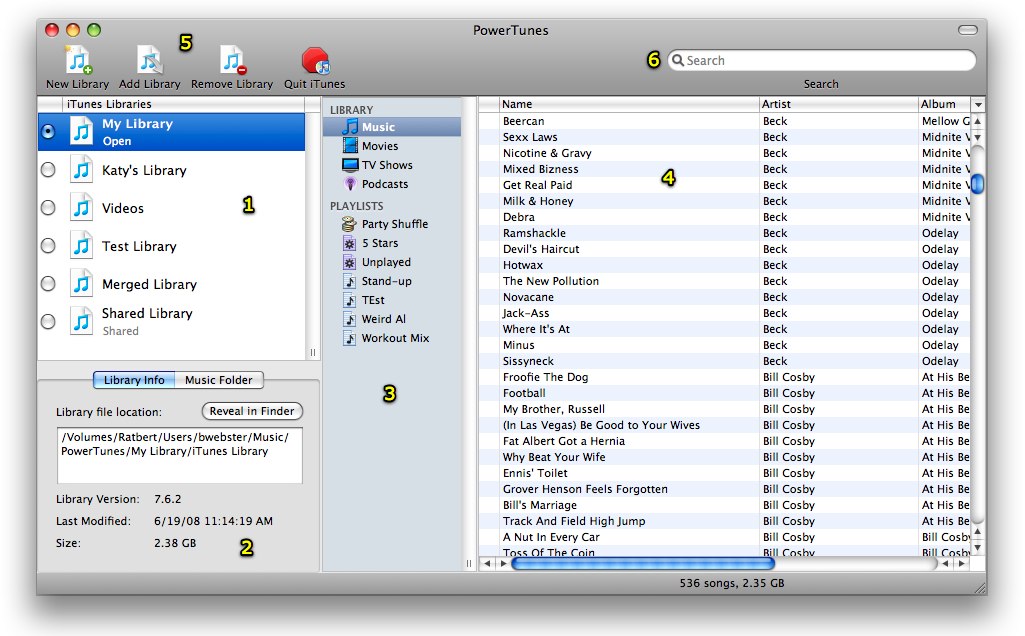
The numbered sections indicated above are:
PowerTunes main feature is to allow you to create and manage multiple iTunes libraries. With PowerTunes, you can easily:
To create a new library, either click the "New Library" button in the toolbar, or select "New Library" from the File menu. You will be presented with the following setup sheet:
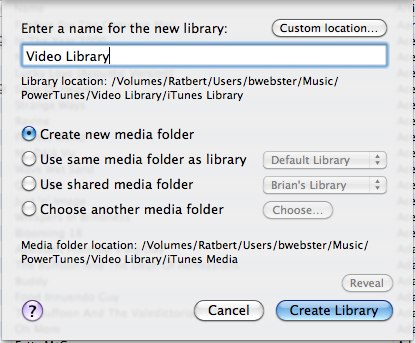
When creating a library, you need to decide the following:
After you have set up your new library the way you want, click "Create Library". PowerTunes will create the new library and automatically open it up in iTunes so you can start working with it.
To perform any operations with an iTunes library using PowerTunes, you must first add that library to PowerTunes' list of libraries, which is displayed on the left hand side of the main window. Libraries you create using PowerTunes are automatically added to this list, but if you have an existing iTunes library on your hard drive that is not in PowerTunes' library list, you can add the library to PowerTunes either by:
Once the library has been added to the list, you can open it up in iTunes or perform any other operations with it you'd like using PowerTunes. If you have lost track of a library, try using the "Find Libraries" command in the File menu of PowerTunes.
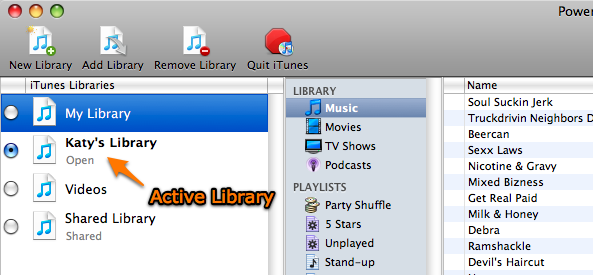
At any given time, there is only one library that is the active library, i.e. the one that is shown when you open up iTunes. In PowerTunes, you can tell which library is active by looking to see which library has the radio button to the left of its icon selected. The name of the active library will also be displayed in boldface. Once you choose a library to be the active library, that library will always open up in iTunes until you choose a different one using PowerTunes.
PowerTunes provides several ways to switch between your libraries:
iTunes can only have one library open at a time, so whenever you switch libraries, PowerTunes will automatically quit and relaunch iTunes in order to open the new active library. PowerTunes keeps a separate iTunes preferences file for each library and swaps out the preferences file each time you switch libraries, so you can have different sets of iTunes settings for your different libraries. This includes keeping track of which library uses which media folder, so each library will maintain its connection to its media folder when switching.
Note that you can also switch to a different library by holding down the option key while launching iTunes, which will let you choose a library file to open instead of the current active library. This method is still safe to use if you're using PowerTunes to manage your libraries, but be aware that this method does not change out the preferences/media folder for the library when switching. So, if you use this method to switch between libraries that use different media folders, you may end up with one of your libraries pointing to the wrong media folder.
You can make a duplicate copy of an existing library by selecting "Duplicate Library" from the File menu. The new copy of the library will have all the same playlists, podcasts, and music, and will share the same media folder as the original library. It is important to note that when doing so, you are only making a copy of the library itself, and not any of the files in that library's media folder.
You will be presented a sheet similar to the one shown when creating a new library, allowing you to choose a name and location for the new copy of the library. However, since the new library is going to use the same music as the original library, the options for choosing a different media folder are disabled, and the duplicate library will automatically be set up to point to the same media folder as the original library. If you also want to make copies of the music files themselves, you can read how to do so in "Moving your media folder".
Once you've got several libraries created and in your library list, PowerTunes gives you some control over how to organize them. You can always drag a library up or down in the list to rearrange the order of your libraries. Note that because of the way shared libraries are handled, they will always appear at the bottom of the list after restarting PowerTunes.
Moving a library
If you want to move a library to another location on your hard drive, you can do so just by moving the folder containing the library to a new location using the Finder. PowerTunes will automatically track the movement of the library file and update itself when you next bring the PowerTunes window to the front. Note: you should avoid moving a library file that is currently open in iTunes, as this may cause iTunes to be confused and either lose track of the file or write out a new file to the old location.
Renaming a library
You can also rename a library by double clicking on the library's name. You cannot rename a library that is currently open in iTunes - you must first quit iTunes before you will be allowed to rename the library.
Library naming
Since PowerTunes needs to maintain full compatibility with iTunes own library switching methods, it needs to be able to handle a wide variety of naming schemes. If you only use PowerTunes to create and manage your libraries, you can pretty much just name stuff how you like and PowerTunes will take care of things for you. However, if you are going to be doing more advanced library management, read ahead for the nitty gritty details of how PowerTunes handles library naming.
When you create a library in PowerTunes, PowerTunes will create a folder with the name that you typed in for the library. The main library file (named "iTunes Library") is then created inside that folder, along with several other files and folders the library needs. This mimics the behavior of iTunes when creating a new library. However, you can actually name your library file something other than "iTunes Library", and you can have more than one library file residing in the same folder. The downside to this approach is that all the other various files and folders that iTunes creates will be mixed together and hard to tell apart. It will still work fine, but it can be confusing, so it is recommended that you store each of your libraries in a separate folder.
By default, the name of the library as seen in PowerTunes is distinct from the name of the library on disk. So, if you rename a library in PowerTunes, the library will not be renamed on disk, and vice versa. However, there is an option in the preferences that will change the library's name on disk along with the library's name in PowerTunes, if you would like the two to always be the same. If your library file is named the default "iTunes Library", then PowerTunes will change the name of the enclosing folder when you type in a new name. If you've given your iTunes library file a custom name, then the library file itself will be renamed.
If you no longer wish to use a library, you can remove it from your library list either by clicking the "Remove Library" toolbar button or selecting "Remove Library" from the File menu. This will remove the library from your list in PowerTunes, but it will not actually delete the library and its associated files from the disk. So, if you do remove a library from PowerTunes in this manner, you can always add it back in using the "Add Library" command.
If you want to delete the library outright from your hard drive, you can hold down the option key while using the Remove Library command, and you'll see that the button/menu item changes to "Delete Library". If you do this, the library will be removed from your library list, and the library and its associated files will be moved to the trash as well.
Removing or deleting a library will never delete any of your music or video files. If you need to clear up space in your media folder, you should either use the "Clean Up Music Folder" feature in PowerTunes, or just delete the files manually either through iTunes or the Finder.
If you have accidentally removed or lost track of one of your iTunes libraries, you can use the "Find Libraries" command in the File menu.
PowerTunes will use Spotlight to search your computer for any stray iTunes libraries that are not in your PowerTunes library list. PowerTunes will display any libraries it finds in the Find Libraries sheet, with a couple exceptions:
Once PowerTunes has found all the library files that it can, you can use the Add Library button to immediately add a library to your PowerTunes library list. The library file will be left in its current folder on the hard drive, and PowerTunes will refer to it directly there. If you want to use the library, but store in in a different location, you will need to manually move it to where you want it. You can also use the Move to Trash to delete the library file if you don't need it anymore.
You will probably see a fair number of libraries with names that look like "iTunes Library 2008-02-15". Whenever you upgrade iTunes, iTunes makes a backup copy of your library file and gives it a name like this, with the date corresponding to the date the backup copy was created. These can be helpful if you experience a problem after an iTunes upgrade, since it lets you revert to a previous version of your library from before the upgrade. However, you may want to make a copy of this backup library file before using it, to make sure you still have a spare copy in case something goes wrong again.
PowerTunes lets you create library shortcuts. A library shortcut is a file you can create and store anywhere on your hard drive to give you easy access to a particular iTunes library. To create a new shortcut file, just select "Create Shortcut" from the File menu, choose a name and location for your shortcut file, and click "Save". Double clicking the shortcut file will automatically open the library it refers to in iTunes. You can put a shortcut file in your dock or a folder of favorite items to let you have quick access to a library you use often.
Note: double clicking an iTunes library file in the Finder does not open that library in iTunes. Double clicking on an iTunes library file has the same effect as double clicking iTunes itself. iTunes will simply open up and display whichever library was last set as the active library. This can be confusing, since with most programs, double clicking on a file will open up that file in the program that handles it.
If you own an iPod, iPhone, iPad, or Apple TV, you of course use iTunes to sync all your music and video between your computer and your device. When you create multiple libraries with PowerTunes, your device will "remember" which iTunes library it is synced with, even if you switch back and forth between different libraries using PowerTunes. If you plug in your device while iTunes has a library open other than the one the device is synced with, current versions of iTunes will still sync things like calendars and contacts, but will leave the music from the device's library on the device untouched. If you want to sync the device with another library, you can select the device in iTunes and go to the Music tab to tell iTunes to sync the active library with your device. This will replace whatever's currently on the device with the music and video from the current iTunes library.
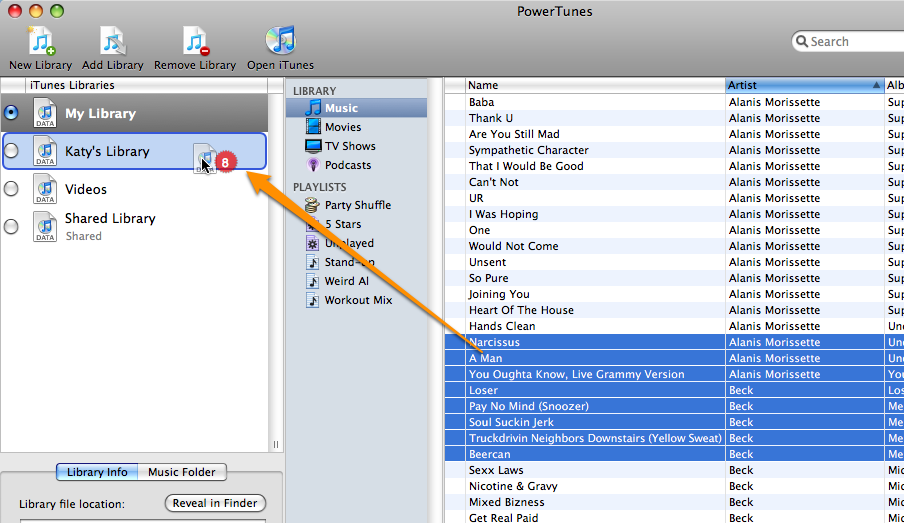
When you plug in an iPod, if the iPod is synced with a library in PowerTunes' library list, a small iPod icon will appear next to that library, so you can easily see which library is the one the iPod is currently synced with. This feature applies to regular iPods, but not any of the other iOS devices; because of their different software, PowerTunes cannot detect which library an iPhone, iPad, or iPod Touch is synced with.
PowerTunes offers several features to help you keep your music organized. With PowerTunes, you can:
If you aren't sure which library you may have stored a particular song in, you can search any of your iTunes libraries in PowerTunes without having to open up iTunes to do so. Simply type a search term into the search field in the upper right corner of the PowerTunes window.
Any tracks that match what you type will be displayed, with all other tracks filtered out. Searching is case insensitive, and will search the contents of all the columns you have made visible in the track list in PowerTunes.
PowerTunes provides a one-step solution for a common task: moving your media folder to a different location. For example, you may decide that you want to move your media folder out of your home folder so that other users can access it, or to an external hard drive to clear up space on your main hard drive. To move your media folder, select the library whose media folder you wish to move, and choose "Move/Copy Media Folder" from the Library menu.
You will then be asked to choose a new location and name for your media folder. PowerTunes currently only supports moving the entire media folder as a unit, so you cannot choose an existing folder and combine the contents of the two. There is also a checkbox located near the bottom of the sheet that lets you opt to make a new copy of the media folder rather than moving the existing folder. Note that if you choose a destination on a different disk from the existing media folder, PowerTunes will automatically copy the media folder.
After choosing your location, PowerTunes will proceed to move/copy the media folder to the new location. After that is done, it will then modify the selected library to point to the new media folder location. PowerTunes will automatically quit and relaunch iTunes, which forces iTunes to rescan the new media folder and update its tracks to make sure they all point to the correct, new locations. If you have multiple libraries that all use the same media folder, PowerTunes will repeat this process with each library, to make sure that they are all updated correctly.
If you have a library that is using music in one media folder, but you'd like to change it to point to the music from another media folder, you can use the "Switch Media Folder" command in the Library menu in PowerTunes to do so. A sheet will be displayed that lets you choose what media folder you would like to switch the selected library over to. PowerTunes will change the library's media folder and open up the library so that iTunes can have a chance to update its database with the new locations of all the music and video files in the library.
When selecting a new media folder, in order for iTunes to be able to recognize where the songs are located in the new folder, the new media folder must have the same organization as the old media folder did. If there is a track that does not exist in the new media folder, or is not located in the same subfolder, or has a different filename, then that track will continue to refer to its music file in the old location. If you do a switch and have some of these "stray tracks" that are still in the old media folder, you can use the "Organize Library…" command (located in the File menu, under the Library submenu) in iTunes. In the window that comes up, check the "Consolidate Files" checkbox, then click OK. iTunes will copy any files from their locations outside the media folder into the new media folder and update its database so that all its tracks point to the files inside the new media folder.
Sometimes, due to an accidental deletion or a hiccup in iTunes' file tracking, you may end up with tracks in iTunes for which the files cannot be found. These "dead tracks" show up in iTunes with a little exclamation mark next to them, and if you try to play one, iTunes will put up a dialog asking you to relocate the music file. This isn't so hard when you have a single track missing, but if a whole section of your music library gets misplaced, fixing these tracks one by one in iTunes is a real pain. You can of course delete the tracks from the library and then just import everything back in again, but doing so blows away all your ratings, play counts, and other track customization that you've done as time goes along.
PowerTunes aims to make this process simpler through the "Fix Dead Tracks" command located in the Library menu. Selecting this command will present you with the following window:
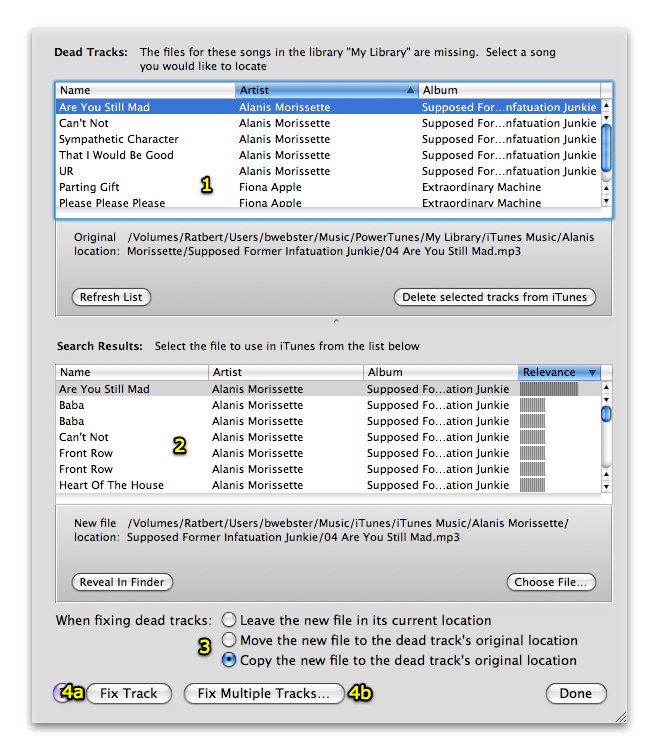
The first thing that PowerTunes does is to scan the library you have selected, looking for any dead tracks that are in that library. This is done automatically when you first open up the window, and the dead tracks it finds are displayed in the list at the top of the window. You can tell PowerTunes to start the scan over by clicking the "Refresh List" button.
To go about fixing your dead tracks, proceed through the following steps:
There are two ways you can proceed to fix the track:
Single track fix. Click the "Fix Track" button, and PowerTunes will fix the selected track as you have specified.
Multiple track fix. If you click the "Fix Multiple Tracks…" button, PowerTunes will perform an additional scan of the folder that contains the new file you have selected to use in iTunes in place of the dead track. If PowerTunes finds additonal matches in the same folder that correspond to other dead tracks, it will display them to you in a list, and you can choose to fix all of the tracks at once. For example, if you had an entire album that had gone missing, you can choose one track from that album to fix, find the file you want to use in its place, and then use this option to automatically fix all the rest of the tracks on the album without having to do each one separately. This can be a big timesaver compared to having to go and fix each track individually.
Note that when fixing tracks, PowerTunes will often have to quit and relaunch iTunes in order to force iTunes to rescan for tracks that have been fixed. Once you are done fixing the tracks you want to fix, click the "Done" button to dismiss the sheet.
By default, PowerTunes examines the iTunes library's XML file to determine the paths of all the tracks in the library. There are some rare situations, however, when a path in that file may not be up to date, and you can end up seeing tracks listed that shouldn't be, or not see tracks listed that should be. If you are having either of these problems, hold down the option key while clicking the "Refresh List" button. The button's title will change to "Resolve Aliases", and when refreshing the list this way, PowerTunes will force iTunes to update the aliases it keeps internally to keep track of each file's location. This takes a much longer time than the default method of scanning, epsecially for very large libraries, but it can be used in situations where you are not getting the right tracks listed in the dead tracks list.
Normally, if you do all your music management through iTunes, the list of tracks that you see in your iTunes library will pretty much be the same as the list of files that are in your iTunes media folder. However, sometimes you can end up with "orphaned" files in your media folder that are no longer in your iTunes library. PowerTunes lets you track down these files and keep your iTunes media folder clear of unwanted files.
Select the library you'd like to clean and select "Find Orphans" command from the Library menu. PowerTunes will search the library's media folder and compare its contents to the files that are in the library itself. Any files that are present in the media folder but aren't in the library will be presented to you in a list. Note that only the library you have selected in PowerTunes is searched - if you have other libraries that use this same media folder, it's possible that some of the listed files are in one of those libraries, just not the one you're looking at at the moment.
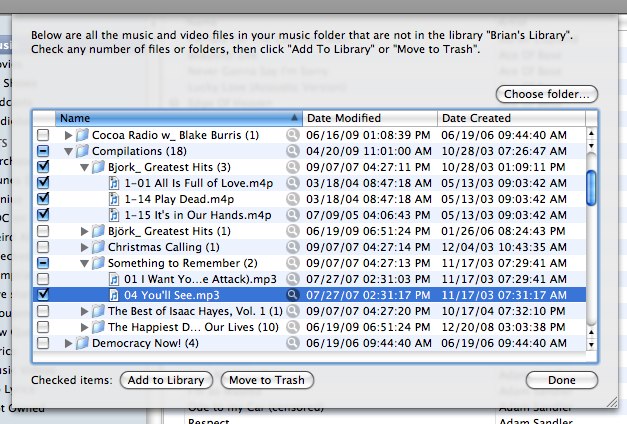
There are three ways to deal with these "orphaned" files: you can add them to your library, move them to the trash, or just leave them alone. First, click the checkboxes next to any number of folders or files to choose which files you'd like to work with (you can option-click any checkbox to check or uncheck ALL the items in the list). If you then click the "Add to Library" button, PowerTunes will add the tracks to the selected iTunes library, after which they will disappear from the list (since they are no longer orphaned). If you click the "Move to Trash" button, those files will be moved to the trash, which also removes them from the list. Note that if you check a folder and click "Move to Trash", PowerTunes will only move the files that you see in the list to the trash. Any other files which are in that folder but don't appear in the list (because they're in the iTunes library) will not be moved to the trash. You can also click the magnifying glass next to a file or folder to reveal its location in the Finder. When you are done adding/trashing files in the media folder, click the "Done" button to dismiss the sheet.
By default, PowerTunes will search the media folder associated with the selected library, but if you want to search a different folder for files to add to your library, you can click the "Choose Folder" button to choose a different folder to search.
PowerTunes gives you several options for transferring music and video files from one of your libraries to another. You can:
For various technical reasons, the following types of items cannot be directly copied from one library to another:
While you can still import new files into iTunes the usual way, by opening up iTunes and dragging the new music into the iTunes window, PowerTunes gives you additional options for importing into your libraries. You can drag files directly from the Finder onto one of your libraries in PowerTunes, and PowerTunes will automatically open up that library and import the dragged files into iTunes. You can also drop files directly on a particular playlist, and PowerTunes will also add the dropped files to that playlist after performing the import. No song options are copied when importing in this manner.
You can copy individual tracks from one library to another by selecting the tracks you want to copy in the track list in PowerTunes and dragging them to the library you want to copy them to.
PowerTunes will import the dragged tracks into the destination library and restore any song options after doing so. You can also specify whether you want the files for the dragged tracks to be copied into the library's media folder.
You can also drag tracks directly into an existing playlist in another library. To do this, drag and hold the tracks over a library for a couple seconds, that library will "spring-load", selecting it so that its contents are displayed to the right. You can then drag the tracks over to the playlist you'd like to add them to and drop them there.
You can copy one or more playlists from one library to another by dragging them from the source list in the middle of the PowerTunes window and dropping them on another library to the left.
All the tracks contained in the dragged playlists will be imported into the destination library, and PowerTunes will copy over all those tracks' song options as well. PowerTunes will also recreate each dragged playlist in the destination library and add the newly imported tracks into the new playlist, so you will end up with identical playlists in the destination library as you had in the original library. Smart playlists are also recreated with the same criteria as they had in the source library.
PowerTunes allows you to merge the contents of entire libraries together into one. Select the "Merge Libraries" command from the Library menu, and you will be presented with this sheet that lets you configure your merge.
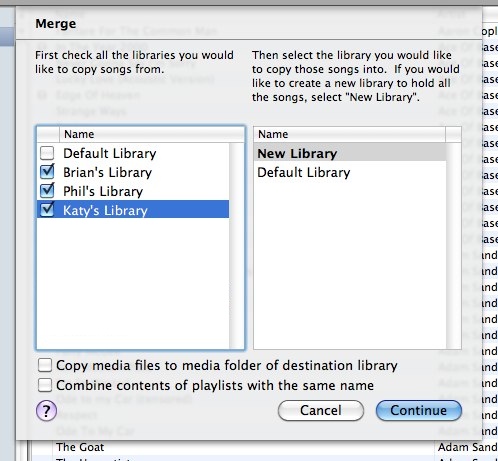
On the left side of the sheet, you can check the libraries that you wish to merge together. On the right side, you can either create a new library to hold the contents of the merged libraries, or choose an existing library. Clicking the "Continue" button will begin the merge process.
If you choose the "New Library" option, you will be given a chance to specify where to create the new library and what media folder it should use after clicking the "Continue" button. Creating a new library for your merge lets you experiment with merging while leaving your existing libraries untouched.
For each library being merged, PowerTunes will import all the tracks from that library into the merged library and recreate all the playlists from that library in the merged library. The only things that can't be copied over automatically are URL tracks (e.g. radio stations), podcasts (which can be copied manually), and PDFs/digital booklets. All the options such as duplicate handling and copying song options that apply to track/playlist copies also apply when doing a merge.
If the "Copy music files to media folder of destination library" checkbox is checked, then all the music and video files involved in the merge will be copied into the media folder of the destination library. You should check this option, for example, if you have music spread out among multiple media folders that you want to bring together all into a single media folder (as well as a single library). If the checkbox is unchecked, then all the files will be imported into the merged library, but the files will be referenced where they already are and new copies of the files will not be made.
If you check the "Combine contents of playlists with the same name" checkbox, then if more than one library involved in the merged has a playlist with a given name, then only one playlist with that name will be created in the merged library, and all the tracks in all the playlists with that name being merged will be combined into the one playlist in the merged library. If this option is not checked, then PowerTunes will recreate each playlist individually and keep their contents separate, so you may end up wih more than one playlist with the same name.
PowerTunes offers several ways to customize what gets done when copying items from one library to another. These include:
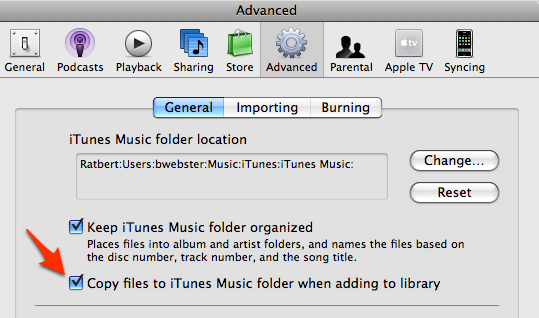
iTunes offers an option in the Advanced section of its preferences that lets you configure whether you want iTunes to make copies of files that you import in the library's media folder, or whether you'd prefer to have iTunes simply reference the existing files where they already live on your hard drive.
When performing copying operations with PowerTunes, by default PowerTunes will respect whichever setting you have for each of your libraries. Note that since each library has its own set of iTunes preferences, you can have some libraries that copy music into their media folders, and others that do not. When you drag files, tracks, or playlists onto a library in PowerTunes to import those items into that library, the arrow cursor will change based on this setting. If you have the library set to copy music into its media folder, then a green plus sign will appear by the cursor when you drag it over the library. If you don't have the library set to copy music files, then the arrow will remain the same.
However, if you wish to override this setting for a single copy operation, you can do so by using modifier keys while dragging. If you hold down the option key while dragging, this will force PowerTunes to copy the dragged items into the library's media folder, overriding the setting that library has in iTunes. Conversely, if you hold down the command key while dragging, this will force PowerTunes to not copy the dragged items. This override only applies to the one drag and drop operation you're performing, and the preference will be restored to its previous setting after the transfer is complete.
To understand how album artwork is handled by PowerTunes, you need to know that there are two different ways album artwork can be stored by iTunes: embedded or downloaded.
Embedded artwork for a track is stored inside a music file itself. This increases the size of the music file (usually by about 50-100 KB), but ensures that the artwork is always stored with the music file, even if you copy it outside of iTunes.
Downloaded artwork is downloaded by iTunes from the iTunes Store and is stored in separate files. (the files are actually stored in the "Album Artwork" folder located in the same folder as your iTunes library file).
Downloaded artwork has the advantage that, since all the tracks on a particular album will have the same artwork, iTunes only needs to store a single copy of the album artwork for that album, instead of storing a separate copy inside each music file on that album, which helps to save some disk space. The downside to downloaded artwork is that only iTunes knows which artwork file goes with which track(s), so if you copy a music file somewhere outside of iTunes, the artwork will be lost.
When you copy tracks using PowerTunes, it handles the two types of artwork slightly differently. Since embedded artwork is already stored in the music files being copied, PowerTunes doesn't need to do anything additional to ensure that the artwork is transferred along with the music - it just happens automatically. For downloaded artwork, iTunes does allow other programs to retrieve the artwork data, but the only way iTunes allows artwork to be assigned to a track is by embedding it. So, when you use PowerTunes to copy a track that has downloaded artwork to another library, PowerTunes will import the file into the destination library, retrieve the downloaded artwork from the original library, and then embed the artwork into the file in the destination library. If you do not want PowerTunes to copy artwork at all, you can uncheck the "Copy album artwork" checkbox in the Music Copying section of PowerTunes' preferences.
You can also embed artwork in existing tracks in an iTunes library, without having to copy them to another library. Select one or more tracks in PowerTunes that you want to embed the artwork for, then select "Embed Album Artwork" from the Library menu. PowerTunes will go through all the tracks and, for each track that has downloaded artwork, will embed that artwork into the music file itself. Additionally, instead of selecting individual tracks, you can select a playlist to embed artwork for all the tracks in that playlist, or select a library to embed artwork for all the tracks in the entire library.
One problem that arises when using multiple libraries with iTunes is that, if you use iTunes features such as rating your music or keeping track of play counts, then when you import music that you have in one of your libraries into a different library, that extra information is not copied over to the new library. When copying music using PowerTunes, it will make sure that this extra information comes along for the ride.
There are two types of track information that you deal with in iTunes: some that is embedded in the music files themselves, and some that is only stored in the iTunes library database. For example, fields such as a song's Name, Artist, Album, and Genre (as well as many others) are actually stored inside the music files themselves. If you edit one of these fields in iTunes, iTunes will modify the music file to update it with the new value you just entered. Since this data is embedded in the music files, when you import those music files into another library, iTunes can automatically read that same data back from the imported files, so you'll end up with the same information as you had entered in the original library.
However, there are a fair number of fields that are not stored inside the music files, and are only stored on a per-library basis. Some examples are song ratings, play counts, equalizer settings, and custom volume adjustments. The set of non-embedded data roughly corresponds to what you see in the Options tab if you do a "Get Info" on one of your tracks in iTunes. Since this data is not stored inside the music files, if you import those files into another iTunes library, the data for those fields is not available to iTunes, so your newly imported tracks will all have default values assigned for those fields (e.g. 0 star ratings, play counts of 0, etc.).
Using PowerTunes to copy your music between libraries solves this problem. After importing the copied music files into the destination library, PowerTunes will transfer over all the settings from the original tracks to the newly imported ones. The full list of data that is copied this way can be found in the "Music Copying" section of PowerTunes' preferences window. If you do not want this information copied, you can uncheck the "Preserve Song Options" checkbox, or you can uncheck individual checkboxes for those fields you do not want to have transferred.
The one notable omission from this list is the "Date Added" field. iTunes automatically assigns a value to the "Date Added" field upon the time of import, and does not allow the value to be changed by another program or even manually by the user, so this field will not be the same in the destination library as it was in the original library.
When performing any sort of importing or copying using PowerTunes, PowerTunes gives you additional options that let you avoid importing duplicate copies of a song into a library. If you check the "Don't import duplicates" checkbox in the Music Copying section of the preferences window, then for each song or video you try to copy to another library, PowerTunes will search the destination library to see if that song or video already exist in the library. If PowerTunes finds an existing copy of the track, then it will not import a second copy of it.
PowerTunes identifies duplicates by comparing one or more attributes of the track against those fields of the tracks in the destination library. The attributes it will use for this comparison are the track's name, artist, album, duration, bitrate, and file type. If PowerTunes finds a track in the destination library whose values for all of these attributes are the same, then that track is identified as being a duplicate of the track being imported. You can customize this behavior in the preferences to only compare a subset of these attributes. For example, if you don't care whether the two tracks' duration are the same, you can uncheck that box, and PowerTunes will only compare using the other five values.
When you copy playlists or perform a merge, PowerTunes automatically recreates the copied playlists in the destination library and adds all the same tracks to the recreated playlists as were in the original playlists. If a duplicate is identified for a track in a copied playlist, by default PowerTunes will add that duplicate track to the recreated playlist in place of the original track. You can turn off this behavior if you wish by unchecking the checkbox for it in the preferences window.
Since iTunes does not provide a way for other programs to access the list of podcasts you are subscribed to in your library, PowerTunes is not able to transfer your subscribed podcasts from one library to another. However, it is not difficult to transfer your podcasts manually, by following these steps:
This should make iTunes subscribe to all the same podcasts in that library as you had in your original library. Note that if you had episodes of those podcasts downloaded to the original libary, iTunes will need to redownload those episodes into the new library.
If you own an iPhone and have downloaded applications from the iTunes store into your iTunes library, you may notice that your iPhone applications are not displayed by PowerTunes when you view your library's contents. This is because iTunes does not include iPhone applications in the "iTunes Music Library.xml" file that it writes out for other programs (such as PowerTunes, iPhoto, iMovie, etc.) to read. Apple does not appear to be inclined to include iPhone applications in this file in the near future, so for the time being, there is no way to directly manage your iPhone applications using PowerTunes. We will continue to look into ways to allow PowerTunes to directly manage iPhone applications in the future.
If you wish to copy applications from one library to another, you can still do so manually. The applications themselves are stored inside the "Mobile Applications" folder that lives alongside the iTunes Library file for a given library. If you have applications in one library, and you want to include those in a different library:
Note that sometimes, if you have updated an application multiple times, you can end up with more than one copy of an app in the Mobile Applications folder (e.g. "AIM.ipa", "AIM 1.ipa", etc.). If this happens, the best way to determine which copy is the most recent version of a particular application is to press command-2 to view the folder in List View, then click the "Date Modified" column to sort the contents of the folder by date. Whichever copy of an app is the most recently modified will be the most recent version of that application.
Due to technical limitations with iTunes, not every type of item in an iTunes library can be copied to another library (this applies to both copying music and video and merging libraries). Below is a summary of what can and can’t be copied, with workarounds described where possible.
Music, movies, TV shows, audiobooks, iTunes U, and ringtones: all these music and video tracks can be copied from one library to another.
Playlists, playlist folders, and smart playlists: all your custom playlist organization can be copied from one library to another.
Track metadata: most track metadata can be copied along with the media files. The main exception is the “Date Added” field, which iTunes automatically sets to the date and time the track is imported into the library. iTunes does not expose a way to change this value after the fact, so if you copy tracks to another library, the tracks in the destination library will have the date that the copy was performed, not the date that the track had in the original library.
Artwork: album artwork can be copied along with your tracks, though the details of this can differ depending on whether the artwork was downloaded from the iTunes store. You can read more details about how this works in Copying Album Artwork.
Podcast subscriptions: iTunes does not make available the links to podcasts that you’re subscribed to in your library, so there is no way for PowerTunes to copy those subscriptions across to another library. Copying your subscription list manually is not too hard though, and that is described in the Copying Podcasts page of this manual.
iOS apps: iTunes does not publish the list of apps you have in your library that can be synced with your iPhone or iPad, so PowerTunes is not able to list these or copy them to another library. This can also be done manually, as described in Managing iPhone Applications.
iTunes Extras, iTunes LPs, PDFs, and iBooks: iTunes does not publish information on these items in your library, so there is no way for PowerTunes to list these items or copy them to another library. Note that as of OS X 10.9, iBooks are now handled by a separate iBooks app on your Mac, instead of via iTunes.
iCloud tracks: If you use iTunes in the Cloud or iTunes Match, iTunes only publishes information about those tracks that have already been downloaded to your machine. If you have any tracks that are in your library, but haven’t been downloaded (i.e. the “iCloud Download” icon appears for the track in iTunes), those tracks will not appear in PowerTunes, and cannot be copied to another library.
If you have multiple user accounts set up on your machine, e.g. for different members of your family, you can use PowerTunes to allow one or more users to access your music without needing to keep around mulitple copies of everything. There are two methods of sharing:
Media folder sharing. This shares the contents of a media folder so that more than one user can access the same music. This shares only the music files themselves, and does not share iTunes specific information such as playlists or song options.
Library sharing. This shares the contents of an iTunes library, including the library's playlists and other information. In order for a user to be able to use a library, they must also have access to the library's media folder, so when you share a library using PowerTunes, that library's media folder will automatically be shared with the same set of users as the library.
Note that this kind of library sharing is only useful if you have set up multiple user accounts on a single machine. If you are interested in sharing music or libraries between multiple machines on a network, you can read about doing so here.
To share a library, select the library you would like to share and select "Share Library" from the Library menu. If you don't want to share one of your existing libraries, but would rather start with an empty library to share, first create a new library as you normally would, then use the "Share Library" command. If you are sharing a library that is located in your home folder, PowerTunes will give you the option to make a copy of that library in /Users/Shared and share the copy instead. This is the recommended way to do things, since sharing a library in your home folder will likely give other users access to some portions of your home folder besides the library itself (specifically, other users will be able to read, but not modify, the contents of any folders in the path to the library file). However, if you wish, you can also choose to share the library where it is.
You will be presented with options to choose whom you would like to share the library with. The options are:
Once you've selected the users you want to share with, click "OK". If the media folder for this library is in your home folder, PowerTunes will give you the option to move your media folder to /Users/Shared, to prevent other users from being able to browse the folders inside your home folder that lead up to your media folder.
PowerTunes will proceed to change the permissions on both the library and media folder as necessary so that the selected users can read and write the library and its music. Once this is done, all you have to do is login as one of the other users that you've shared the library with, and that library will automatically appear in their list of libraries in PowerTunes.
If you want to share a common set of music and video among multiple users, but still allow each user to maintain their own library with separate playlists, ratings, etc., you can use PowerTunes to do so. To share a media folder, first select a library that is using the media folder that you'd like to share, then select "Share Media Folder" from the Library menu. You will be presented the same options as when sharing a library, but these options will only be applied to the media folder, and the selected library will remain unshared.
Once you have shared a media folder, there are two ways for another user to use that media folder with one of their iTunes libraries.
In order to allow multiple users to use an iTunes library or media folder, PowerTunes changes the permissions of the shared files/folders using a feature introduced in OS X 10.4 (Tiger), ACLs (for a quick overview of how ACLs work, refer to this page on Apple's website). There are two main reasons PowerTunes uses ACLs over the more traditional POSIX permissions model.
First, ACLs provide much finer control over permissions and allow PowerTunes to share with specific users, whereas this is not possible with POSIX permissions. For example, if you have a computer set up for your family, you can choose to have a library shared that only be accessed from mom and dad's accounts, but not the kids.
Second, ACLs provide an inheritance feature that will cause any new files created inside a folder to be assigned the same permissions as the folder itself. This is necessary when sharing a media folder, since if one user imports new files into iTunes and they are put in the shared media folder, those files will automatically be given the necessary permissions for other users to be able to read and write those files without having to reapply permissions for the new files manually.
If you share a library or media folder with a set of specific users, PowerTunes will assign an ACL to each file and folder containing one ACL entry for each user, giving that user read and write permission to the file/folder. When sharing with all users, PowerTunes insteads uses an ACL with a single entry, giving the "everyone" group read/write access to the file/folder. These permissions will be applied recursively to the entire media folder for a shared media folder, but are only applied to the library file and its associated files when sharing a library. Note that PowerTunes will overwrite any existing ACLs that are on those files/folders, although th POSIX permissions on those files will remain the same. If you change a previously shared library to be shared with nobody, PowerTunes will remove all ACLs on the shared files/folders.
Here are a few setups that people commonly want to arrange with iTunes, and descriptions of how PowerTunes can help you achieve these setups:
If you already have your iTunes music set up on your internal hard drive and want to move it to an external hard drive, you will first want to decide whether you just want to store your music and videos on the external drive, or if you want your library itself, incuding all your playlists, ratings, play counts, etc. to live on the external drive as well. If you just want to store the music there, just perform the "Copying the media folder" step below. If you want to store your library database as well, also perform the "Copying the library" step.
Copying the library
Use the "Duplicate Library" command in the File menu. In the configuration sheet that appears, click the "Custom location" button and choose a location on your external drive to store the library. A new copy of your library will be created there with all the same tracks and playlists as the original. This copy of the library will still be referring to the media folder in its original location.
Copying the media folder
Select your iTunes library in PowerTunes and then select "Move/Copy Media Folder" from the Library menu. Choose a new location and name for your media folder on your external drive, and PowerTunes will copy your music there and change your iTunes library to use the new media folder.
To share your music across a network, you first need to decide where the music itself will be stored. Choose which computer will hold the music, then open System Preferences on that computer and enable Personal File Sharing in the Sharing pane. Details on enabling file sharing on OS X can be found on Apple's support site at these links:
Once that's done, go to another computer that you'd like to access the music from and go the Finder. To connect to the shared computer, follow the directions on Apple's support site at:
Connecting to shared computers and file servers on a network
When you connect to the remote machine, it's easiest to log in with your default admin username and password, since that will let you access any hard drive on the machine, and thus let you store your music anywhere you want on the machine. Once you're connected, you can open up PowerTunes and set up your machine to use the remote library/music.
If you have an iTunes library set up on the remote machine that you want to use on your machine, all you have to do is add the library from the network drive to PowerTunes just like you would any other library. Note that you must also be able to access the media folder that this library uses, which is also most likely on the same machine. If the library and media folder are located on the same hard drive, then this is easy. If the media folder is on a different hard drive from the library file (e.g. the library file is on the internal drive but the music itself is stored on an external drive attached to the computer), then you will need to make sure that your machine can access both drives over the network.
If you only want to use the media folder on the remote machine, but have a separate library for your local machine, then you can either a) create a new library and use the "Choose media folder" option in the setup sheet to point it at the media folder on the network drive, or b) switch an existing library's media folder to point to the media folder on the network drive.
Important: If you are using a single library from multiple machines, and you open that library from both machines at the same time, you may end up getting errors reported by iTunes when it tries to save changes made to the library file. PowerTunes does its best to detect and warn before opening a library that's already open on another machine, but there are some cases that PowerTunes can't catch, and of course PowerTunes can't warn you if PowerTunes itself is not open. If you do end up with a library open on more than one machine at a time, your library should be safe, but you will probably lose any changes that you made from one of the two machines. When using this setup, do your best to quit iTunes on one machine before opening it on another machine if both machines are using the same library.
If you have a large music library that is slowing iTunes down, or has simply become too large to handle easily, you can use PowerTunes to split up your library into multiple smaller ones. Before starting the process, there are a couple decisions you'll want to make.
First, decide how exactly you want to split up your music, and how many libraries you'll be creating. For example, you might split up your music by era (70s, 80s, etc.) genre (rock, classical, etc.) or by type (music in one library, video in another). You can create your libraries all at once before copying any music, or you can create them one at a time as you go along.
Next, you'll want to decide whether you want to have the actual music files remain in their current media folder where they are, or instead create new media folders for new libraries and make separate copies of the music there. When you use the "New Library" button to create each of your new libraries, in the configuration sheet that comes up, if you want to keep all the music files in the original library's media folder, you'll want to click the "Use same media folder as library" radio button, then choose the library you're splitting up from the pop-up menu to the right. If you want to have new, separate media folders for each of your libraries, leave the "Create new media folder" radio button selected instead.
Now that you've got a library created, you'll want to actually copy over the music you want to have in that library. The easiest way to do this is to collect the music you want to have in that library into one or more playlists in the original library. You can then just drag those playlists from that library and drop them on your new library to transfer all the tracks and playlists over to the new library. One particular trick that can be handy is to set up a smart playlist in your original library that automatically collects the tracks that meet a certain criteria (e.g. all tracks whose year is between 1970 and 1979 for your 70s library), then just copy the smart playlist over to your new library.
You then just repeat this process for each new library you want to create to finish splitting up your library. PowerTunes will not delete any tracks or files from the original library when you do your copies, so everything there will remain intact there until you are sure you want to delete it yourself.
PowerTunes allows you to easily store music in a single media folder, but still split it up across multiple libraries for organizational purposes.
New Libraries
If you're creating a new library and want it to use an existing media folder, simply select the "Use same media folder as:" option in the new library configuration sheet, and choose the existing library whose media folder you want your new library to use.
Existing Libraries
If you have an existing library that you want to change so it uses a different media folder, the easiest way is to use the "Switch Media Folder" command in the Library menu. This will redirect that library so that it uses the media folder you chose to store its music. iTunes will automatically update its database to point to files in the new media folder.
Consolidating Music
If you do want to switch a library's media folder, but that library has references to some music files that either don't get updated correctly by iTunes, or the files live somewhere else on your hard drive outside any media folder, you can copy any stray files into the library's new media folder by opening the library in iTunes, going to the File menu, then the Library submenu, then selecting "Organize Library…". In the window that comes up, click the "Consolidate Files" checkbox, then click OK. This will copy any stray files into the library's media folder and update iTunes' database to point to the files in the media folder. Alternately, if you only want to consolidate specific files and not everything in the whole library, select the tracks you want to consolidate, then control-click on one of the tracks and select "Consolidate Files..." from the contextual menu that pop up.
Apple provides a service called iTunes Match that lets you upload your music library to iCloud and then access your music from your other Mac, iPhone, iPad, or iPod Touch. iTunes Match can be used alongside PowerTunes, but there are a few details about how iTunes Match interacts with multiple libraries that you should consider when setting up your libraries.
Each of your libraries can have iTunes Match either enabled or disabled, and you can set this separately on a per-library basis. When a library has iTunes Match enabled, if you select "Update iTunes Match" from the "Store" menu in iTunes, it will automatically add any new tracks that have been purchased, matched, or uploaded to iCloud from other libraries or devices to the iTunes library you currently have open. It doesn't automatically download all the new tracks by default, but it adds entries for the tracks to your library, and you can later download the actual song files for those tracks you wish to download. Note that this applies to any library with iTunes Match enabled, either on the same Mac or on different Macs.
If you plan on using PowerTunes to keep different libraries with separate content, then you will probably not want to enable iTunes Match on more than one library. If you do enable iTunes Match on multiple libraries, when iTunes updates content from the cloud, tracks from your different libraries will end up intermingled with each other, which defeats the purpose of separating them in the first place. For example, if you have a Blues library and a Classical library, and you enable iTunes Match in both libraries, then iTunes will end up adding your blues tracks to your classical library and your classical tracks to your blues library, which is probably not what you want it to do.
A single Apple ID can have a maximum of 10 devices (Macs, iPhones, iPads, etc.) registered with it at once for iTunes Match. This registration is per-machine though, not per-library, so enabling iTunes Match on multiple libraries on a single machine will only count as a single device as far as registrations are concerned. However, a given Mac can only be registered with one Apple ID at a time. This means that on your Mac, you cannot have one library with iTunes Match enabled using one Apple ID, and a second library with iTunes Match enabled using a second Apple ID. All libraries on a single Mac must all use the same Apple ID for iTunes Match, even if the libraries belong to different user accounts on that Mac.
If you have any tracks in your library which are stored on iCloud, but which have not yet been downloaded to your Mac (i.e. they have the little "cloud download" button next to their names in iTunes), iTunes does not write out any information for such tracks to its XML file, so those tracks will not appear in PowerTunes when browsing your library, or using features such as "Find Orphans" or "Fix Dead Tracks". The iCloud status of each track (e.g. "Matched", "Uploaded", "Purchased", etc.) is not written out either, so you must open the library in iTunes itself to view that information.
PowerTunes provides a Dashboard widget that lets you quickly open up any of your iTunes libraries without needing to open up PowerTunes first. To install the widget, just select "Install Dashboard Widget" from the PowerTunes menu in the menu bar.

The widget is fairly simple, providing a pop-up menu that lists all the libraries you have in PowerTunes. If you select a library from the pop-up menu, your Dashboard is dismissed and that library will immediately be opened up in iTunes. PowerTunes does not need to already be open for this to work, and the widget will automatically detect any changes you make in PowerTunes to your library list, keeping its pop-up menu up to date. Note that any libraries for which the library file cannot currently be found (e.g. libraries stored on a hard drive not currently attached to the computer) will not be included in the pop-up list. Also, as a shortcut, double clicking on the PowerTunes icon on the left side of the widget will open up PowerTunes itself.
The PowerTunes Dashboard widget can be uninstalled the same way as any other widget, using Dashboard's built-in widget manager.
PowerTunes offers a variety of preferences that allow you to customize its behavior. You can access these by choosing the "Preferences" menu item from the PowerTunes menu (or by pressing command-comma).
General preferences
Music copying preferences
Many of the features of PowerTunes work without a registration code, but if you find PowerTunes useful and/or wish to use some of the advanced features only available to registered users, a license can be purchased for $19.95 by clicking the “Purchase Now” button in the upper right corner of the main window, or online at https://store.fatcatsoftware.com. The differences between a licensed and an unlicensed copy of the program is outlined below.
|
|
Unlicensed |
Licensed |
|
Create new libraries |
Yes |
Yes |
|
Use existing libraries |
Yes |
Yes |
|
Find libraries on your Mac |
Yes |
Yes |
|
Library shortcuts |
Yes |
Yes |
|
Share library/media across users |
Yes |
Yes |
|
Dashboard widget |
Yes |
Yes |
|
Find orphans in your media folder |
10 orphan limit |
Add unlimited orphans to library |
|
Fix dead tracks |
10 track limit |
Fix or remove unlimited dead tracks |
|
Merge libraries |
No |
Yes |
|
Copy tracks and playlists |
20 track limit |
Unlimited tracks |
|
Import media directly into a library |
20 item limit |
Unlimited imports |
Unregistered copies of PowerTunes can be used on as many computers as you'd like. A license for PowerTunes is for a single user, but allows for use on two machines (e.g. a desktop and a laptop). If you intend have more than one user using the registration-only features of the program, you should purchase a registration code for each person who will be using the program. If you buy a code for multiple users, the number of users the registration covers will be shown in the registration window.
After purchasing your license, you will receive a serial number that you can use to register your copy of PowerTunes and give you unlimited access to the program's features. To enter your serial number, either click the "Register Now" link in the order confirmation e-mail that is sent after placing your order, or copy and paste your name and serial number into the registration window in PowerTunes. You can open the registration window by selecting "Registration" from the PowerTunes menu in the upper left corner of the screen.
PowerTunes requires Mac computer with an Intel Core 2 Duo or later processor running OS X 10.7 or later (there is no Windows version of PowerTunes). You must also have iTunes 10.5 or later installed. If you have an older version of iTunes, you can download the latest version for free from Apple at http://www.apple.com/itunes.
Is there a Windows version of PowerTunes?
PowerTunes is a Mac OS X only program, and there are no current plans for a Windows version.
When I copy music to another library, why is the "Date Added" field is not transferred over along with all the other track metadata?
Unfortunately, iTunes does not allow modification of the Date Added field, either by another program or by manually typing in a new value. As a result, whenever you perform an operation that imports new tracks into an iTunes library, those tracks will always have the current date set for their Date Added value.
iTunes is displaying a message saying "The iTunes Library file cannot be saved. An unknown error occurred (-54)." What does that mean?
The most common cause of this is when you have an iTunes library that is open by two copies of iTunes at the same time. This can happen if you share a library between multiple user accounts, or use the same library from two or more computers across a network. If this is the case, you will need to quit all but one copy of iTunes that has that library open.
I was performing a long copy/merge operation that was halted, saying a timeout occurred trying to quit iTunes.
The most common cause of this is when iTunes has opened up an alert or other window that has not been dismissed. This includes the iTunes preferences window, the info window showing details of a track, or an alert asking a question that requires a response. If one of these windows is up, then iTunes will not quit or respond to any other commands sent to it by PowerTunes until you dismiss the window in question. Some common settings you can change to prevent this from happening are:
How does having multiple libraries affect purchases I've made at the iTunes Store? Do I have to authorize separately for each library?
iTunes Store authorization is kept in an entirely seperate place from the iTunes library and media folder, so once you authorize your machine for your iTunes account, this authorization will apply to all your libraries. You may need to log back into the iTunes Store itself when switching libraries, to change settings or make a purchase, but you can continue to play authorized music without having to type in your password all the time.
How come my iPhone applications don't appear when viewing a library in PowerTunes?
See the "Managing iPhone applications" section for a full description of how to deal with iPhone applications when using PowerTunes
Why can't I see things like iBooks or PDF files in PowerTunes?
iTunes does not publish any details about these types of files, and only provides information for music and video files in the library, so unfortunately there is no good way for PowerTunes to know which non-media items are in the iTunes library, or what playlists they reside in. This applies to iBooks, PDF files (including liner notes), iTunes Extras content, and iTunes LPs.
In the PowerTunes window, where my library's playlists should be, there is a message reading "The iTunes Music Library.xml file for this library is malformed. Conversion of data failed. The file is not UTF-8, or in the encoding specified in XML header if XML."
The most common cause of this error is when you have a audio stream in your library with a corrupted URL, which iTunes writes out improperly to its XML file. The solution is to find and eliminate the offending stream from your library. Hint: if you hit command-J in iTunes and enable the "Kind" column, you can look for tracks whose kind shows as "MPEG audio stream".
If you are experiencing a problem using PowerTunes, you can contact PowerTunes tech support in two ways.
Open up PowerTunes and select "Contact Support" from the Help menu. This will bring up a window where you can explain your problem and send it directly to PowerTunes support. This is the preferred method, as it will automatically transmit basic information about your setup that will help in making sure your problem can be diagnosed quickly and correctly. The following information will automatically be included with your request:
Additionally, if you are experiencing a problem that involves iTunes crashing or PowerTunes crashing, you can include the appropriate crash log(s) with your submission. All information that is submitted is transferred over an encrypted SSL connection.
Alternately, you can also e-mail for support at $supportlink$
Version 1.3.4 (released 6/2/2016)
Version 1.3.3 (released 4/1/2016)
Version 1.3.2 (released 7/20/2015)
Version 1.3.1 (released 10/16/2014)
Version 1.3 (released 2/7/2014)
Version 1.2.5 (released 2/5/2013)
Version 1.2.4 (released 11/27/2012)
Version 1.2.3 (released 11/13/2012)
Version 1.2.2 (released 07/13/2012)
Version 1.2.1 (released 02/23/2012)
Version 1.2 (released 12/14/2011)
Version 1.1.6 (released 07/21/2011)
Version 1.1.5 (released 07/15/2011)
Version 1.1.4 (released 01/13/2011)
Version 1.1.3 (released 06/20/2011)
Version 1.1.2 (released 11/17/2009)
Version 1.1.1 (released 09/18/2009)
Version 1.1 (released 07/15/2009)
Version 1.0.3 (released 05/06/2009)
Version 1.0.2 (release 12/09/2008)
Version 1.0.1 (released 09/04/2008)
Version 1.0 (released 07/09/2008)