Normally, when using iPhoto, you have a single iPhoto library that holds all of your photos. As your library grows over time, it can become hard to manage, and iPhoto can get slower due to the large number of photos in the library. iPhoto Library Manager lets you instead divide your photo collection among multiple iPhoto libraries. This allows for more fine grained organization, as well as improving the performance of iPhoto when browsing and editing. You can also easily browse and search your photos, copy photos between libraries, and find duplicate photos in your libraries.
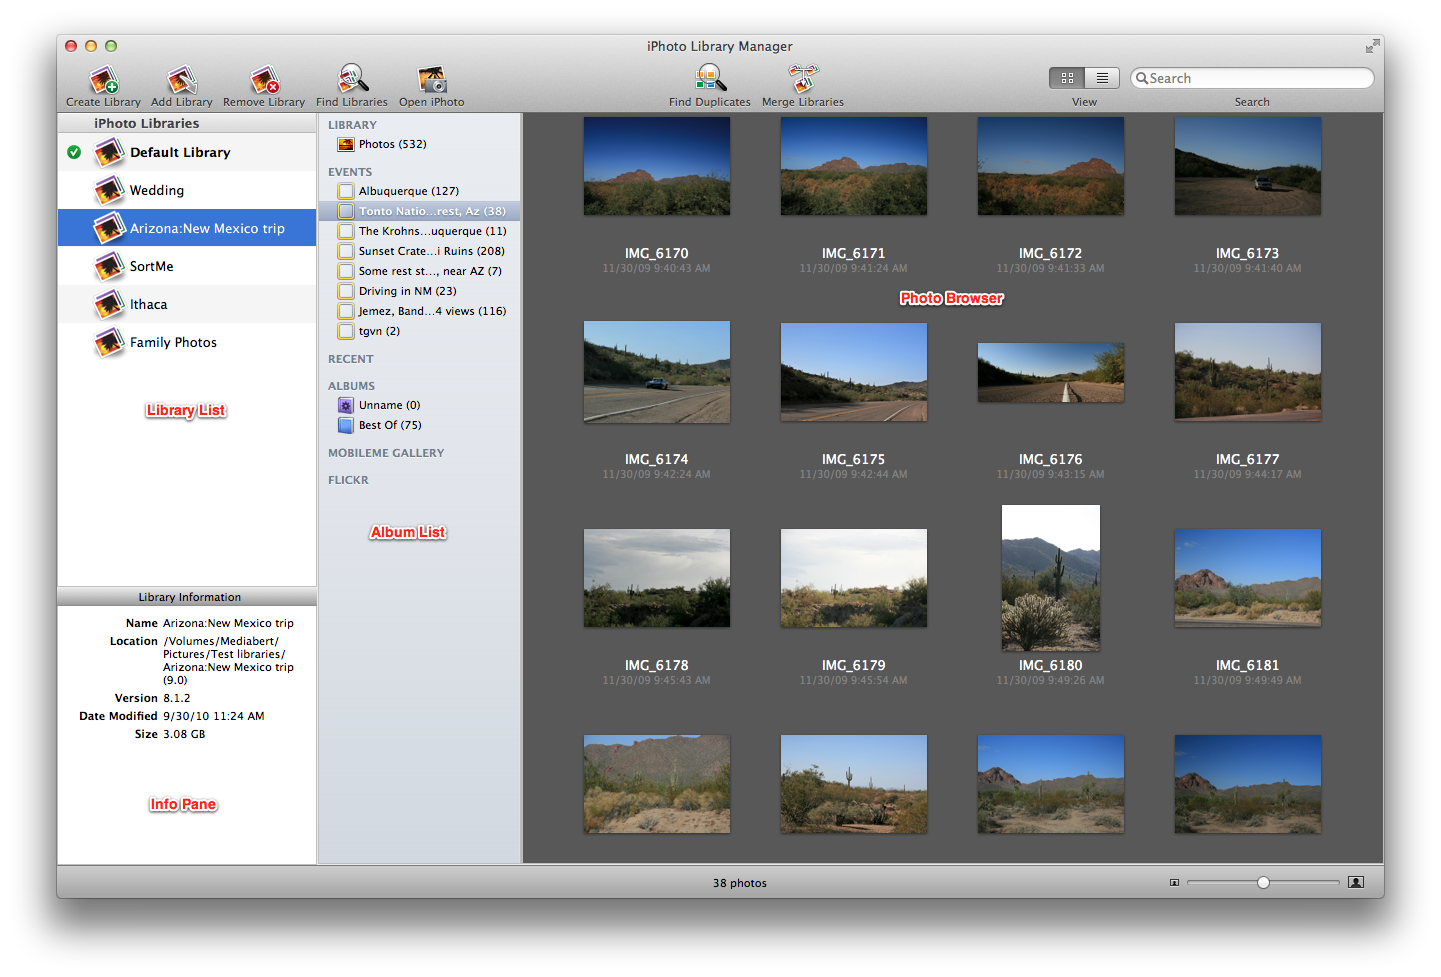
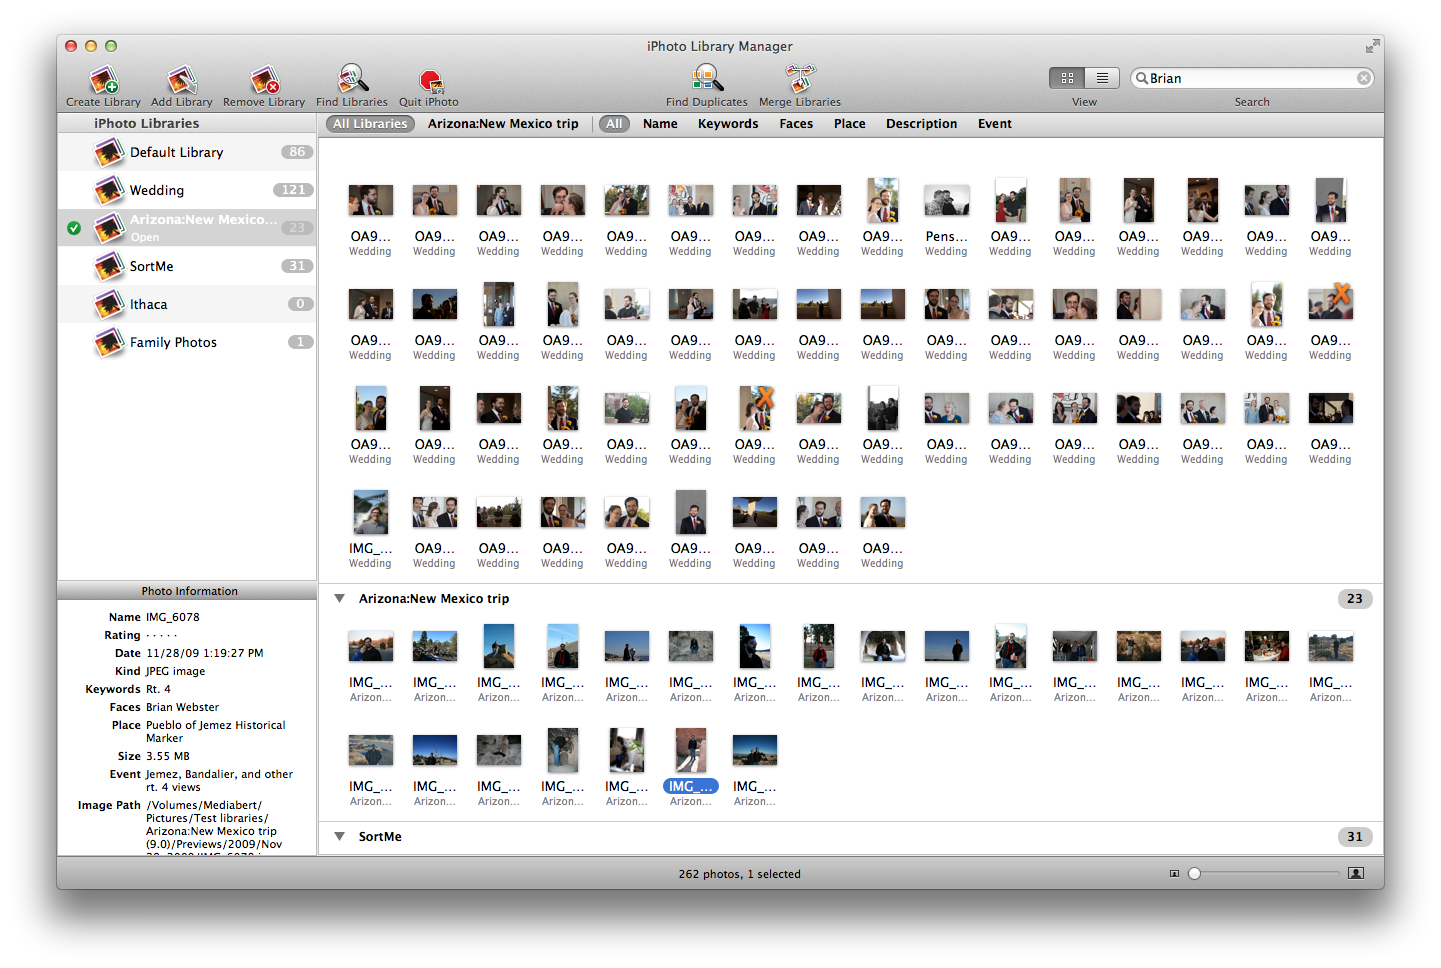
There are four main parts to the main iPhoto Library Manager window:
Library list:
This is a list of the iPhoto libraries that iPhoto Library Manager knows about. You can create new libraries with the “Create Library” button, and you can add existing libraries to the list via the “Add Library” button, or by dragging and dropping a library from the Finder into the library list. You can rename the items in the list by selecting the library, then clicking the name and typing in a new name. The “Remove Library” button lets you remove a library from your library list (though the library will remain where it is on your hard drive).
Album list:
This displays the list of albums and events in the selected library. You can select an album or event to view the photos it contains in the photo browser on the right. You can also drag albums or events from this list and drop them onto one of your libraries on the left to copy them to that library.
Photo browser:
The photo browser takes up the majority of the window, and allows you to browse through the actual photos stored in whatever library you have selected. There is both a grid view, which lets you browse photos much like in iPhoto, and a list view, which provides an easy way to view your photos' attributes, such as dates, ratings, keywords, etc.
Info pane:
The pane in the lower left corner of the window will show more detailed information about whatever item you currently have selected in the window. This can display information for a photo, an album or event, or a library, depending on what you have selected most recently.
iPhoto Library Manager can be run from anywhere on your hard drive, though usually you'll want to store it in the Applications folder, along with the rest of the applications on your Mac. To install it, drag the iPhoto Library Manager icon from the disk image to the Applications folder. To uninstall, drag iPhoto Library Manager from your hard drive to the trash. If you are upgrading a previous version of iPhoto Library Manager, you can simply replace the old version with the new one, and your list of libraries and all your settings will be retained automatically. You can also use the "Check For Updates" menu item from within iPhoto Library Manager to automatically check for, download, and install new updates.
iPhoto Library Manager 4 requires Mac OS X 10.6.8 or later and an Intel based Macintosh with a Core 2 Duo processor or better. You can create, add, and switch between libraries with any version of iPhoto. The album copying, library merging, library rebuild, duplicate finding, and photo importing features all require iPhoto 8.1.2 or later.
Many of the features of iPhoto Library Manager work without a registration code, but if you find iPhoto Library Manager useful and/or wish to use some of the advanced features only available to registered users, a license can be purchased for $29.95 by clicking the “Purchase Now” button in the upper right corner of the main window, or online at https://store.fatcatsoftware.com. The differences between a licensed and an unlicensed copy of the program is outlined below
|
|
Unlicensed |
Licensed |
|
Yes |
Yes |
|
|
Yes |
Yes |
|
|
Yes |
Yes |
|
|
Yes |
Yes |
|
|
Yes |
Yes |
|
|
20 photo limit |
Unlimited photos |
|
|
Copy albums, events, and photos |
20 photo limit |
Unlimited photos |
|
Preview only |
Full merge |
|
|
Find duplicates only |
Note that you can still preview the results of all operations, but you need to register to actually go through with making the resulting changes to your iPhoto library.
Unregistered copies of iPhoto Library Manager can be used on as many computers as you'd like. A license for iPhoto Library Manager is for a single user, but allows for use on two machines (e.g. a desktop and a laptop). If you intend have more than one user using the registration-only features of the program, you should purchase a registration code for each person who will be using the program. If you buy a code for multiple users, the number of users the registration covers will be shown in the registration window.
If you own a copy of PowerPhotos, you can use your PowerPhotos serial number with iPhoto Library Manager as well. There is no need to purchase a separate license for each program.
If you already own a copy of iPhoto Library Manager 3, you can upgrade to version 4 for a discounted price. When placing your order, you will just need your serial number from iPhoto Library Manager 3 in order to receive the upgrade discount. You can retrieve your serial number in the following ways:
iPhoto stores all of the photos and information about your photo collection in an iPhoto library. When viewing an iPhoto library in the Finder, it appears as a single icon, known as a package, but in reality, that package contains a whole hierarchy of folders and files inside of it. When you import photos into iPhoto, they are copied by iPhoto into the library package, and iPhoto takes care of organizing them within that library and keeping track of where they are. iPhoto also creates a handful of its own data files in the library along with the photos themselves. These files contain information such as how you have your photos organized into albums, the title, ratings, keywords, and other information you assign to your photos, and much more.
An iPhoto library is a self-contained unit, so all the photos and related data are all stored within that one library package. This means that you can backup, move, or copy the library by simply copying or moving the library package using the Finder, just like you would copy any other file or folder.
Typically, while working with iPhoto, it keeps all the details of the library package hidden from you. You can just use iPhoto's interface to manage your photos, and you never even need to look inside the iPhoto library package itself. However, in some cases, especially if you encounter problems with your iPhoto library, in can be useful to know a little bit more about what goes on inside the library. If you wish to delve into the library package's contents, you can do so by control-clicking on it in the Finder and selecting "Show Package Contents" from the contextual menu. If you choose to do so though, do not move, rename, or delete any items within the library package. Altering the library contents in this manner can cause iPhoto to become very confused, and thus is not recommended.
If you wish to learn more about the internals of an iPhoto library, you can read more in iPhoto Library Internals.
Apple has created some confusion with the versioning scheme it has used for iPhoto through the years. There are two separate ways a version of iPhoto can be referred to: the version number (e.g. iPhoto 9.0), or the marketing name (e.g. iPhoto '11). The numbers used in both cases used to be the same, but have diverged over the years, so it can be tricky to keep things straight sometimes.
To summarize iPhoto's version history:
|
Version number |
Marketing name |
Release date |
|
1.0 |
iPhoto |
01/2002 |
|
2.0 |
iPhoto 2 |
01/2003 |
|
4.0 |
iPhoto '04 |
01/2004 |
|
5.0 |
iPhoto '05 |
01/2005 |
|
6.0 |
iPhoto '06 |
01/2006 |
|
7.0 |
iPhoto '08 |
09/2007 |
|
8.0 |
iPhoto '09 |
01/2009 |
|
9.0 |
iPhoto '11 |
10/2010 |
This documentation attempts to be consistent in using the actual version rather than the "marketing" nomenclature, calling them iPhoto 7.0, 8.0, etc. This is consistent with Apple own documentation, which usually (but not always!) uses the iPhoto version number rather than the iLife release name. This is also the version number you will see in iPhoto Library Manager when looking at the version of a library or the installed version of iPhoto.
The Full Sordid History
The first version iPhoto was released in January of 2002. The first two versions of iPhoto, versions 1 and 2, were offered for free, and were available as individual downloads. Starting with the next version, Apple started bundling iPhoto with their new iLife suite, which also included other applications such as iMovie and iDVD. That release was called iLife '04, since it was released in January of 2004. However, since iPhoto was only at version 2, they decided to skip a version number, so the version of iPhoto that came with iLife '04 was iPhoto 4.0. There was never any such thing as iPhoto 3.
Apple continued this naming scheme in 2005 and 2006, releasing iLife '05 and iLife '06 at the Macworld show in January, which included iPhoto 5.0 and iPhoto 6.0, respectively. However, in 2007, iLife was not ready in time for the usual January release, and was instead released in September of 2007. Since the year was already nearly over by the time they were able to release it, Apple decided to name this release iLife '08. Unlike in 2004, they did not skip a version number with iPhoto, so iLife '08 actually included iPhoto version 7.0. This version of iPhoto can be referred to as either iPhoto '08 or iPhoto 7, depending on where you look.
The next release of iLife was in January 2009. The bundle was named iLife '09, and again, the actual version number of iPhoto only advanced by one, so iPhoto '09 is actually iPhoto version 8.0. The next release was iPhoto '11, which came out in October of 2010, and contained iPhoto version 9.0.
To create a new library, either click the "Create Library" button in the iPhoto Library Manager window, or select "Create Library" from the File menu. You will then be prompted to choose a name and location for the new library. When the library is first created, it will initially be empty, with no photos. To open your newly created library, double click on it, and iPhoto Library Manager will open the library in iPhoto for you.
If you have an iPhoto library already on your disk, you can add it to your list by clicking the "Add Library" button or selecting “Add Library” from the File menu. iPhoto Library Manager will automatically search your computer using Spotlight for any libraries that are not already in your library list. You can select one or more libraries from the list it displays and then click “Add” to add those libraries to your library list.
Spotlight is not able to search some drives, such as network drives or other drives excluded from Spotlight indexing. If a library you want to add does not appear in the list, click the “Choose Manually…” button, and that will let you select a specific library to add to the list.
To remove a library from your list, select it and then select "Remove Library" from the File menu. Note that this will only remove the entry for the library in the list and will not delete any of your files from the disk. If you really do want to move the library to the trash, you can hold down the option and shift keys, and the "Remove Library" command will change to "Delete Library" instead. This will both remove the library from the library list and move the library to the trash for you. Note that you'll still need to empty the trash via the Finder or Dock in order to delete the library permanently.
By default, iPhoto Library Manager will warn you when you are about to remove a library from your list. If desired, you can turn this warning off in the preferences.
If you want to make an exact copy of one of your libraries, either as a backup or as part of moving a library to another disk, you can do so one of two ways.
Note: if you have unchecked the "Copy items into the iPhoto library" checkbox in the Advanced section of iPhoto's preferences, and have since imported photos into your library that refer to photos outside the iPhoto library, any such photos will not be copied anywhere. The duplicate copy of the library will simply refer to the same photos in the same locations. If you're duplicating the library with the intention of transferring it to another machine, the duplicate library will not be able to find any of the external photos if they are not available from that machine.
If you wish to move one of your libraries to a new location on a single drive, iPhoto Library Manager will automatically track the library when you do so. Select the library you want to move in iPhoto Library Manager and select "Reveal Library in Finder" from the File menu to show the library in the Finder. Then, use the Finder and move the library to the new location on the drive. You will see iPhoto Library Manager update the path for that library as soon as you bring its main window back to the front.
If you wish to move your library from one drive to another, you will need to copy the folder to the new drive and then add the copied library to iPhoto Library Manager's list. After you have opened up the newly copied library with iPhoto and confirmed that it displays correctly, you can go ahead and delete the original copy of the library. Another way to do this is to use iPhoto Library Manager's "Duplicate Library" command in the File menu to make a copy of the selected library on another drive.
While iPhoto Library Manager will track libraries that are moved, iPhoto is not quite as smart. If you move a library, make sure to bring iPhoto Library Manager to the front and verify that it has tracked the library to its new location before launching iPhoto. Moving the library that iPhoto is currently using while iPhoto is still running is a very very very bad idea - don't do it. Quit iPhoto first if you are planning to move the currently active library.
You can assign any name you wish to each of your libraries in the list by first selecting the library, and then clicking on its name to begin editing it (just like renaming a file in the Finder). Alternately, you can control-click on the library and select “Rename Library” from the contextual menu that pops up. When you first add a library to iPhoto Library Manager, it will be given the same name as the library package has in the Finder. The package name and the name in iPLM are separate though, so you can change one without having to change the other. For example, if you've added a library that belongs to another user, and that library is named simply "iPhoto Library", you can give it a different name in iPLM such as "Bob's Library" without affecting the name of the actual library on disk. If you want to also change the name of the library on disk, just use the "Reveal Library in Finder" item in the File menu and edit the library's name using the Finder.
If a library shows up in red in the list, it means that the folder for that library does not exist on the disk, or the disk the library resides on is not currently available. If the library is kept on another disk, insert or connect the disk, and the library name should change back to black, indicating the library is now available.
To share your iPhoto library across a network, you first need to decide where the library itself will be stored. Choose which computer will hold the library (or if you have an existing library, choose the computer that already holds that library), then open System Preferences on that computer and enable Personal File Sharing in the Sharing pane. Details on enabling file sharing on OS X can be found on Apple's support site at these links:
Once that's done, go to another computer that you'd like to access the library from and go the Finder. To connect to the shared computer, follow the directions on Apple's support site at:
Connect to shared computers and file servers on a network
When you connect to the remote machine, it's easiest to log in with your default admin username and password, since that will let you access any hard drive on the machine, and thus let you store your music anywhere you want on the machine. Once you're connected, you can open up iPhoto Library Manager and set up your machine to use the remote library. Note that iPhoto requires both read and write access to a library in order to open it, even if you don't intend to actually make any changes, so make sure you log in as a user that is able to modify the library.
If you have an iPhoto library set up on the remote machine that you want to use on your machine, all you have to do is add the library from the network drive to iPhoto Library Manager just like you would any other library, either by clicking the "Add Library" button or by dragging the library into the library list. Once the library shows up in iPhoto Library Manager, you can access it just like any other library.
When accessing this library, the machine where the library is stored must be awake and available on the network, and the other machine must be connected to that machine via file sharing, otherwise iPhoto Library Manager may display an error when you try to open the library. iPLM will automatically attempt to connect to the remote machine when you try to open the library. The machine still must already be awake for this to work, and you'll need to type in the appropriate username/password to connect to the machine, but this can save you from having to remember to connect to the machine manually before opening the library.
Starting with iPhoto 9.3 and Aperture 3.3, Apple has added the ability for Aperture and iPhoto to directly open each other's libraries, without having to import photos back and forth between them. iPhoto Library Manager does support working with Aperture libraries if you have iPhoto 9.3 installed on your machine, though all operations on such libraries will still be performed via iPhoto. Aperture library names end with an extension of “.aplibrary”, whereas iPhoto libraries either have an extension of “.photolibrary”, or no extension at all.
iPhoto Library Manager lets you manage multiple iPhoto libraries, but only one of your libraries can be open in iPhoto at any given time. In your list of libraries, whichever library has a green checkmark appearing next to it is the active iPhoto library. Opening iPhoto, either by using the “Open iPhoto” button in iPhoto Library Manager, or by clicking on iPhoto in the Finder or on the dock, will display the active library in iPhoto.
To switch to another library, just double click the library's icon in iPhoto Library Manager, and it will take care of quitting iPhoto, changing the active library, and then reopening iPhoto to display the library that you double clicked. iPhoto Library Manager keeps a separate copy of your iPhoto preferences for each of your libraries, and will swap the preferences whenever it switches to a different library. This allows you to have different settings in the iPhoto preferences window on a per-library basis.
If you have iPhoto 8 or later, you can also simply double click the library itself in the Finder to open that library up in iPhoto. Be aware though that this does not work with iPhoto 7 - double clicking the library will not open the library you clicked, instead it will just open whichever library was last opened in iPhoto. This can be confusing, since you can double click one library but end up seeing another library's contents. Also, using this method will not swap out the iPhoto preferences like iPhoto Library Manager does when switching libraries.
iPhoto Library Manager provides a feature called library shortcuts which let you easily open any iPhoto library by just double clicking a file. To create a library shortcut, either use the "Create Shortcut" command in the File menu. A file will be created there that will, when double clicked, open up iPhoto Library Manager, switch to the library you created the shortcut for, and open up that library in iPhoto. You can use a shortcut if you open up a particular library frequently, and don't want to bother with opening up iPhoto Library Manager and switching to that library manually every time you want to use it. You can even drag a shortcut file onto your dock, which will give you one click access to an iPhoto library.
One of the primary uses of iPhoto is to import and organize photos you have taken with your digital camera. There are a couple things you should know about how this works when you have multiple iPhoto libraries.
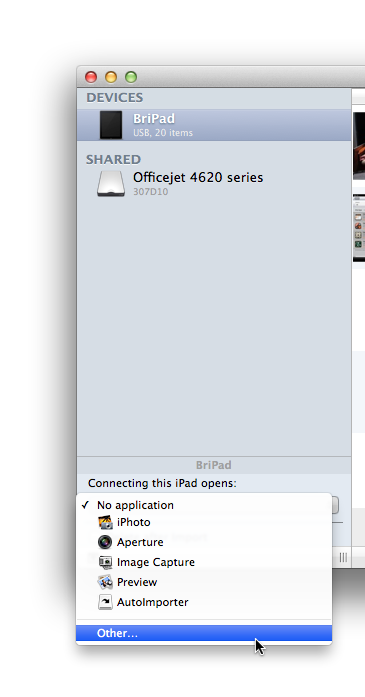
If you have iPhoto set up to launch automatically as soon as your plug your camera in, this will cause iPhoto to open whichever library you had last chosen to work with in iPhoto. This can sometimes cause the wrong library to be opened up, at which point you have to quit iPhoto, go open up iPhoto Library Manager, switch to the correct library, and then open up iPhoto again. If this happens to you a lot, you might want to instead set iPhoto Library Manager to open up when you attach your camera rather than iPhoto. This way, you can be sure that you have the right library selected before opening up iPhoto, and avoid importing photos into the wrong library.
To set this up, open up the Image Capture application located in your main Applications folder on your hard drive. Plug in your camera, and it should appear in the “Devices” section. Select the device, then use the pop-up menu at the bottom of the list and select “Other...”, at which point you can select iPhoto Library Manager in your Applications folder, and click OK. Now, when you plug in your digital camera, iPhoto Library Manager should automatically open instead of iPhoto.
If you publish some of your photos to galleries using Facebook or Flickr, there are a few things that are good to know for dealing with these galleries when you have multiple iPhoto libraries.
You can publish web galleries from any of your iPhoto libraries. Any galleries you publish will all show up on the relevant together, no matter what library they originally came from. If you publish a gallery from one library, then open up another library and sync your galleries, iPhoto will automatically download the contents of all your galleries into that library as well. Note that if you add a photo to an existing gallery from one library, the next time that gallery is synced with another library, that photo will be downloaded into the gallery in that second library as well.
If you don't want your galleries to appear in a particular library, then:
- If you're using iPhoto 9, open iPhoto's preferences, go to the "Accounts" section, select your account in the list on the left, and click the "-" button below the account list to remove the account. This will cause your galleries from that website to no longer be synced with that library, though the galleries and their photos will remain as-is on the website itself.
- For earlier versions of iPhoto, open up the library, open iPhoto's preferences, go to the "Web" section, and select to check for updates "Manually". If some galleries have already been synced with the library, there is no way to remove those galleries from the library without also deleting them from the server, but any additional changes and galleries will not be synced to that library.
In the library you originally published a particular gallery from, iPhoto shares a single copy of each photo between the original album you created and the gallery itself. As a result, these photos will appear both in your gallery and in your main Photos/Events lists. In other libraries, however, when iPhoto downloads photos from the website, those photos will only appear when you select the gallery, and will not appear in your Photos/Events lists. If you want those photos to appear there, you will need to drag the photos from your gallery and drop them on either the Photos or Events item at the top of the album list on the left.
By default, when you upload photos to a web gallery, iPhoto creates reduced size versions of the photos to make the uploading process faster. This means that if you later download those photos into another library from the website, you will not receive the same full resolution photos that you had in the original library. To avoid this, when you publish your gallery, click the "Show Advanced" button and use the pop-up menu that is revealed to choose to publish full sized versions of your photos instead of reduced size versions.
If you delete a gallery from one library, that will entirely delete the gallery from the website, and the next time you open any of your other iPhoto libraries that have copies of those galleries, iPhoto will automatically remove the gallery from those libraries as well. It will give you a chance to import the photos into your library before it gets rid of the gallery, but there is no way to keep the gallery in the library once it's been deleted from the website. There is no way to keep only some galleries in one library, and only other galleries in another library - it's all or nothing, so if you want to have some galleries appear in a library, you will need to have all of them appear in that library.
Starting in iPhoto 9.2, Apple introduced a new feature called Photo Stream, which lets you automatically transfer photos via their iCloud service between your iPhoto library and your other devices such as an iPhone, iPad, or another Mac. This feature works when you have multiple iPhoto libraries set up, but there are a couple things to be aware of.
First, iPhoto will only allow Photo Stream to be active in one iPhoto library at any given time. If you've already enabled Photo Stream in one library, but then open a second library and enable Photo Stream there, this will cause Photo Stream to be turned off in the first library.
Any photos downloaded by Photo Stream are actually stored in an entirely separate location from any of your iPhoto libraries. This means that, even if you do switch Photo Stream from one library to another, you will not need to go through redownloading all the photos you already have in Photo Stream back from the iCloud servers. So, switching Photo Stream from one library to another is a relatively inexpensive operation, so you can do it as often as needed without it being much of a hassle.
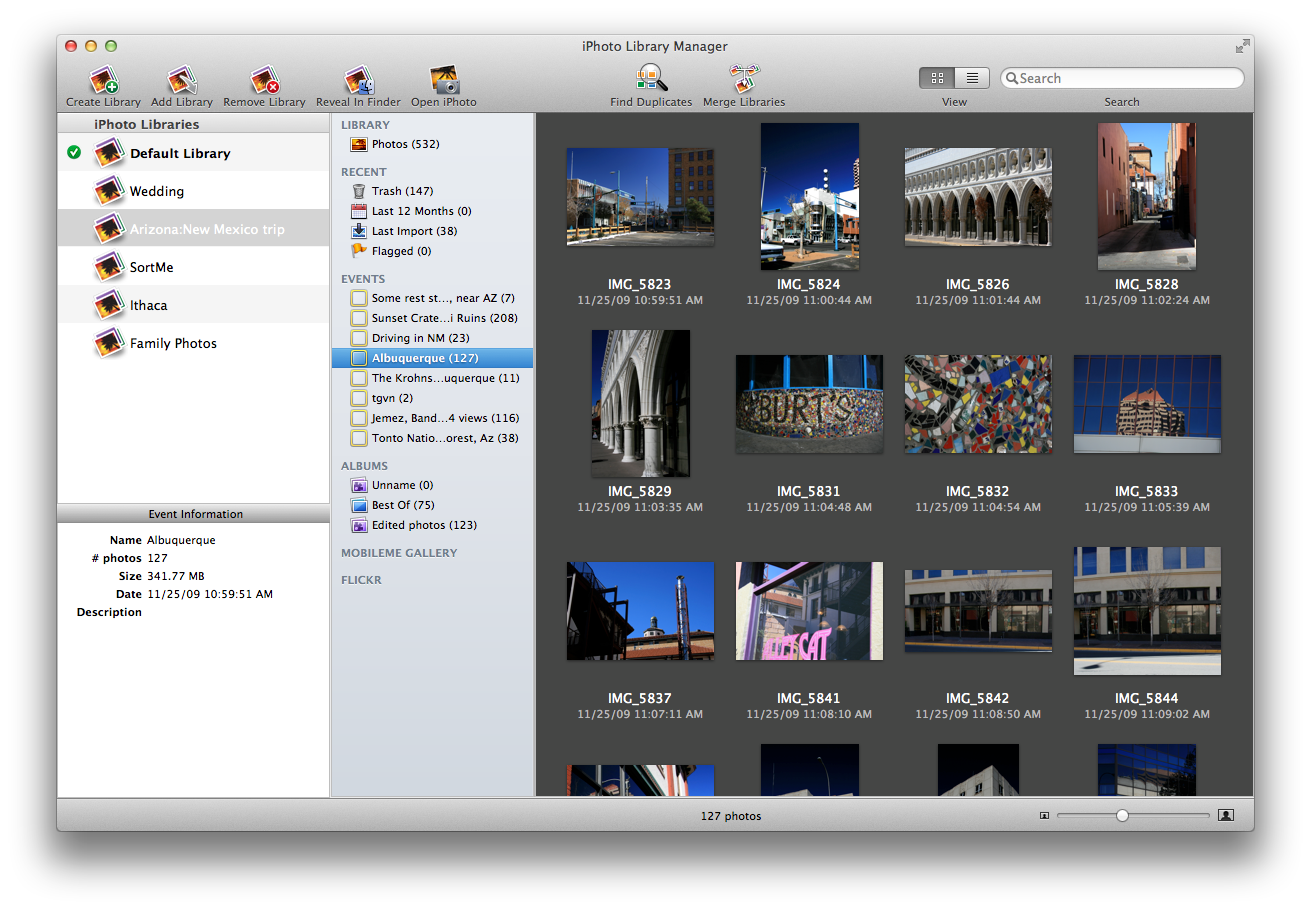
The grid view of the photo browser allows you to look through your photos much like you do in iPhoto, with your photos arranged in a grid, showing a small preview of each photo with some basic information below the photo itself. The slider in the lower right corner allows you to change the size of the photos, and selecting an individual photo will display that photo's information in the info pane in the lower left corner of the window.
You may seen one or more of the following icons superimposed on a photo in the grid view:
![]() - indicates you have flagged that photo in iPhoto
- indicates you have flagged that photo in iPhoto
![]() - indicates the photos has been marked as "hidden" in iPhoto
- indicates the photos has been marked as "hidden" in iPhoto
![]() - indicates the original for this photo is referenced outside the library package
- indicates the original for this photo is referenced outside the library package
![]() - indicates the full size image file for this photo cannot be found; if the small thumbnail version of the photo can be found, it will still be displayed
- indicates the full size image file for this photo cannot be found; if the small thumbnail version of the photo can be found, it will still be displayed
![]() - indicates that neither the full size image nor a thumbnail image for this photo can be found/read
- indicates that neither the full size image nor a thumbnail image for this photo can be found/read
You can customize the appearance of the grid view by using the various commands available in the View menu. These include:

In addition to the iPhoto-style grid view, iPhoto Library Manager also provides a list view, which is useful when you're more interested in looking through your photos' attributes, such as keywords, ratings, faces, and so forth. You can switch between grid view and list view using the control in the upper right, next to the search field.
You can customize the appearance of list view using the commands available in the View menu. These include:
In both grid view and list view, iPhoto Library Manager provides a few different options for seeing the full size version of one of your photos.
If you double click a photo, or select one or more photos then hit the space bar, that will open a QuickLook panel that shows you the full size version of the selected photo(s). Note that the QuickLook panel has a button that lets you expand it to fill the screen, which can be useful for a quick, full screen slideshow of multiple photos.
If you want to reveal the actual photo file in the Finder, control-click on a photo, and select either "Show File" or "Show Original File".
If you want to do something with a particular photo in iPhoto itself, control-click on the photo, and choose "Select in iPhoto". That will open up that library in iPhoto and select the image in iPhoto's main window, so you can then do whatever you want with it.
You can also drag an image out of the image browser and drop it directly on to your favorite image editing application, such as Preview or Photoshop, to open the photo in that application.
In the lower left corner of the window, you'll find the information pane, which will display detailed information about whatever object you have selected in the rest of the window. You can use this to see information for a library, album, event, or individual photo. The following information is displayed here:
For libraries: the library's name, iPhoto version, size, and location on your computer. The size shown is for the entire library package, including all of iPhoto’s own data files. Note that this size will be larger than the size shown in iPhoto itself, which only adds up the space taken up by the photos themselves.
For albums: the album's name and description, and the number and size of the photos it contains.
For events: the event's name, date, and description, and the number and size of the photos it contains.
For photos: all of the photo's attributes (name, date, rating, keywords, description, faces, place, kind, and size) as well as the full paths to both the original and modified versions of the image.
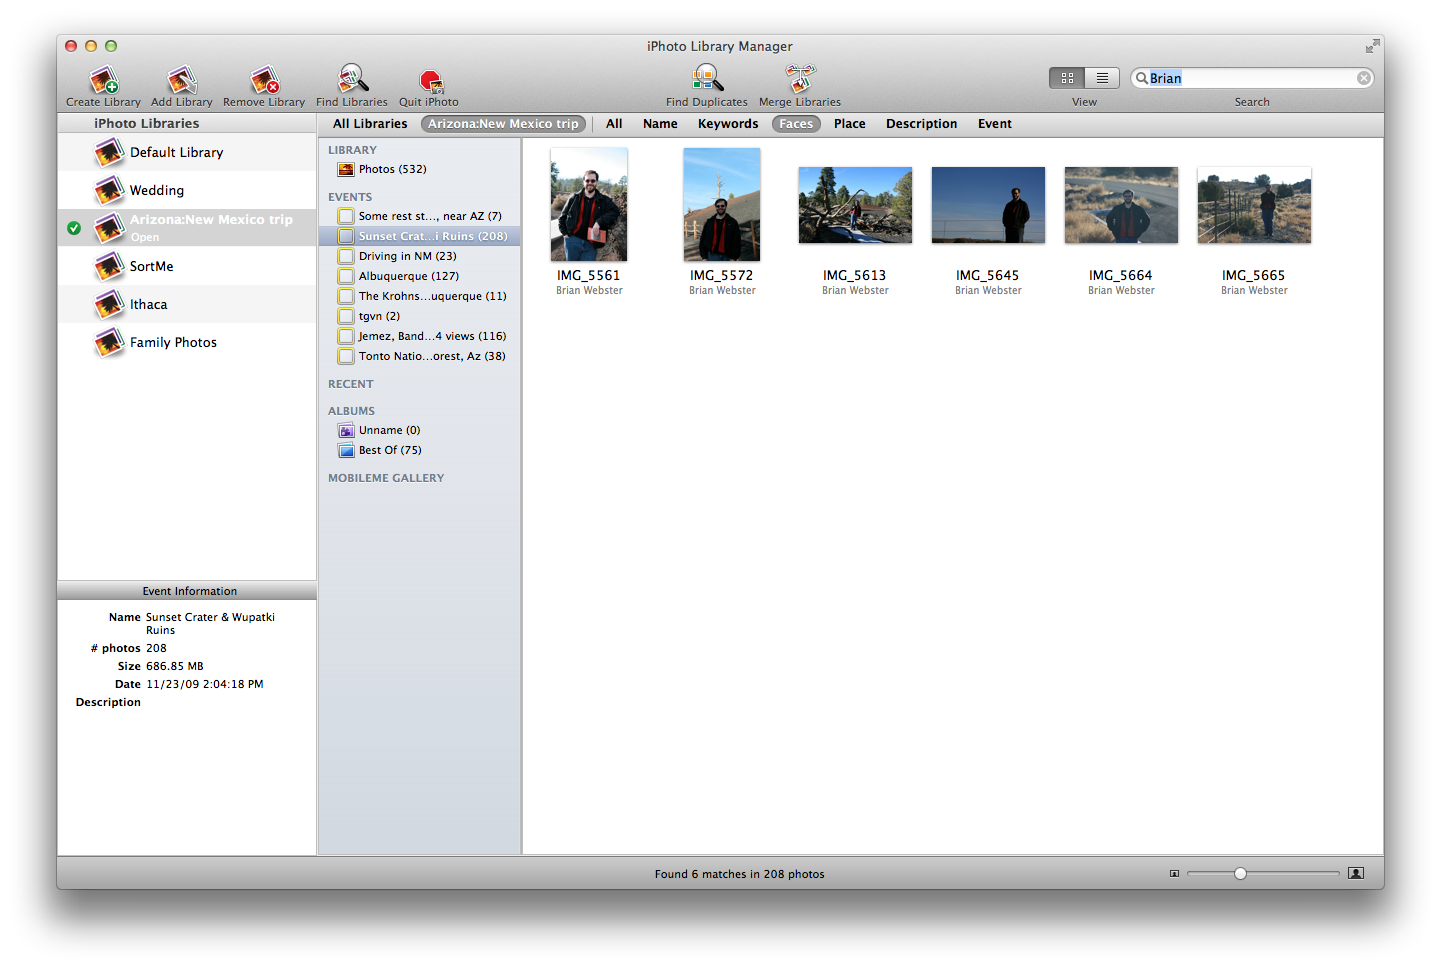
The search field in the upper right hand corner of the window allows you to search your iPhoto libraries for photos directly from within iPhoto Library Manager. Simply type the text you'd like to search for in the search field, and your photos will be filtered down to only show those matching what you typed.
By default, all supported attributes are searched for the text you typed in. This includes the photo's title, description, keywords, faces, place, and the names of the albums/event to which the photo belongs. Once you've started a search, a search scope bar will appear at the top of the photo browser. You can narrow your search to look at just a single attribute (e.g. faces, keywords, etc.) by clicking that attribute's name in the scope bar.
To cancel your search and resume normal photo browsing, click the "X" button located inside the search field.
In addition to searching a single library, iPhoto Library Manager can also search all your libraries at once, by clicking the "All Libraries" button in the search scope bar. This will begin a search in all the libraries in your library list, and display all photos matching the search in the photo browser. A progress indicator is displayed next to each library's name in the library list while the search is still in progress for that library, then once the search has completed for that library, a number will be displayed next to the library name, showing how many photos in that particular library match the search criteria.
You can customize the display of your search results in many of the same ways as when you're just browsing a single library. There are a few differences:
Here are a few tips and tricks to help efficiently find the photos you’re looking for in your libraries.
Using the Find Duplicates feature in iPhoto Library Manager consists of three main steps.
1. Searching for duplicates
The first step is to tell iPhoto Library Manager what libraries you would like to search for duplicate photos, and how you would like it to compare photos to determine whether they are duplicates or not. You can read about this step in “Starting the duplicate finding process”.
Once you start the duplicate finding process, iPhoto Library Manager will perform an analysis of your photos and try to determine which photos are duplicates of each other. The result of the analysis is a list of duplicate groups. Each duplicate group contains two or more photos which have been identified as duplicates of one another. These groups will be shown to you in iPhoto Library Manager’s duplicate browser.
2. Choosing keepers
Next, iPhoto Library Manager will choose a keeper from each duplicate group. You can customize how keepers are chosen from each duplicate group by choosing a duplicate rule, which will look at various attributes of the duplicate photos and choose one of them based on those attributes. A bunch of built-in duplicate rules are included with iPhoto Library Manager, or you can create your own custom duplicate rule. You can read about this step in “Choosing keepers with duplicate rules”.
3. Performing actions
Typically, the keeper will be the instance of the photo you want to keep around, and you will perform actions on the rest of the photos in the group. The most common action is to move the extra duplicates to the trash in iPhoto, but other actions are also available, such as flagging the photos, tagging them with a keyword, or adding them to an album. You can read about this step in “Performing actions on duplicate photos”.
To begin finding duplicate photos in your iPhoto libraries, either click the "Find Duplicates" button in the toolbar, or select "Find Duplicates" from the Library menu.This will present you with a view to set up your duplicate finding.

There are two areas you need to set up to begin your duplicate search
What to search
The Find Duplicates command can search one or more iPhoto libraries at once, looking for duplicate photos. To search a library, drag it from the library list on the left into the area labelled "Choose Libraries to Search". To remove a library, click the X next to its name.
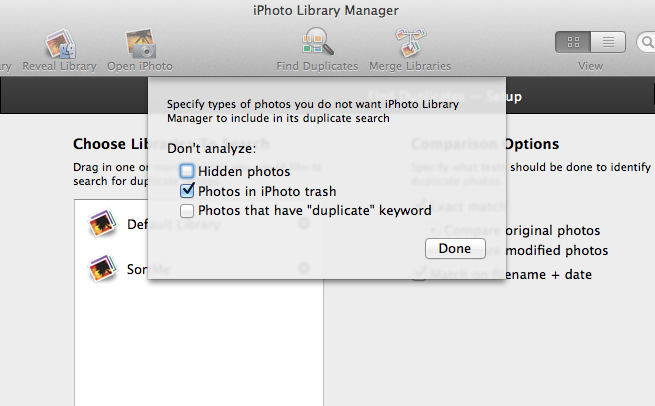
You also have the option to exclude certain photos from being included in the search. Click the "Exclusions…" button, and you will be given the option to skip looking at photos that are either in the iPhoto trash, are marked as hidden, or already have the keyword named "duplicate" assigned to them in iPhoto.
How to compare photos
iPhoto Library Manager has two methods that you can use to compare photos to each other and determine whether they are duplicates
Once you've set up your search, click the blue "Find Duplicates" button in the upper right corner of the window, and iPhoto Library Manager will begin analyzing your libraries for duplicate photos.
Once iPhoto Library Manager has determined which photos are duplicates, it will display those duplicates to you so you can see what it has found.
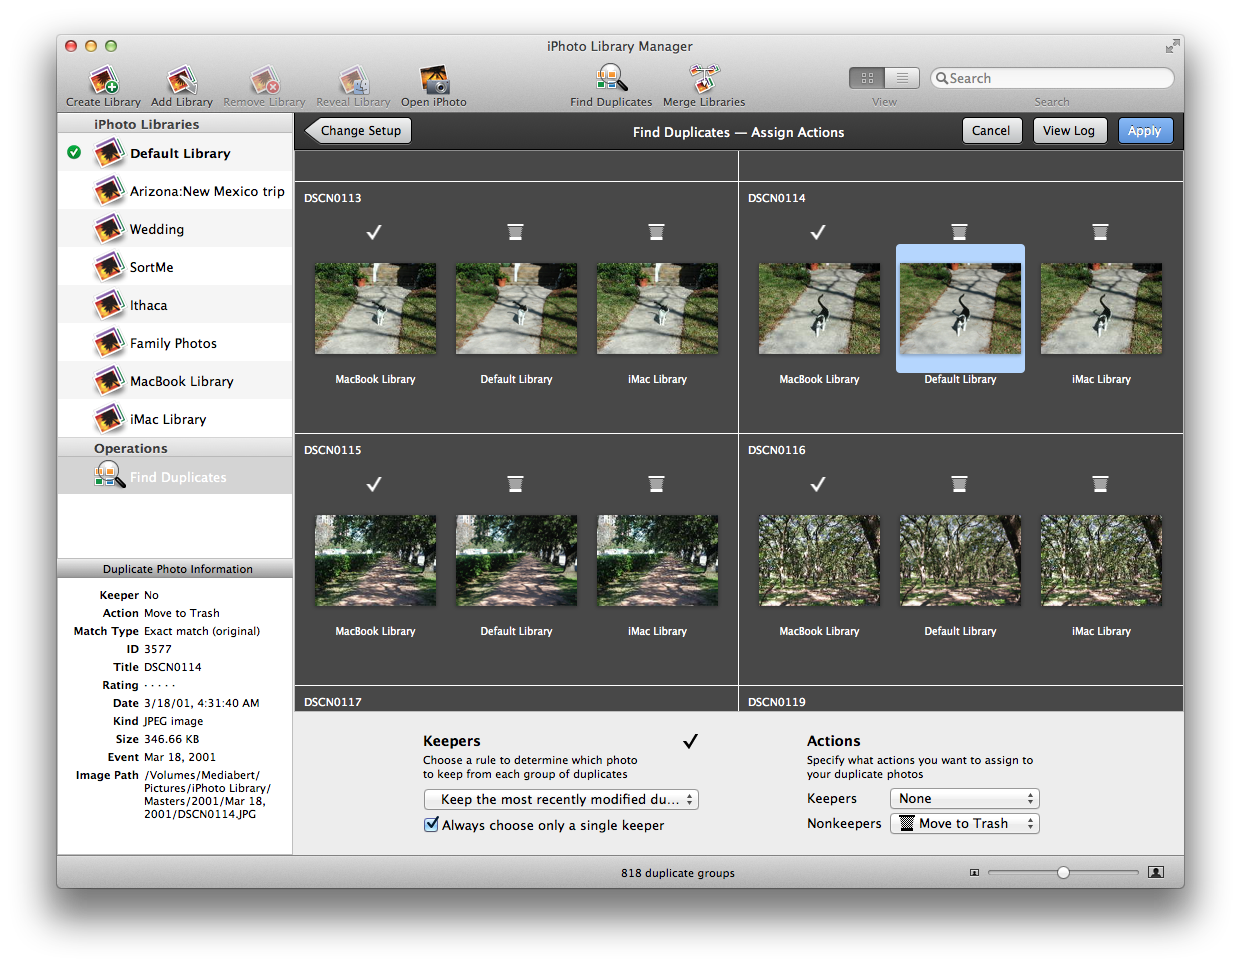
Your duplicate groups are displayed in a grid, with each group separated from the others. Just like when browsing a regular library, you can zoom in and out on the photos, select an individual photo to see its attributes in the information pane, and so forth.
If your duplicate rules have successfully chosen keepers and applied actions to your duplicates, those actions will be represented by icons displayed above each photo in the duplicate browser. The following icons can appear there:
![]() - indicates the photo has been chosen as the keeper for that duplicate group
- indicates the photo has been chosen as the keeper for that duplicate group
![]() - indicates the photo will be flagged
- indicates the photo will be flagged
![]() - indicates the photo will be hidden
- indicates the photo will be hidden
![]() - indicates the photo will be added to the "Duplicates" album
- indicates the photo will be added to the "Duplicates" album
![]() - indicates the photo will be assigned the "duplicate" keyword
- indicates the photo will be assigned the "duplicate" keyword
![]() - indicates the photo will be moved to the trash
- indicates the photo will be moved to the trash
The zoom slider in the lower right corner of the window can increase or decrease the size of the duplicates being displayed. Since some groups can contain more photos than will fit horizontally in the box for that group, some groups may have a small scrollbar appear along the bottom, allowing you to scroll left and right to see all the photos in that group. To view the full size version of a photo, either double click it, or select it and press the space bar.
The “View Log” button will display information logged by iPhoto Library Manager during the duplicate analysis. This lets you see in more detail the paths of the photos that were identified as duplicates, which photos have been marked as keepers, and what actions have been applied to which photos.
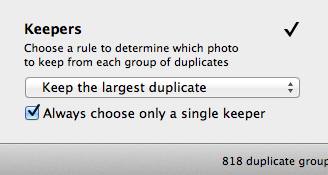
iPhoto Library Manager uses a rule-based system to choose a keeper from each group of duplicate photos. The keeper will typically be the one photo that you want to keep around, with the rest of the duplicates getting moved to the trash, or having some other action performed on them. You can choose from several built-in duplicate rules using the pop-up menu down at the bottom of the window.
Once a rule has been chosen from the pop-up menu, iPhoto Library Manager will evaluate all the duplicate groups based on that rule. In the duplicate browser, you will see a white checkmark above whichever photo from each group has been chosen as the keeper.
The built-in duplicate rules include:
Editing rules
The built-in rules are a good start, but since everybody’s photo collection is unique, you may need to create a custom duplicate rule to choose keepers according to what makes the most sense for your own photos. To create a custom rule, click the rules pop-up menu and select “Edit Rules…” from the bottom of the menu. This will present you with the following window:
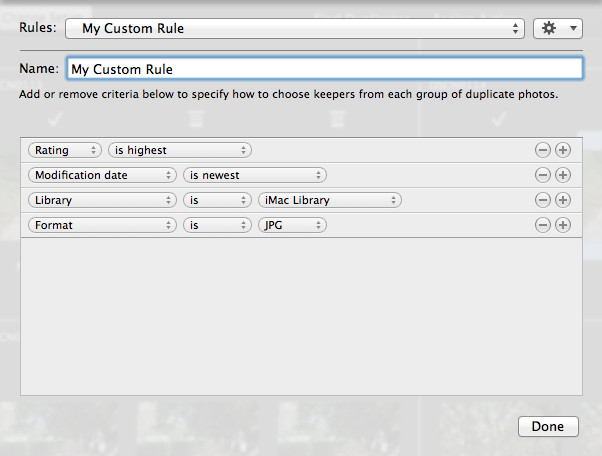
You can view (but not edit) the built-in rules to see how they are implemented. To create your own rule, click the gear button in the upper right and select “New Rule” from the menu that appears. If you’d like a rule similar to one of the built-in rules, select that rule from the pop-up menu, then click the gear button and select “Duplicate Rule” to make a copy of that built-in rule. You can specify a name for your new rule by typing it in the “Name” field.
Each duplicate rule is made up of one or more criteria that you'd like to use to compare the photos in each duplicate group. By evaluating these criteria, one or more photos from the group will be chosen as the keeper from that group. The criteria available to compare include the photos' rating, modification date, size, format, and much more. See the Criteria Details section for more information.
Because in many cases the duplicate photos will also have identical values for many of these attributes, you can specify multiple criteria to evaluate the photos by. If the first criteria is identical for some or all the photos in the group, the evaluation will then proceed to the second criteria, and so on, until they have all been evaluated.
How rules are evaluated
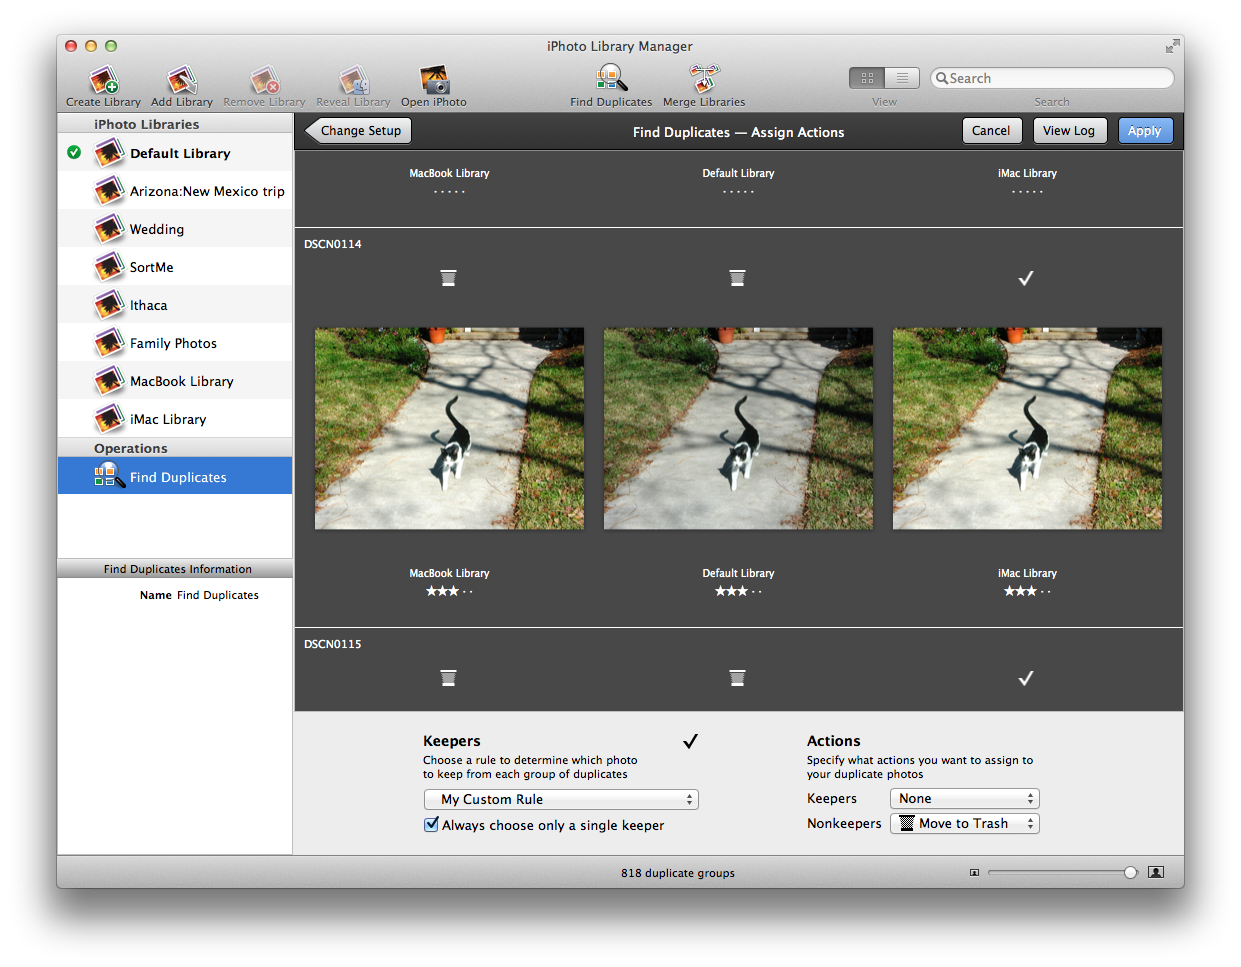
In the example above, we have three photos that have been identified as duplicates by iPhoto Library Manager, and the four criteria from the rule displayed above that were specified to evaluate the duplicate photos.
The first criteria says to choose whichever photo has the highest rating. However, all the photos have the same rating (0 stars), so this criteria does not choose any photos, and evaluation continues to the next criteria.
The second criteria says to prefer whichever photo has the newest modification date. Two of the photos have been edited and have the same modification date, but the photo in “Default Library” has an older modification date. So, this criteria narrows down the group from three photos to just the ones from MacBook Library and iMac Library, and then evaluation continues to the next criteria.
The third criteria says to prefer a photo that came from the library "iMac Library" over photos from other libraries. One of the two remaining photos is from the "iMac Library", so that photo is marked by this criteria as the chosen photo.
Since we have now narrowed down the group to a single photo, the fourth criteria is not needed, and is skipped. The photo from “iMac Library” is selected as the keeper, and will appear with a white checkmark over it in the duplicate browser.
Single vs multiple keepers
By default, only a single photo is marked as a keeper from each duplicate group. If your duplicate rule does not narrow things down to just a single photo, then iPhoto Library Manager will pick one of the remaining photos for you as the keeper. However, if you uncheck the “Always choose only a single keeper” checkbox, then all the photos that make it to the end of criteria evaluation will be marked as keepers.
For example, let’s say you have a duplicate group with two photos from “Library A”, and two photos from “Library B”, and that you have a duplicate rule set up with a single criteria that says “Library is Library A”. Both photos from Library B will be eliminated by the criteria, leaving just the two photos from Library A. If “Always choose only a single keeper” is checked, then iPhoto Library Manager will only mark one of the two photos from Library A as a keeper; if it is unchecked, then both photos from library A are marked as keepers.
The following is a list of the criteria that can be used in duplicate rules to select photos from among a set of duplicates.
Once your duplicate rule has decided which photos are keepers, you can specify one or more actions that you'd like to perform on the photos in the duplicate group. Actions include things like flagging, hiding, or trashing the photo, adding a "duplicate" keyword to it, or adding the photo to an album. You can specify one type of action to be taken on the keeper photos, and another action to be taken on the nonkeeper photos.
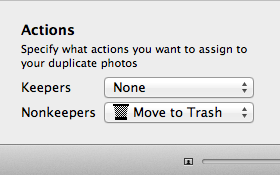
The most common configuration will be to move nonkeepers to the trash, and take no action on the keepers, but you can customize this to take different actions on both kinds of photos. Selecting a new action from one of the pop-up menus at the bottom of the window will update the duplicate browser to show what action will be taken on each photo. You can also control-click on a photo to manually assign an action.
The available action types are:
Move to Trash: moves the photo to iPhoto’s trash. The photo will not immediately be deleted from the library, so this action can be undone if necessary. To do so, open the library in iPhoto, and select the “Trash” item in the album list on the left. That will show you all the photos that are currently in the trash in that library. To move photos out of the trash, either drag them over to the main “Photos” album, or select them and then choose “Put Back” from the Photos menu at the top of the screen (this must be done in iPhoto itself, not in iPhoto Library Manager).
Flag: marks the photo as flagged, so it will appear with an orange flag icon in its corner when browsing in iPhoto. You can also see all your flagged photos by selecting the “Flagged” album in the album list.
Hide: marks the photo as hidden in iPhoto. This makes it so that the photo no longer appears when scrolling through your photos in iPhoto. You can reveal hidden photos by choosing “Hidden Photos” from the View menu in iPhoto. Hidden photos will be displayed, but with an orange “X” displayed in the corner of the photo. To unhide a photo, select it and choose “Unhide Photo” from the Photos menu.
Add to Album: this will add the photo to an album named “Duplicates” in the iPhoto library. If an album named “Duplicates” already exists, the photos will be added to that album, otherwise iPhoto Library Manager will create a new “Duplicates” album and then add the photos to it.
Assign Keyword: adds a keyword named “duplicate” to the photo. This will allow you to see which photos are marked as duplicates by looking at their keywords, use the search field in iPhoto to find photos marked with the “duplicate” keyword, or set up a smart album that shows photos marked with that keyword.
No changes will actually be made to your library until you click the “Apply” button in iPhoto Library Manager while browsing your duplicate photos. This allows you to experiment with different rules and actions and see the results before committing to actually making any changes to the library.
While duplicate rules provide a very flexible way to decide which duplicate photos to keep and get rid of, sometimes you may still want to make some decisions yourself, rather than leaving everything up to the automated rules.
You can do this by clicking on the small arrow that appears in the lower right hand corner of a particular photo when you move the mouse over it (or control-clicking anywhere on the photo). This will display a menu showing the list of actions that you can assign to the photo. Choosing one of the actions will assign that action to the photo, replacing any existing action that was assigned to it by a duplicate rule. If you don’t want any action taken on a particular photo, just choose the “Clear Action” menu item instead.
The “Mark as Keeper” menu item can be used to change which photo is marked as the keeper, denoted by a checkmark above the photo. When you change a group’s keeper photo, the default actions you’ve chosen for keepers and nonkeepers will automatically be assigned to the photos in the duplicate group based on your new keeper choice.
Each action can also be assigned to a photo via a keyboard shortcut, as listed below. If you use the arrow keys to navigate through the photos in the duplicate browser, you can use this in conjunction with the keyboard shorctuts to customize your duplicate actions without ever using the mouse.
Keyboard shortcuts:
Here are a few tips and tricks that might be helpful when using iPhoto Library Manager to deal with duplicate photos in your libraries.
Make sure to try out the various duplicate detection options to see which settings work best for your particular photo collection. For instance, if you are having some photos which you think should be identified as duplicates but aren’t, try enabling the “Also compare filename + date” option. This is more inclusive, and will identify photos that are not byte-for-byte matches of each other.
Duplicate rules can be very helpful in eliminating the laborious work of going through all the found duplicates and picking which one(s) you want to take action on. Some common examples include:
When keeping your photos separated in multiple libraries, you sometimes need to copy a set of photos from one library to another. With iPhoto, the only way to do this is to export the photos from one library and then import them into another. However, in the process of doing this, you lose all the data you've worked to assign to your photos, such as titles, dates, keywords, ratings, places, and faces. iPhoto Library Manager provides a way to copy photos directly from one library to another without losing this valuable information.
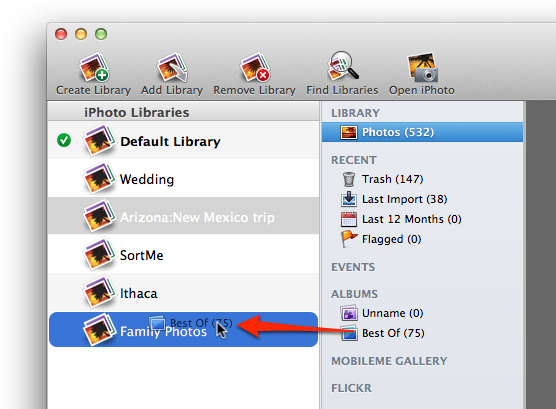
To copy albums or events to another library, select them in iPhoto Library Manager, then drag them them onto the library you would like to copy them to. iPhoto Library Manager will first collect the information about those photos from the source library, and then import those photos into the destination library and restore all the photo information as it was before. If a photo has been modified in the original library, then the original version of the photo will also be transferred to the destination library, so that the "Revert to Original" command in iPhoto will work as expected. If you drag more than one album at once, and a photo belongs to more than one of those albums, the photo will only be imported once, but will be added to all the appropriate newly created albums in the destination library.
Note that you cannot drag albums from iPhoto itself into iPhoto Library Manager - you must drag the albums from iPhoto Library Manager's own window in order to perform a copy. Also, only regular albums, folders, and smart albums can be copied between libraries. Copying “keepsake” items like calendars, books, and slideshows, or copying web galleries between libraries is not supported.
Unregistered users are limited to only copying albums/events totalling no more than 20 photos.
In addition to copying albums or events, you can also drag individual photos from iPhoto Library Manager's photo browser and drop them on another library in your library list to copy the photos and their metadata over. No albums will be recreated when doing this, but the photos will be imported grouped into events with the same name as the events they belong to in the original library.
To ensure that this extra information will come over, you should drag the photos from iPhoto Library Manager’s image browser, and not from a Finder window or some other program that lets you drag files. If you drag from somewhere else, they will be treated as regular photos, and the extra information associated with them will not be brought into the destination library.
In addition to copying photos directly from another iPhoto library, you can also import new photos directly into one of your iPhoto libraries by dragging the photos from the Finder and dropping them onto a library in the iPhoto Library Manager window. iPhoto Library Manager will automatically open up the library they were dropped onto and import the photos in iPhoto for you. Unlike when copying directly from another library, there will be no additional metadata such as ratings, keywords, faces, etc. for iPLM to copy across. This does still have the advantage of being more convenient than opening the library manually, plus you can still take advantage of iPLM's duplicate detection system when importing photos this way.
iPhoto Library Manager allows you to merge the contents of multiple libraries together into one, while preserving all your albums, events, and photo metadata. For a full list of what items can and can't be copied (which varies depending on what version of iPhoto you're using), look here.
To begin a merge, click the "Merge Libraries" toolbar button, or select "Merge Libraries" from the Library menu. This will present you with the following view for setting up your merge:
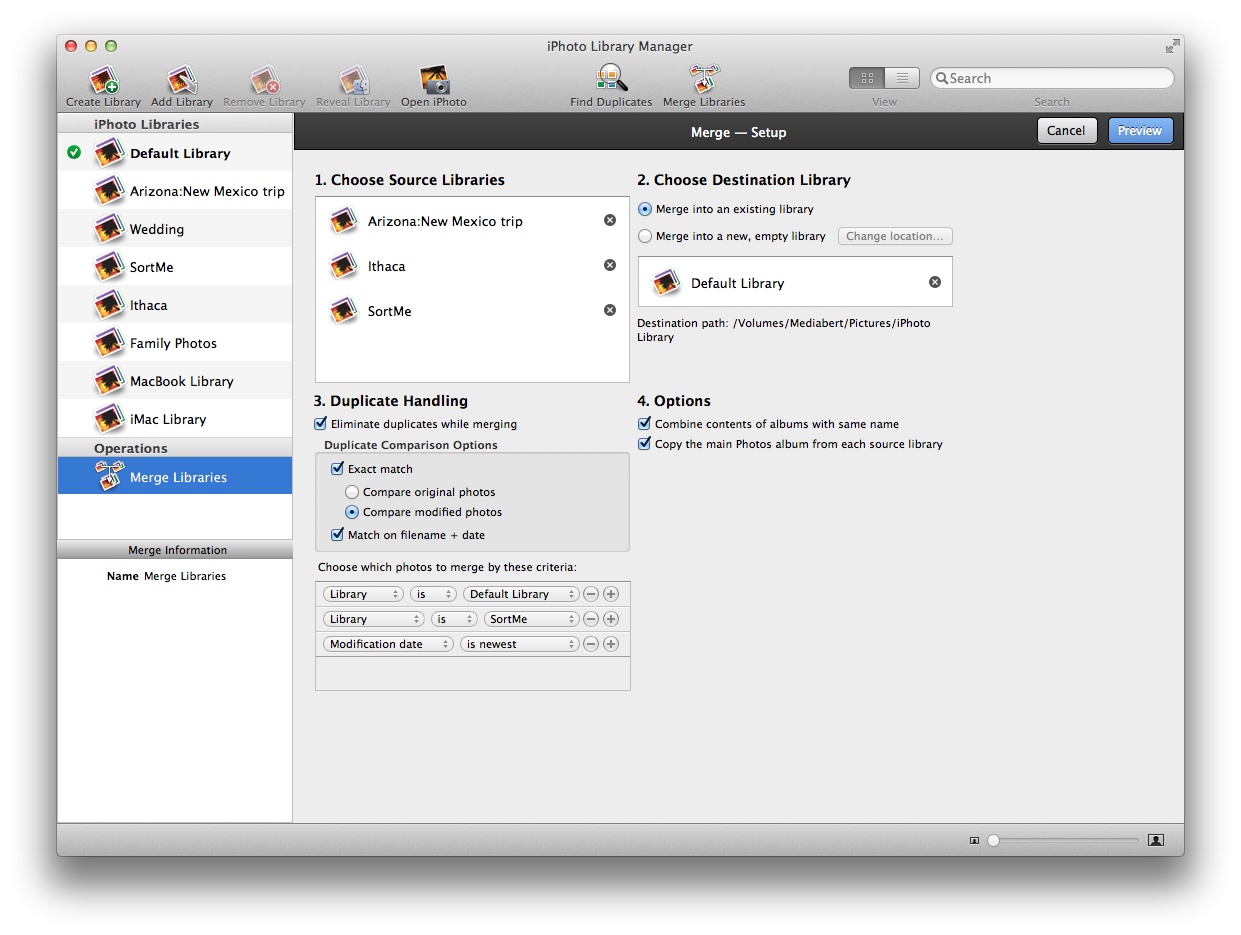
There are four main parts to setting up your merge
Choose Source Libraries
To specify one or more libraries whose contents you would like to merge into another library, drag the libraries from the library list on the left and drop them onto the area labelled “Choose Source Libraries”
Choose Destination Library
Then, you must specify what iPhoto library you want to receive all the photos and other content you're merging. You can either drag one of your existing libraries to where it says "Drop destination library here", or if you wish your existing libraries to be merged into a brand new library, click the "Merge into a new, empty library" button. You will then be prompted to choose a name and location on your hard drive to store the new library. If you wish to change this location later, just click the "Change location" button to do so.
Duplicate Handling
When merging libraries, iPhoto Library Manager provides an option to only import a single copy of any photos which are duplicates and appear multiple times among the libraries being merged together. If the “Eliminate “duplicates while merging checkbox is off, then all photos will be imported, regardless of whether they are duplicates. Similar to when using the Find Duplicates command, you can specify a list of criteria for iPLM to use when deciding which photo from a group of duplicate photos should be kept. You can read more about how these criteria work in the duplicate rules chapter of the manual.
Note that unlike when using Find Duplicates, you do not specify an actions (e.g. flagging, moving to trash, etc.) when merging, since iPLM is simply using the rules to choose a single photo to import from each group of duplicate photos. You can read more about how this works in the Handling Duplicates When Copying section of the manual.
You are also given some options to customize how iPhoto Library Manager determines that two photos are duplicates of one another. You can read more about these in the Choosing keepers with duplicate rules section.
When merging into an existing iPhoto library, if a group of duplicate photos contains one photo that is already in the destination library, that photo will always be the one to be kept rather than a photo from any of the source libraries being merged. The reason for this is because there is not a reliable way to replace an existing photo with a different one in iPhoto, including making sure that photo appears in the correct place in albums, keepsake items, web galleries, and other various aspects of the library structure. The best way around this limitation is to merge into a new library rather than an existing library.
Options
Some other options are configurable when setting up your merge:
Once you have set up your merge, click the "Preview" button to advance to the preview screen, where you can see what the results of your merge will look like.
Merging tips and tricks
Whenever you use iPhoto Library Manager to copy photos, whether it be by copying albums and events, merging libraries, or rebuilding your library, iPhoto Library Manager will give you the opportunity to preview what the destination library will look like before actually proceeding to copy the photos over. You can browse the library preview just like you can do with a normal library, including both grid view and list view, customizable subtitles and columns, performing searches, and so on. This lets you inspect a number of aspects of what will be copied.
Missing photos
If there are photos that are missing from the library that they're being copied from, any such photos will not be displayed when looking at the preview. iPhoto Library Manager will log the locations of any missing photos, which you can find by clicking the "View Log" button in the upper right and reading the log messages shown there.
Duplicate handling
If you are performing a merge or copying photos and have specified to skip copying duplicate photos, a "View Duplicates" button will be visible in the upper right which you can click to view what duplicates iPhoto Library Manager has found among the photos being copied. In each group of duplicate photos, a checkmark will appear above the photo which has been chosen to be included - the rest of the photos in the group will not be copied. Additionally, if you go to the View menu, and in the "Show Subtitle" submenu choose "Library", that will show the name of each photo's library of origin underneath that photo. (in list view, the submenu will be "Show Columns" instead of "Show Subtitle")
Album/event organization
The preview will show you what your albums and events will look like in the destination library after the photos have been copied over, which lets you see the effects of several different settings. Some examples include:
Whenever you use iPhoto Library Manager to copy photos/albums/events, merge libraries, or rebuild a library, you can have iPhoto Library Manager attempt to detect duplicate photos in the photos being copied. This works much the same way as when you use the Find Duplicates command, except that once the duplicate analysis has been done, instead of taking specific actions on the duplicate photos (e.g. flagging, moving to the trash, etc.) one photo from each group of duplicates is chosen to be the one that is copied, and the rest of the duplicate photos will be skipped.
When looking at the preview of the photo copying you're about to do, you can click the "View Duplicates" button in the upper right to see what duplicates were found among the photos being copied. In each group of duplicate photos, a white checkmark will be displayed over the photo which will be included when copied, and the rest of the photos in the group will not be copied. If any of the photos which are not being copied belong to any albums which are being copied, the checked photo will be added to that album in place of the other photo. If you wish to change which photo is used for a particular group, either control-click the photo and choose "Use This Photo" from the menu that comes up, or select the photo and press the return key.
Note that regardless of the duplicate criteria you specify, if one of the duplicate photos is located in the library that you are copying to, that photo will always be chosen over new photos that are being copied into the library. The reason for this is because, in order to use one of the other duplicate photos instead, the duplicate already in the library would need to be deleted from the library, then the new photo would need to be added to all the places in the destination library (e.g. the photo's event, any albums it belongs to, any web galleries, slideshows, books, etc.) where the original photo was. Unfortunately this is not possible due to technical limitations with iPhoto, so we just keep the existing photo in preference to any photo being newly copied into the library.
Due to technical limitations with iPhoto, not every type of item in an iPhoto library can be copied to another library. The table below summarized what can and can't be copied in each version of iPhoto, with more details explanations of each item below. This applies to copying albums and events between libraries via drag and drop, merging libraries, and rebuilding a library.
iPhoto Library Manager requires iPhoto 8.1.2 or later to be installed in order to copy photos. Photos can be copied from libraries that come from iPhoto 7 or earlier, but those older libraries are effectively "read-only", so you cannot copy any new photos into an older library.
|
|
iPhoto 7 or earlier |
iPhoto 8 |
iPhoto 9 |
||
|
Photos with basic metadata (rating, keywords, date, description, title, hidden, flagged) |
Yes (read-only) |
Yes |
Yes |
||
|
Modified versions of photos paired with originals |
Yes (read-only) |
Yes |
Yes |
||
|
Individual photo edits (e.g. cropping, filters, color adjustments, etc.) |
Yes (read-only) |
Yes |
Yes |
||
|
Places data |
n/a |
Yes |
Yes |
||
|
Faces data |
n/a |
Yes |
Yes |
||
|
Regular albums |
Yes (read-only) |
Yes |
Yes |
||
|
Folder albums |
Yes (read-only) |
Yes |
Yes |
||
|
Smart albums |
Yes (read-only) |
Yes |
Yes |
||
|
Events |
Yes (read-only) |
Yes |
Yes |
||
|
Keepsake items (books, slideshows, etc.) |
No |
No |
No |
||
|
Facebook/Flickr galleries |
No |
No |
iPhoto auto-syncs |
||
Photos with basic metadata: Photos can obviously be copied from one library to another. In addition, iPhoto Library Manager will also copy each photo's keywords, rating, description, title, and date over to the new library. This includes all photos formats, including RAW photos and movie files.
Modified versions of photos paired with originals: When you edit a photo, iPhoto keeps a copy of the original photo around, allowing you to revert your changes and go back to the original version of the photo. iPhoto Library Manager will copy both the modified and original versions of each photo, so that you can use the "Revert to Original" command in the destination library just like you could in the original library.
Individual photo edits: When you edit a photo using only iPhoto, it keeps track of the series of edits you have done and allows you to go back and change the individual edits later. For example, if you perform a saturation adjustment, iPhoto remembers the saturation level and lets you readjust it independently later on, even if you've performed other edits. If you are running iPhoto 8.0 or later, iPhoto Library Manager will transfer this list of edits along with the photo, so you can change individual edits in the destination library just like in the original library
Places data: In Photo 8.0 and later, you can assign geographic locations to your photos within iPhoto. iPhoto Library Manager will transfer all place information along with the photos when performing a copy between libraries. Exception: if you are copying photos from an iPhoto 9 library to an iPhoto 8 library, then custom places created in the "Manage My Places" window in iPhoto will not be transferred (latitude/longitude information for each photos will still be copied though).
Faces data: iPhoto 8.0 and later will automatically detect people's faces in your photos and allow you to assign names to them. iPhoto Library Manager will copy this information between libraries along with your photos.
Regular albums: When copying albums between libraries, a new album with the same name will be created in the destination library, and all the same photos that were in the album in the original library will be added into the newly created album.
Folder albums: In supported versions, if you have albums organized into folders in the iPhoto album list, those folder albums and their hierarchy will be recreated in the destination library. In iPhoto versions where this isn't supported, any regular albums contained in folders will be created in a flat list in iPhoto.
Smart albums: Smart albums will be recreated in the destination library with the same set of rules as in the original library. Exception: if you are copying between an iPhoto 9 library and a library of an earlier version of iPhoto, smart albums cannot be recreated when doing so.
Events: When copying photos between libraries, events will be recreated in the destination library with the same photos as they contained in the original library. Each event's name, date, description, and key photo will also be preserved.
Keepsake items: These items cannot be copied between iPhoto libraries.
MobileMe galleries: These cannot be directly copied between libraries, but iPhoto will automatically sync galleries from the MobileMe server back to your iPhoto library. You can read about this in more detail on this help page.
Facebook/Flickr galleries: These cannot be directly copied between libraries. In iPhoto 9 (but not iPhoto 8), iPhoto will automatically sync these galleries similarly to what is done with MobileMe galleries.
Aperture libraries
Starting with iPhoto 9.3, Apple added support for iPhoto opening libraries created by Aperture, and vice versa. iPhoto Library Manager does support performing copying/merging/rebuilding operations with Aperture libraries, as well as finding and eliminating duplicate photos. However, only those types of items which are directly supported in iPhoto itself can be copied between libraries, and any Aperture-only items are not supported. Unsupported items include:
Whenever you perform any operation that alters an iPhoto library, such as copying albums, merging libraries, finding duplicates, or importing photos, iPhoto Library Manager will create a log file containing basic information about what's going on as the copying takes place. You can access these log files by selecting "Show Logs" from the Window menu. In the folder that is revealed, you will see a separate log file for each copy operation that you've done using iPhoto Library Manager. The name of each log file consists of the date and time that the operation began, followed by a brief description of the operation (e.g. "2009-04-09 093421-Merge (Hawaii, Florida) into 'Vacation'.log") The files will open by default in the Console application when you double click them, but they are just plain text files, and can be opened in any other program that can read text files, such as TextEdit or Microsoft Word. Log files that are older than thirty days will automatically be cleaned up by iPhoto Library Manager, so that your logs folder doesn't accumulate new log files forever.
If any errors occur during a photo copying operation, they will be reported in the message that is displayed by iPhoto Library Manager after the operation has completed. If you want to get more detail on what errors occurred, you can open up the log file for that operation and search for the word "error". If any photos were missing from the original library and thus could not be imported into the destination library, a search for the word "missing" will let you find exactly which photos were missing. You can also search for the word "duplicate" to find out which, if any, photos were skipped as a result of having the "Don't import duplicates" preference setting enabled.
If you have an iPhoto library that is corrupt and causing iPhoto to crash or otherwise be unusable, iPhoto Library Manager provides the ability to rebuild your library based on the information found in its library data files. Note that iPhoto also has a built-in rebuild function that can be sometimes be used to repair a corrupted library database. You can find instructions on how to use that on Apple's website at http://support.apple.com/kb/HT2638 (iPhoto 6 or later) or http://support.apple.com/kb/HT2042 (iPhoto 5 or earlier).
iPhoto Library Manager's rebuild works differently, in that instead of trying to repair the library in place, it creates a brand new library and tries to reimport the entire contents of the original library into the new one, including reconstructing albums, photo metadata, etc. Note that rebuilding a library has all the same limitations as other photo transfer operations as far as what can and can't be copied between libraries. Also, depending on how badly damaged the library is, iPhoto Library Manager may or may not be able to piece together some or all of the library metadata.
To start a rebuild, select the library you would like to rebuild, then choose the "Rebuild Library" item from the "Library" menu. You will be prompted to choose a location for the rebuilt library, and whether or not you want iPLM to scavenge orphaned photos it finds in the library package. Once you've made your choices, iPLM will examine the library and rebuild the library structure and photos as best it can, then display you a preview of what it was able to find. If your library is badly damaged and the preview is missing a lot of content from the original library, this can save you from going through with a rebuild that won’t end up being of much help.
Once you've had a chance to examine the preview, if you want to go forward and create the rebuilt library, click the "Rebuild" button in the upper right. iPhoto Library Manager will create a new library and start importing the contents of the original library into the new one.
Scavenging photos
In some cases, either the iPhoto library database is too damaged for iPhoto Library Manager to be able to salvage any information from it, or the library data is incomplete and there are photos that still exist inside the library package, but iPhoto has lost track of them. In these cases, you may want to check the "Scavenge orphaned photos" checkbox when choosing a location for the rebuilt library. After iPhoto Library Manager has read the library data as best it can, it will perform an additional pass through the package and locate any photos that are no longer referenced in the library database. Any additional photos that are found will be included in the rebuild, and a new "Scavenged Photos" album will be created in the rebuilt library containing any scavenged photos.
If you want to copy photos from a library on one Mac to a different library on another Mac, you can do that with two basic steps. First, follow the instructions in Accessing an iPhoto library on another Mac so that one of your Macs has access to both libraries. Then, you can perform any copying between those libraries just like any other libraries on your Mac, including copying albums, events, or photos, or merging libraries.
When copying between Macs, here are a couple things to watch out for:
iPhoto library open on the other Mac
An iPhoto library can only be open by one copy of iPhoto at a time, so if iPhoto is still running on the remote Mac when you try copying photos, you will probably receive an error message from iPhoto when you try to open that library, complaining that the library is locked. If this happens, make sure to quit iPhoto on the other Mac before proceeding with copying your photos.
Different versions of iPhoto installed on the two Macs
Ideally, both machines should be running the same version of iPhoto. iPhoto Library Manager will allow you to copy between libraries of different versions, but the library that you're copying to must always match the version of iPhoto that's installed on the Mac you're using iPhoto Library Manager on.
If the destination library is newer than your version of iPhoto, you won't be able to perform the copy, and you might want to consider working on the Mac with the newer version to perform your copying.
If the destination library is older than your version of iPhoto, then iPhoto will prompt you and ask if you want to upgrade the library to the new version of iPhoto. If you tell it to upgrade the library, and your other Mac is still running an older version of iPhoto, then you will not be able to access the upgraded library from that other Mac without installing the newer version of iPhoto itself. So, don't upgrade the library unless you're sure you have the right version of iPhoto installed on all the Macs you want to access that library from.
If you have iPhoto libraries on two separate computers and would like to merge them together into one library, the first thing you need to do is choose which machine you'd like to use to perform the merge (we'll call this the "merging machine"), and make both libraries accessible from that machine. This can be done a few different ways, including:
Once you have the library (or a copy of the library) accessible to the merging machine, next add the library to iPhoto Library Manager's library list. Once both libraries are visible in iPhoto Library Manager, you can the merge the libraries like any other libraries on your machine. If you would then like to use the merged library on both machines, simply copy the merged library back to the other machine and add it to iPhoto Library Manager so you can use it there as well.
iPhoto includes a built-in CD/DVD burning feature that allows you to backup some or all of your albums to CDs or DVDs for storage. When you insert such a burned disc into your computer, it will appear in the iPhoto source list on the left just below your main library. From there, you can copy photos from the CD/DVD into your library. However, this process can sometimes result in incorrect metadata (especially keywords) being assigned when those photos are copied to the library. If you have troubles with this, you can instead use iPhoto Library Manager to copy your photos to one of your libraries on your hard drive.
To copy photos from a CD/DVD:
If you have an iPhoto library that has either become corrupt or had photos accidentally deleted from it, and you have been using Time Machine to back up your library, you can use iPhoto Library Manager to copy any missing photos from your Time Machine backup either to the current version of that same library, or to another on of your iPhoto libraries. To do this:
From there, you can copy photos from the restored library just like with any other library on your machine.
You can store an iPhoto library on an external or removable hard drive just the same as you can on your computer's built-in hard drive. To create a new library, follow the normal procedure for creating a new library, and choose the external drive as the location for the library. If you have an existing library that you would like to store on your external drive, use the "Duplicate Library" command in the File menu. You will be given a choice of where to duplicate the library to, at which point you can choose the external hard drive that you'd like to copy the library to. Once you've created or copied your library on the external drive, you can then open it up just like any other iPhoto library.
Apple recommends that you store your iPhoto library on a Mac formatted drive, and notes specifically that issues can occur when storing the library on a FAT32 drive (used by DOS/Windows). In practice, this advice also applies to ExFAT and NTFS formatted drives. iPhoto Library Manager will warn you when adding a library that’s already on a drive of one of these formats, and will refuse to create a new library on such a drive. If you already have a library on a non-Mac formatted drive, it’s recommended that you either copy it over to another drive that is already Mac formatted, or copy it off of the current drive, erase and reformat the drive to be Mac formatted, then copy the library back on.
If you have a library that has gotten too large and you want to split it into multiple, smaller libraries, there are a couple different ways you can go about doing so.
Copying Albums
First, click the “Create Library” button and choose the location you want to create the second library.
Then, drag one or more albums or events of photos from the album list of your big library onto your newly created library. This will copy those albums over to the new library, including all their dates, ratings, comments, etc. After you have copied the photos to your new library, you can use iPhoto to delete them from the big library, to clear up the disk space in that library. You can repeat this process with small or large batches of albums and any number of libraries to split up your collection into smaller, more manageable pieces.
One common way of splitting up a library is to split things up by date, e.g. so you have one library per year. The easiest way to do that is to create a smart album in your iPhoto library that uses the "Date" field to show just photos from a certain range of dates. For example, if you wanted to make a library with just photos from 2013, you'd set up a smart album with a date range from Jan 1, 2013 to Dec 31, 2013. Then in iPhoto Library Manager, you can just create a new library then drag that smart album over to the new library to copy all those photos across. Then just repeat for each library you want to create with a different date range.
Duplicate & Prune
Use the "Duplicate Library" command in the File menu to make a copy of the library folder that you want to split. You can then open one copy of the library and move whatever photos and albums you don't want in that library to its trash. Then open the second library and move the rest of the photos into that library's trash. After double checking to make sure that no photos have been trashed from both libraries, empty the trash of each library. This method is useful if you have some items that iPhoto Library Manager can’t copy (e.g. books, calendars, or slideshows) but you want to preserve those items in both of your new libraries.
In order for photos to show up in the iPhoto window, they must first be imported into the iPhoto library. If you already have a folder full of photos you want to use with iPhoto, just pointing iPhoto to the folder full of pictures won't make it automatically recognize and be able to work with them. To make a library with the folder full of pictures, you should first make a new library in iPhoto Library Manager, open that library, then drag the folder of photos from the Finder into iPhoto.
If you’re setting up a new Mac and want to transfer your iPhoto Library Manager setup, by far the easiest way is to use Apple’s Migration Assistant to copy all your data from your old Mac to the new one. This will include your iPhoto Library Manager preferences, library list, and libraries automatically.
Manual migration
If you can’t or don’t want to use Migration Assistant to copy your data to your new Mac, here is how you can transfer your setup manually.
iPhoto Library Manager stores the list of libraries it keeps track of in its preferences file, which is located at ~/Library/Preferences/com.fatcatsoftware.iPhotoLibraryManager.plist. (on OS X 10.7 and later, to access the Library folder in the Finder, press command-shift-G and type “~/Library” into the sheet that appears). If you copy that preference file to the same place on the new computer, that will bring the list of libraries over to the new machine. You should quit iPLM on the new machine before copying the preference file into the Preferences folder. This will transfer your registration information over to the new computer as well.
Note, however, that the libraries will only be found on the new machine if the libraries themselves are located in the same place on the new machine. For libraries on an external or networked drive, this should just work by connecting the drive in question to the new machine, since it will be showing up with the same drive name as before. Any libraries that are stored on the internal drive of the old machine would have to be placed in the same location on the new machine in order to be automatically found.
If iPhoto Library Manager can't find a particular library, it will display its name in red in the library list, so that's a quick way of knowing which libraries it wasn't able to find. If any libraries don't make the transition, you can just drag the library into the library list to add it back in.
To access iPhoto Library Manager's preferences, click on the "iPhoto Library Manager" menu and select "Preferences". There you will find the following sections:
General
Photo Copying
These settings allow you to customize some aspects of how iPhoto Library Manager copies photos between libraries. These settings apply when copying albums and events, importing photos, merging libraries, and rebuilding libraries.
One of the key features of iPhoto Library Manager is that it will copy a photo's list of keywords when copying the photo from one library to another. However, this only helps for keywords that are actually assigned to one or more of your photos. What if you have a large list of keywords, but some of them aren't actually assigned to any photos in your library? How can you take that keyword list and duplicate it in another library? Here's one technique that utilizes this feature of iPhoto Library Manager:
Now that the photo's been copied and the keywords recreated, you can delete the dummy photo from the destination library. You can also return to the original library and remove all the keywords from the dummy photo, or just delete it if you made a temporary photo for this purpose.
Another similar technique, if you create new libraries fairly often and like to have a standard list of keywords in your libraries, is to create an empty library and use this technique to populate its keyword list, then just keep it around. Whenever you need a new library, instead of creating a blank one, just use the "Duplicate Library" command to duplicate this library, along with the whole keyword list. Now all your new libraries will start out with the same custom keyword list.
When you copy an album or event from one library to another using iPhoto Library Manager, the destination library will make its own copies of any photos that are being transferred. If you no longer want those photos to be in the original library, you can safely delete them without it affecting the copies that are in the library you copied the album to.
One common task that is often needed when managing your libraries (especially when splitting a libary in two) is to delete an album along with all its photos from one of your libraries. This is tricky, since when you select photos in an album and press the "delete" key (or drag them to the trash), it does not remove the photos from your library as a whole, it only removes them from the album. And, of course, deleting the album itself also leaves the photos in your library. The trick is to select all the photos and hit command-option-delete. This will remove the photos from both the library and the album.
To entirely remove an album of photos from a library:
If you have a library from a newer version of iPhoto that you simply want "downgrade" to an older version of iPhoto, the easiest way to do that is with the "Rebuild Library" command. You will want to be running iPhoto Library Manager on the machine that has the older version of iPhoto you want to convert the library to. This will create a new library and import the entire contents of the original library into the new one using the older version of iPhoto. As with any rebuild, there are some items that will not be included (most notably, hidden photos, books, calendars, and slideshows), but if you have none of these items or don't mind losing them in the downgrading process, then this is a decent option for converting a library to an older version.
Normally, when you import photos into an iPhoto library, iPhoto makes its own copies of those photos and stores them inside the iPhoto library. This makes the library self-contained, making it easy to copy or back up, and lets iPhoto worry about managing the locations of the photos itself.
Some people need more flexibility than this though, so iPhoto offers an option in its advanced preferences labelled “Copy items to the iPhoto Library”. This is on by default, but if you turn it off, then when you import photos into your library, iPhoto will create aliases that point to those photos in their original location, rather than making its own separate copies of them. This can be useful if you need to store photos on a separate drive or more easily access them from another program. These are often referred to as “referenced” photos, and photos stored inside the library as “managed” photos.
iPhoto Library Manager understands and deals with referenced photos, so you can view and copy such photos just fine using iPLM. However, when you use iPLM to copy photos to another library, whether it be using the merge or rebuild commands, or by dragging and dropping individual albums, events, or photos, those photos will always be copied into the destination iPhoto library (i.e. as “managed” photos) regardless of whether the photos are managed or referenced in the library they’re coming from. This behavior is intended to minimize the chances of doing things like accidentally deleting the only copy of a photo when you think that you actually have multiple copies in different libraries. You can also take advantage of this behavior, e.g. by using iPLM’s rebuild library command to convert an existing “referenced” library into a new “managed” library.
When using iPhoto Library Manager's "Rebuild Library" or "Merge Libraries" commands, it can sometimes be the case that the resulting library created by iPhoto Library Manager is significantly smaller on disk that the original library/libraries were. There are several reasons why the new library can be smaller than the original:
In some cases, you might end up moving a number of photos to the trash in iPhoto (e.g. when using the Find Duplicates command), but then decide you don't want to delete the photos after all. Fortunately, it's not difficult to return photos from the iPhoto trash to the main section of the library. To do so:
Note that the "Put Back" command is mapped to the command-delete keyboard shortcut. One might think that selecting photos in the trash and pressing command-delete would delete them permanently, but it actually just moves the back into the library. The "Empty Trash" command is the only way to delete the photos permanently, and it will always delete all the photos that are in the trash - there is no way to delete just a subset of the photos that are in the trash.
There are sometimes when your iPhoto library can, for one reason or another, become corrupt and unable to use. Various symptoms can include your photos not showing up properly (e.g. showing up as gray or black squares), the library becoming unusably slow, or iPhoto crashing as soon as you try to open your library. There are several steps you can perform to try to get your library back into working order.
iPhoto's built-in rebuild function
iPhoto contains a built in method for rebuilding a library's database and/or thumbnails. The steps and results of rebuilding differ depending on what version of iPhoto you're running, and the nature of the problem with your library. Full instructions for doing a rebuild can be found on Apple's site at Rebuilding the iPhoto Library.
Permissions problems
One other common cause of this is that the permissions for your library or its contents have been turned off so that iPhoto can't read the data it needs. To fix this, use iPhoto's built-in permission repair capability, which you can read about on Apple's site at Rebuilding the iPhoto Library.
iPhoto Library Manager's rebuild function
iPhoto Library Manager includes its own rebuild function which can attempt to rebuild a corrupted library based on any salvageable information it can find in the library package. You can read more about this rebuild function here.
If you have an iPhoto library that you are keeping on an external hard drive, and that library suddenly has all its content "disappear" (i.e. you open up the library iPhoto and it contains no photos or albums), there is one particular cause that accounts for a large number of these cases.
When you attach an external hard drive, OS X "mounts" the drive (i.e. makes it ready for use) in a particular location on the system. There is actually an invisible folder named "Volumes" at the root level of your main hard drive, and when you attach an external hard drive to the machine, OS X puts the contents of that hard drive inside the Volumes folder. So for example, if your hard drive is named "External", OS X will mount your hard drive at /Volumes/External, and all the hard drive's contents will appear as subfolders underneath that. (for the rest of this explanation, substitute the name of your own hard drive for "External")
The most common trigger for the disappearing library problem is when you either have a system crash, a power outage, or you accidentally disconnect the external drive without ejecting (i.e. unmounting) the drive first. Many programs will not handle this well, and will continue to write files and folders to /Volumes/External even though the hard drive is no longer there. Since there is nothing at /Volumes/External, a plain folder can sometimes be created at that location where the drive contents used to be. This folder is actually stored on your internal hard drive, and any program that writes files into it will actually be writing those files to your internal hard drive when it thinks it’s writing them to the external drive.
The next time you plug in the hard drive, OS X will want to mount the drive at that same /Volumes/External location, only now there is a folder there, so it can no longer use that precise location. So, what it does instead is to mount the drive at /Volumes/External-1 (or sometimes "/Volumes/External 1", depending on your version of OS X), so the drive's contents show up there instead. This is not immediately obvious though, since the name of the drive appears the same in the Finder. In fact, if the same crash/outage/unplugging happens multiple times, you can end up with multiple folders, e.g. "External", "External-1", "External-2", etc.
iPhoto stores the location of its current library as a simple path, so if you open up iPhoto with a library on your external drive set as the current library it will go looking in /Volumes/External instead of /Volumes/External-1. This results in an empty library being created on your internal hard drive, and thus the "disappearing library" phenomenon.
Luckily, the solution to this problem isn't terribly hard. There are actually two different ways you can go about fixing it, one simpler method, and one more thorough method.
The simple method is to select the library in iPhoto Library Manager and use the "Remove Library" button to remove that library from iPLM's library list (don't worry, this won't delete any files, it only removes the library's entry from iPLM's list). Then, click the "Add Library" button, and go select the library on the external drive to add it back to iPLM, but this time with the correct path (e.g. starting with /Volumes/External-1/). This should allow you to get your library back up and running quickly.
However, doing this doesn't alter the fact that there's this "doppleganger" folder hanging around at /Volumes/External, which may end up affecting more programs than just iPhoto, so you may want to take these further steps to clean everything up. First, click on the Finder and select "Go To Folder..." from the "Go" menu. When it asks you for a path, type in "/Volumes" and hit return. This should reveal the normally invisible Volumes folder to you. Inside, you will probably see an alias for each drive that's attached to the machine, plus one or more plain folder icons for your "doppleganger" folders.
To clean this up, you should first eject your external hard drive, quitting any applications that are using files on that hard drive beforehand. Once it's gone, you can then take any stray folders hanging around in /Volumes and move them either to the trash or your desktop. It's possible that in the time the folder's been around, one or more programs has managed to write some files into the folder, so you should double check inside first before trashing it to make sure there aren't any files in there that you want to keep around.
Once you've gotten rid of the folder(s), go ahead and plug your external hard drive back in, and it should now show up at its normal location at /Volumes/External. You should double check your library paths in iPhoto Library Manager to make sure they are pointing to the correct location, and doing a remove+add to fix any libraries that aren't pointing at the right place. After that, you should be able to use your hard drive like normal.
If you receive an error message from iPhoto Library Manager when trying to copy albums or merge libraries, make sure you are running the most recent version of iPhoto Library Manager. This is especially important if you have recently updated iPhoto, as this can sometimes require a compatibility update for iPhoto Library Manager. You can select the "Check For Updates..." menu item from the "iPhoto Library Manager" menu to see if there is an update available to download.
If you are still experiencing errors, then contact support@fatcatsoftware.com for further assistance. Please include in your message the version of iPhoto you are using, the version of OS X installed on your computer, and what model of Mac you're using.
If you have a library that, when you attempt to open it in iPhoto, you get an error message saying "The iPhoto Library is locked, on a locked disk, or you do not have permission to make changes to it." (or something similar), there are a few basic reasons for the vast majority of such errors.
Two copies of iPhoto are trying to access the same library.
If the library you are trying to open is being accessed over a network, such as through file sharing from another machine, or a network disk such as a Time Capsule, Airport Extreme, or other NAS drive, make sure that no other machine on your network already has that library open in iPhoto. iPhoto only allows a library to be open in one copy of iPhoto at a time, so if you already have the library open in iPhoto on one machine, you will need to quit iPhoto on that machine before you can open that same library on a different machine.
You do not have sufficient permissions to open the library.
iPhoto requires that you be able to both read and write to a library in order to be able to open it. This is the case even if you don't plan on making any changes to the library - you still need to have write permission to open it, read-only permission is not enough. Here are a few troubleshooting tips to make sure you have write permission to your iPhoto library:
Occasionally, when performing a long operation such as merging libraries or rebuilding a library, iPhoto Library Manager’s progress can reach a certain point and then just stop. The most common reason for this is that iPhoto itself is experiencing some problem that has caused it to stop responding to further commands from iPhoto Library Manager. There are a few typical causes of this:
Force quitting iPhoto
In the cases above where force quitting iPhoto is necessary, you can do so by pressing command-option-escape, which will bring up the Force Quit window. Select iPhoto in the list of applications and then click the “Force Quit” button to perform the force quit. If you do this in the middle of an iPhoto Library Manager operation, iPLM will see that iPhoto has quit and automatically relaunch it, then continue on with the rest of the copying operation.
If iPhoto was importing an event worth of photos at the time, that event’s photos and/or their metadata will likely not have been imported successfuly into the destination library. iPLM will note this in the log file that it generates though, so at the end of the operation, if you click the “View Log” button, you can search the log for the term “unexpectedly quit”. That will show you where the force quit happened, and which event was being imported at the time. You can then find that event in the original library and just copy it over manually instead.
Certain versions of OS X enforce a minimum version of iPhoto that must be installed, and will refuse to run older versions. If this is the case, then trying to open libraries or perform other operations with iPhoto Library Manager will likely result in an error message saying that the installed version of iPhoto is not compatible.
Normally, it would be a simple matter of updating your version of iPhoto via the Mac App Store, but since Apple’s release of their new Photos app, iPhoto is now no longer available on the app store, which makes it impossible to directly update older versions of iPhoto. It is still possible for most Macs to get the latest version of iPhoto, but it now requires jumping through some hoops. To download the latest version of iPhoto:
There are a few obstacles you may encounter when following these steps:
If you are experiencing a problem using iPhoto Library Manager, you can contact tech support in two ways.
Open up iPhoto Library Manager and select "Contact Support" from the Help menu. This will bring up a window where you can explain your problem and send it directly to Fat Cat Software support. This is the preferred method, as it will automatically transmit basic information about your setup that will help in making sure your problem can be diagnosed quickly and correctly. The following information will automatically be included with your request:
Additionally, if you are experiencing a problem that involves iPhoto crashing or iPhoto Library Manager crashing, you can include the appropriate crash log(s) with your submission. All information that is submitted is transferred over an encrypted SSL connection.
Alternately, you can also e-mail for support at support@fatcatsoftware.com